
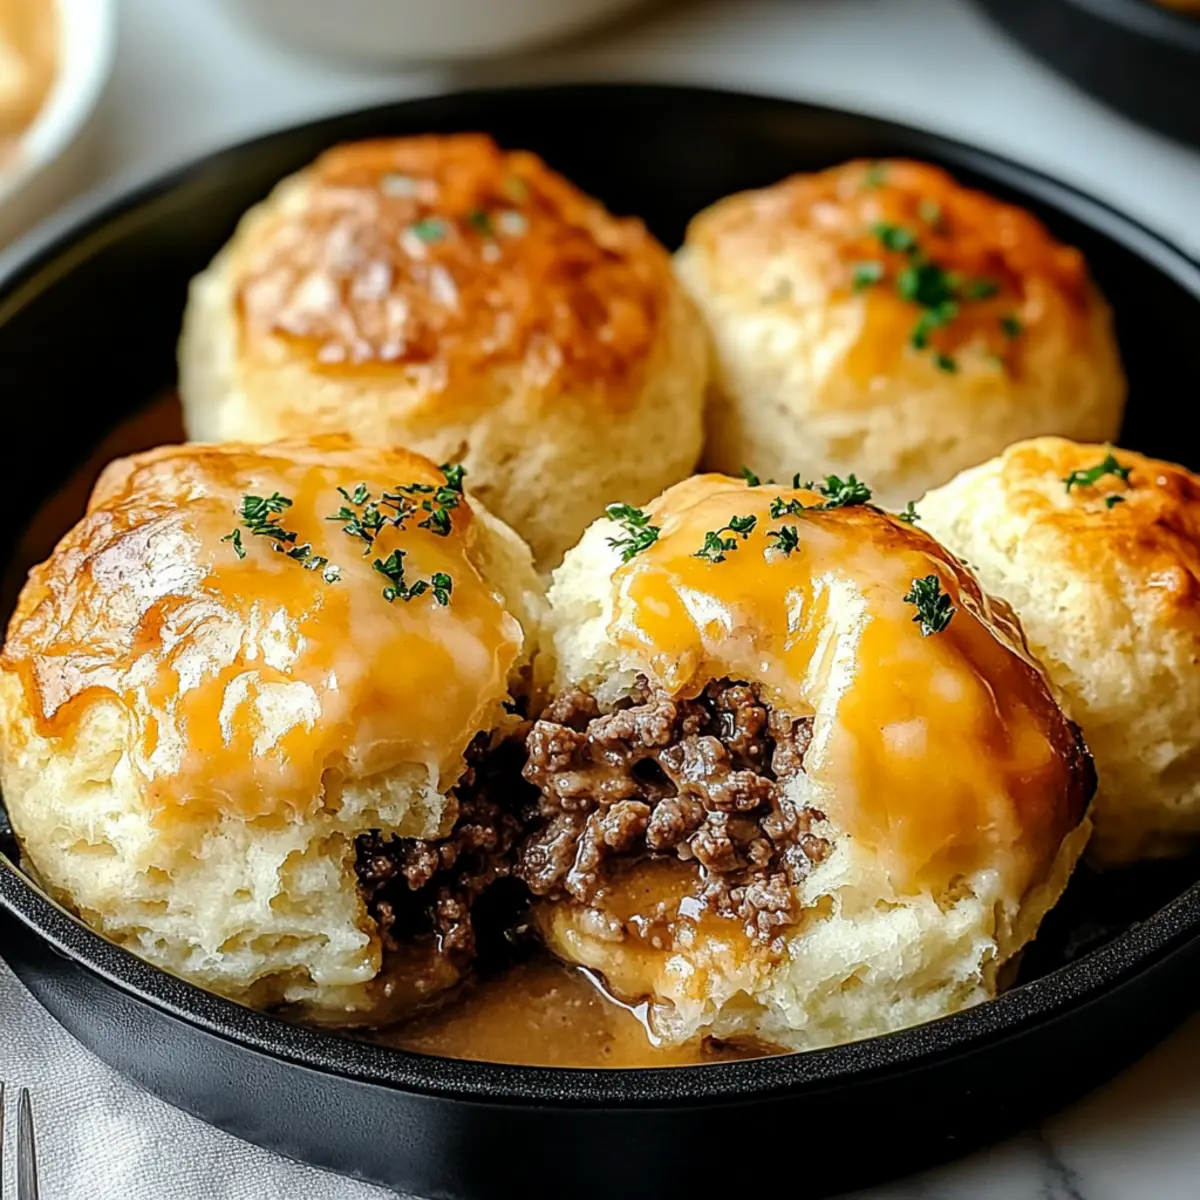
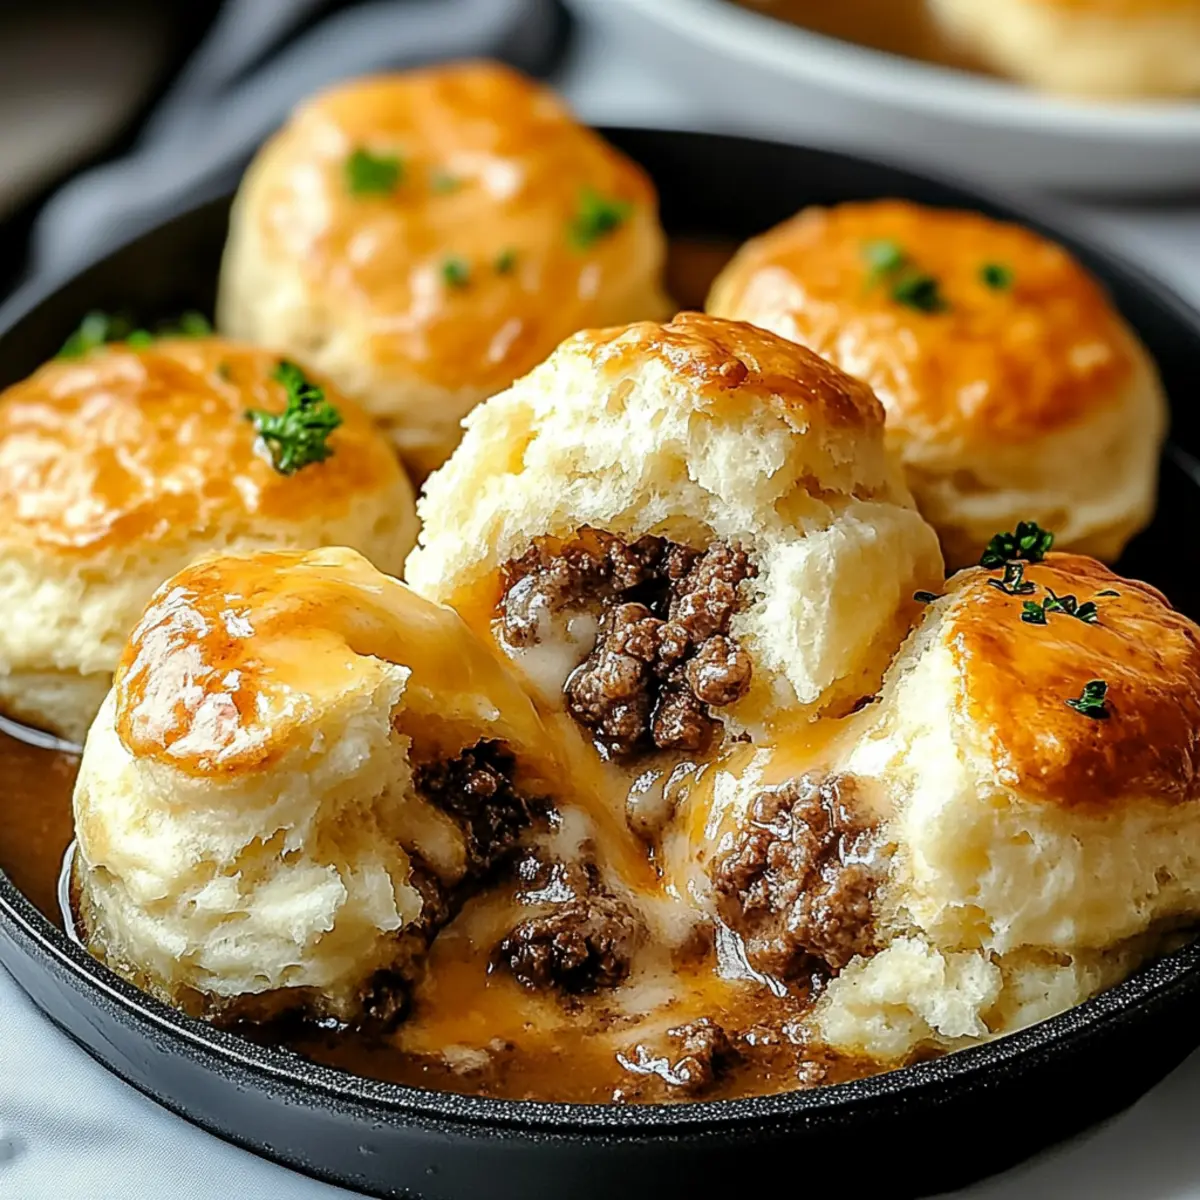
As I pulled my freshly baked Cheesy Beef Biscuit Bombs from the oven, the enticing aroma wafted through my kitchen, instantly lifting my spirits. These delightful nuggets are not just a treat for the senses—they’re a customizable comfort food that promises to please everyone at your table. The combination of flaky biscuit dough enveloping seasoned beef and melty cheese makes for an easy recipe that’s perfect for a cozy breakfast, a hearty snack, or even dinner on a busy night. Plus, with the option to swap in your favorite cheeses or add a splash of veggies, these bombs become a delightful canvas for your culinary creativity. What inventive twist will you put on this comforting classic?
Why Are Cheesy Beef Biscuit Bombs Irresistible?
Melt-in-Your-Mouth Delight: These biscuit bombs combine a crispy exterior with a gooey, savory filling, delivering comfort in every bite.
Customization Potential: Whether you’re a fan of cheddar or feeling adventurous with pepper jack, you can easily tailor the ingredients to suit your taste.
Quick and Convenient: Bake these beauties in just 12-15 minutes, making them a perfect option for busy weeknights or spontaneous gatherings.
Crowd-Pleasing Appeal: From kids to adults, these hearty bites are guaranteed to impress everyone at your table—our friends love pairing them with marinara for an extra flavor boost.
Perfect for Any Occasion: Ideal for breakfast, a cozy snack, or dinner, these Cheesy Beef Biscuit Bombs fit seamlessly into any meal plan. If you’re looking for more comforting ideas, try out our Spicy Southern Cheesy Chicken Spaghetti Casserole!
Cheesy Beef Biscuit Bombs Ingredients
For the Filling
• Ground Beef – Rich and savory, it’s the base of our comforting filling; feel free to substitute with ground turkey for a lighter option.
• Shredded Cheddar Cheese – Adds that sharp, melty center that makes these bombs irresistible; swap for mozzarella if you desire a milder flavor.
• Cream Cheese (softened) – This creamy ingredient binds everything together, enhancing the soft texture; consider ricotta for a unique twist.
• Grated Parmesan Cheese – Provides a salty kick and depth; nutritional yeast can replace it for a dairy-free version.
For the Dough
• Refrigerated Biscuit Dough – Forms the flaky and golden outer layer; opt for homemade dough for a fresher flavor if time allows.
Seasoning
• Garlic Powder – Infuses aromatic depth into the filling; fresh minced garlic can add a vibrant twist.
• Onion Powder – Provides a mild sweetness and flavor; finely chopped onions are a great substitute.
• Black Pepper – Adds a hint of spice; adjust to your preference for a bit more kick.
For Finishing Touches
• Melted Butter – Used for brushing to achieve a glorious golden finish; olive oil serves as a healthier alternative.
Reflecting the essence of Cheesy Beef Biscuit Bombs, these ingredients work harmoniously to deliver comforting, savory goodness.
Step‑by‑Step Instructions for Cheesy Beef Biscuit Bombs
Step 1: Preheat Your Oven
Start by preheating your oven to 375°F (190°C). This ensures that your Cheesy Beef Biscuit Bombs bake evenly and develop a beautifully golden exterior. While the oven warms up, you can prepare the filling, saving you time and making the most of your cooking process.
Step 2: Cook the Beef
In a skillet over medium heat, add the ground beef. Cook for about 6-8 minutes, stirring occasionally, until the beef is well-browned and fully cooked. Drain any excess grease from the skillet, keeping the flavor intact while ensuring the bombs aren’t greasy.
Step 3: Season the Meat
After the beef is cooked, stir in garlic powder, onion powder, and black pepper, cooking for an additional 1-2 minutes. This step adds aromatic depth to the filling. Remove the skillet from heat and let the mixture cool slightly while you prepare the cheese blend.
Step 4: Mix the Filling
In a large bowl, combine the softened cream cheese, shredded cheddar, and grated Parmesan cheese. Mix well until you have a smooth and creamy blend. Then, stir in the slightly cooled beef mixture. This cheese and beef combination will create the heavenly filling for your biscuit bombs.
Step 5: Prepare the Biscuits
Open the refrigerated biscuit dough and gently flatten each biscuit into a disc on a clean surface. Aim for about 4 inches in diameter. This will create the perfect pocket to hold all your cheesy goodness, enhancing the flavor of your Cheesy Beef Biscuit Bombs.
Step 6: Fill and Seal
Place a generous spoonful of the beef and cheese mixture in the center of each flattened biscuit. Carefully fold the dough over the filling to create a pocket and pinch the edges to seal them tightly. Make sure to not overstuff, as this may cause the filling to leak during baking.
Step 7: Bake to Perfection
Arrange the biscuit bombs on a baking sheet lined with parchment paper. Brush the tops with melted butter for a golden finish. Place them in the preheated oven and bake for 12-15 minutes, or until the biscuits are puffed and golden brown. The enticing aroma will fill your kitchen, promising a delightful treat.
Step 8: Serve and Enjoy
Once baked, remove the Cheesy Beef Biscuit Bombs from the oven and let them cool for a few minutes. Serve warm, perhaps alongside marinara sauce for dipping, or enjoy them as they are. The combination of flaky pastry and gooey filling will surely delight everyone at your table!

Variations & Substitutions for Cheesy Beef Biscuit Bombs
Feel free to unleash your culinary creativity and make these Cheesy Beef Biscuit Bombs your own with these tasty swaps!
- Cheese Swap: Replace cheddar with pepper jack for a spicy kick that pairs perfectly with the savory beef.
- Veggie Boost: Add chopped bell peppers or spinach to the filling for a fresh, colorful twist; this also adds extra nutrients!
- Lower-Fat Option: Use ground turkey or chicken instead of beef for a leaner version that still packs a flavorful punch.
- Homemade Dough: If time permits, use homemade biscuit dough for a fresher taste; the love you put in will shine through!
- Herb Infusion: Incorporate fresh chopped herbs like parsley or chives into the filling for a burst of freshness; it elevates the flavor beautifully.
- Seasoning Adjustments: Experiment with smoked paprika or chili powder to create a distinct flavor profile that matches your spice tolerance.
- Garlic Variation: Swap garlic powder for fresh minced garlic; nothing beats the aroma of fresh garlic!
- Dairy-Free Delight: Replace cream cheese with tofu for a plant-based option that still delivers a creamy texture without the dairy.
Each of these variations invites you to customize your Cheesy Beef Biscuit Bombs, making them a delight at every gathering. Don’t forget, these delicious bites are fantastic when served with dipping sauce, perhaps a hint of marinara as our friends suggest, or even alongside a fresh salad—perfect for any time of day! For more comforting ideas, consider our Cheesy Ranch Potatoes and Smoked Sausage for a delightful combination of flavors!
Make Ahead Options
These Cheesy Beef Biscuit Bombs are a fantastic choice for busy home cooks looking to meal prep! You can assemble the biscuit bombs and refrigerate them for up to 24 hours before baking. Simply prepare the filling, fill each biscuit, seal them, and place them in an airtight container in the refrigerator. This not only saves time but ensures that they are just as delicious when baked. If you prefer, you can freeze the unbaked bombs for up to 3 months; just make sure to arrange them on a baking sheet before freezing. When you’re ready to serve, bake them directly from frozen, adding a few extra minutes to the cooking time for perfectly golden results!
What to Serve with Cheesy Beef Biscuit Bombs
Indulge in a delightful dining experience that enhances the comforting flavors of your biscuit bombs.
-
Creamy Mashed Potatoes: These buttery potatoes provide a smooth contrast to the crispy biscuit bombs, making every bite a velvety delight. A drizzle of gravy over them can elevate your meal even further.
-
Fresh Garden Salad: A crisp salad with mixed greens, cherry tomatoes, and a light vinaigrette adds a refreshing crunch to balance the rich flavors of the biscuit bombs. It’s the perfect way to incorporate healthy greens.
-
Marinara Sauce: A warm, tangy marinara for dipping complements the cheesy filling, enhancing the flavors with its acidity. This classic pairing will keep your taste buds dancing with joy.
-
Roasted Vegetables: Seasonal veggies like carrots, zucchini, and bell peppers, roasted to perfection, add a delightful crunch and earthy flavors. Their natural sweetness harmonizes beautifully with the savory bombs.
-
Coleslaw: A tangy, crunchy coleslaw offers a contrasting texture and a hint of sweetness, making it an ideal side dish. It’s light yet filling enough to create a satisfying meal.
-
Garlic Breadsticks: The addition of buttery, garlicky breadsticks will complete your comfort food feast. They’re perfect for soaking up any leftover marinara sauce and provide that extra indulgence.
-
Iced Tea or Lemonade: A refreshing drink like homemade iced tea or lemonade will cleanse your palate between bites, enhancing the overall dining experience.
-
Chocolate Chip Cookies: For a sweet finale, these classic cookies provide a touch of nostalgia and sweetness to round off your savory meal. They are the perfect treat to enjoy with friends and family after the main course.
Expert Tips for Cheesy Beef Biscuit Bombs
• Perfectly Browned Beef: Make sure to cook the ground beef thoroughly until it’s well-browned; this enhances the flavor of your Cheesy Beef Biscuit Bombs.
• Avoid Overstuffing: While it’s tempting to pack in a lot of filling, too much can cause leaks. Keep it just enough to close each biscuit securely.
• Seal Well: Pinch the edges of the biscuit tightly to prevent the filling from escaping while baking, ensuring a cohesive and delightful bite.
• Butter Brushing: For an irresistibly golden and flaky finish, brush the tops with melted butter right before baking; this also adds extra flavor.
• Cooling Time: Allow the bombs to cool slightly after baking to set the filling; this helps prevent burns and enhances the eating experience.
How to Store and Freeze Cheesy Beef Biscuit Bombs
Fridge: Store cooked Cheesy Beef Biscuit Bombs in an airtight container for up to 3-4 days. Simply reheat in the oven or microwave for a quick snack.
Freezer: For longer storage, freeze assembled, unbaked biscuit bombs in a single layer. They can be kept for up to 3 months; bake them directly from frozen, adding a few extra minutes to the cooking time.
Reheating: To reheat baked bombs, place them in a preheated oven at 350°F (175°C) for about 10-15 minutes until warm and crispy again.
Wrapping: If you’re freezing them, wrap each bomb tightly in plastic wrap before placing them in a freezer-safe bag to avoid freezer burn.
Cheesy Beef Biscuit Bombs Recipe FAQs
How do I select the best ground beef for the filling?
Absolutely! Look for ground beef that is around 80/20 (80% lean meat to 20% fat) for the best flavor and moisture. Choose beef that is bright red and firm; avoid packages with dark spots or excessive liquid. If you’re looking for a healthier option, you can opt for leaner ground turkey or chicken.
What’s the best way to store leftover Cheesy Beef Biscuit Bombs?
Once cooked, place the Cheesy Beef Biscuit Bombs in an airtight container and refrigerate for up to 3-4 days. To reheat, pop them in a preheated oven at 350°F (175°C) for about 10-15 minutes until they are nice and warm, restoring that delicious crispiness.
Can I freeze the assembled Cheesy Beef Biscuit Bombs?
Very! To freeze, lay the assembled biscuit bombs on a baking sheet without touching and freeze them for about 1-2 hours until solid. Afterward, wrap each one in plastic wrap and store them in a freezer-safe bag for up to 3 months. When you’re ready to bake, simply pop them in the oven from frozen—just add a few extra minutes to the baking time.
What should I do if the filling leaks out while baking?
If you’re having trouble keeping the filling intact, it’s generally a sign of overstuffing! While it feels tempting, make sure to only add about 1-2 tablespoons of the beef and cheese mixture into each biscuit before sealing them. Additionally, pinch the seams tightly to create a secure closure before baking.
Are Cheesy Beef Biscuit Bombs safe for dogs to eat?
If you’re considering sharing these bombs with your furry friends, it’s best to avoid it. The ingredients like garlic powder and onion powder can be harmful to dogs. Instead, you could set aside some plain cooked ground beef or biscuits made without these ingredients for your pet.
What variations can I try to cater to dietary needs?
Absolutely! You can substitute the ground beef with lentils or chopped mushrooms for a vegetarian take. If dairy is a concern, use dairy-free cream cheese and nutritional yeast in place of Parmesan. For gluten-free options, look for gluten-free biscuit dough. The more the merrier—experiment with your favorite combinations!

Cheesy Beef Biscuit Bombs for Cozy Home-Cooked Bliss
Ingredients
Equipment
Method
- Preheat your oven to 375°F (190°C).
- In a skillet over medium heat, cook the ground beef for about 6-8 minutes until well-browned. Drain excess grease.
- Stir in garlic powder, onion powder, and black pepper, cooking for an additional 1-2 minutes, then remove from heat.
- In a large bowl, combine softened cream cheese, shredded cheddar, and grated Parmesan cheese until smooth; then stir in the beef mixture.
- Open the refrigerated biscuit dough and flatten each biscuit into a disc about 4 inches in diameter.
- Place a generous spoonful of the beef and cheese mixture in the center of each biscuit, fold dough over and pinch edges to seal.
- Arrange the bombs on a baking sheet and brush the tops with melted butter, then bake for 12-15 minutes until golden brown.
- Let the bombs cool slightly before serving warm, optionally with marinara for dipping.
Leave a Reply