
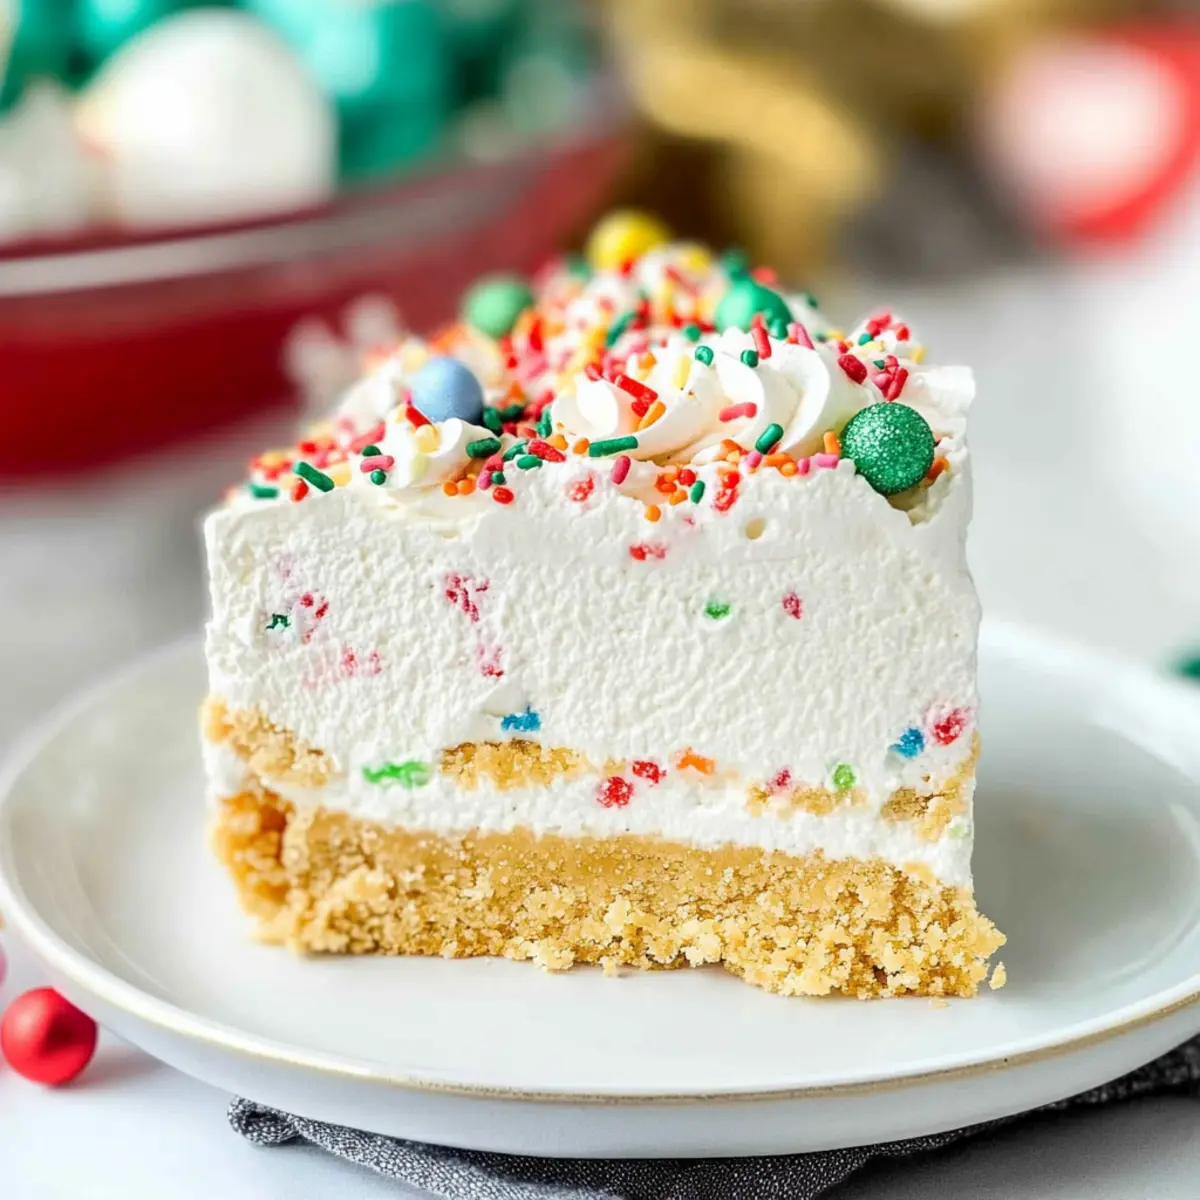
As I rummaged through my holiday baking supplies, I stumbled upon a stack of vanilla Oreo cookies that whispered, “Use us!” That’s when the idea of crafting a No Bake Christmas Cookie Lush came to life. This delightful dessert is not only quick to whip up but also a true crowd-pleaser, making it ideal for busy holiday gatherings. With its layers of creamy cheesecake and luscious pudding atop a buttery cookie crust, each slice offers an irresistibly festive touch, especially when finished off with vibrant holiday sprinkles. And the best part? You can customize it with different cookie types and pudding flavors to make it your own. Fancy a chocolate twist or a fruity delight? Let your creativity shine! Are you ready to indulge in this festive sensation that will leave your guests asking for seconds?
Why Is This Dessert Irresistible?
Simplicity: The No Bake Christmas Cookie Lush requires minimal effort and no baking, making it perfect for busy holiday schedules.
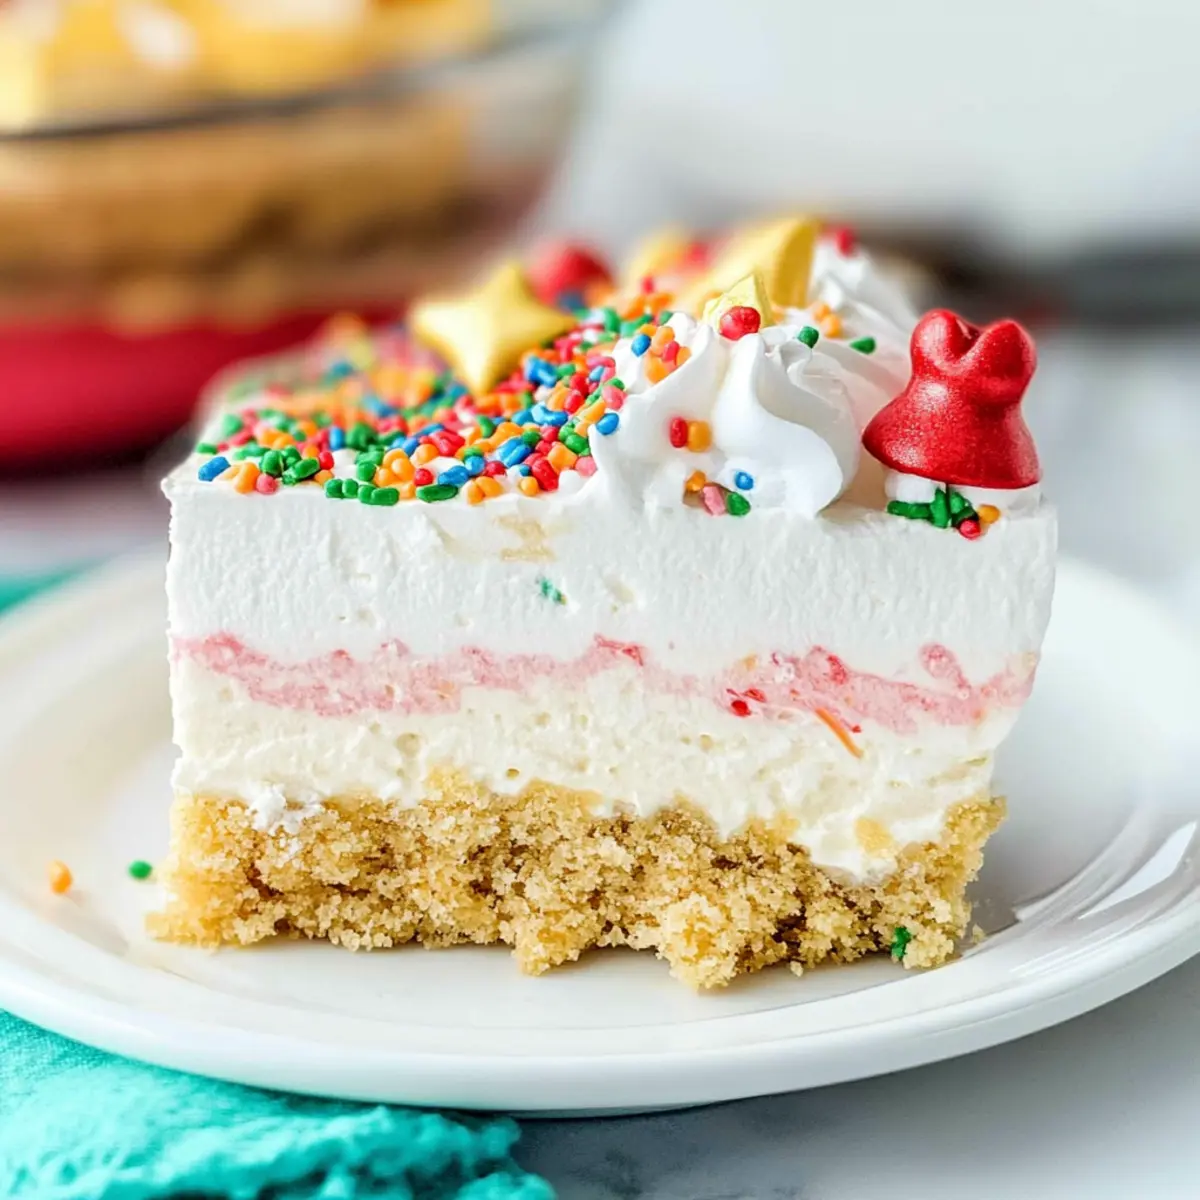
Layers of Flavor: With its creamy cheesecake and rich pudding layers, this dessert is a true indulgence, combining sweetness and richness in every bite.
Customizable: Feel free to switch up the cookie crust or pudding flavors to create your unique take on this festive treat—how about trying a chocolate pudding for a delightful twist?
Crowd-Pleaser: This eye-catching dessert not only impresses with its vibrant sprinkles but also delivers on taste, leaving guests clamoring for the recipe! Pair it with a cozy drink like hot cocoa for a complete holiday experience.
Time-Saving: Ready in just a few simple steps, making it a go-to choice for festive gatherings. If you’re looking for other easy holiday treats, check out my Cheesecake Stuffed Baked Apples or these comforting Mashed Potato Bake for more ideas!
No Bake Christmas Cookie Lush Ingredients
• To create this delightful holiday treat, gather the following ingredients!
For the Crust
- Vanilla Oreo Cookies – Provides sweet flavor and a crunchy texture for the crust and topping. Substitution: Any vanilla-flavored sandwich cookie or graham crackers can be used.
- Butter – Adds richness and helps bind the cookie crumbs into a crust. Use melted butter for best results.
For the Cream Cheese Layer
- Cream Cheese – Gives the dessert a creamy texture and rich flavor. Use full-fat cream cheese for optimal taste.
- Powdered Sugar – Sweetens the cream cheese layer without grittiness. No substitutions, but adjust to taste for less sweetness.
- Holiday Sprinkles – Enhances visual appeal and adds a festive touch. Use vivid colors to align with holiday themes.
- Whipped Topping – Adds lightness and airiness to the layers. Homemade whipped cream can be used as a fresher alternative.
For the Pudding Layer
- Cheesecake Instant Pudding Mix – Imparts a creamy cheesecake flavor to the pudding layer. Vanilla or white chocolate instant pudding can be replaced if desired.
- Cold Milk – Used for preparing the pudding mix; whole milk is recommended for creaminess. You can use a non-dairy milk alternative if needed.
Step‑by‑Step Instructions for No Bake Christmas Cookie Lush
Step 1: Prepare the Baking Dish
Begin by lining a 9×13-inch baking dish with parchment paper, if desired. This step makes it easier to slice and serve the No Bake Christmas Cookie Lush later. Ensure the parchment paper hangs over the edges slightly, allowing for easy removal. Set the dish aside while you prepare the crust.
Step 2: Make the Cookie Crust
Crush 36 vanilla Oreo cookies into fine crumbs using a food processor or a zip-top bag and rolling pin. Combine the crumbs with melted butter and ½ tablespoon of holiday sprinkles in a large bowl, mixing until evenly moist. Press this mixture firmly into the bottom of the prepared baking dish, creating an even layer. Refrigerate for about 10 minutes to set the crust.
Step 3: Create the Cream Cheese Layer
In a mixing bowl, blend softened cream cheese with powdered sugar and peppermint extract until smooth and creamy. This should take about 2-3 minutes with an electric mixer. Gently fold in one container of whipped topping along with ½ tablespoon of sprinkles to add festivity. Spread the cream cheese mixture evenly over the chilled crust, smoothing it out with a spatula.
Step 4: Prepare the Pudding Layer
In another bowl, whisk together the cheesecake instant pudding mix and cold milk for 2-3 minutes until the mixture thickens. The pudding should reach a creamy, smooth consistency. To add a touch of festivity, fold in another ½ tablespoon of holiday sprinkles. Carefully spread the pudding layer atop the cream cheese layer, ensuring an even distribution.
Step 5: Assemble the Final Layer
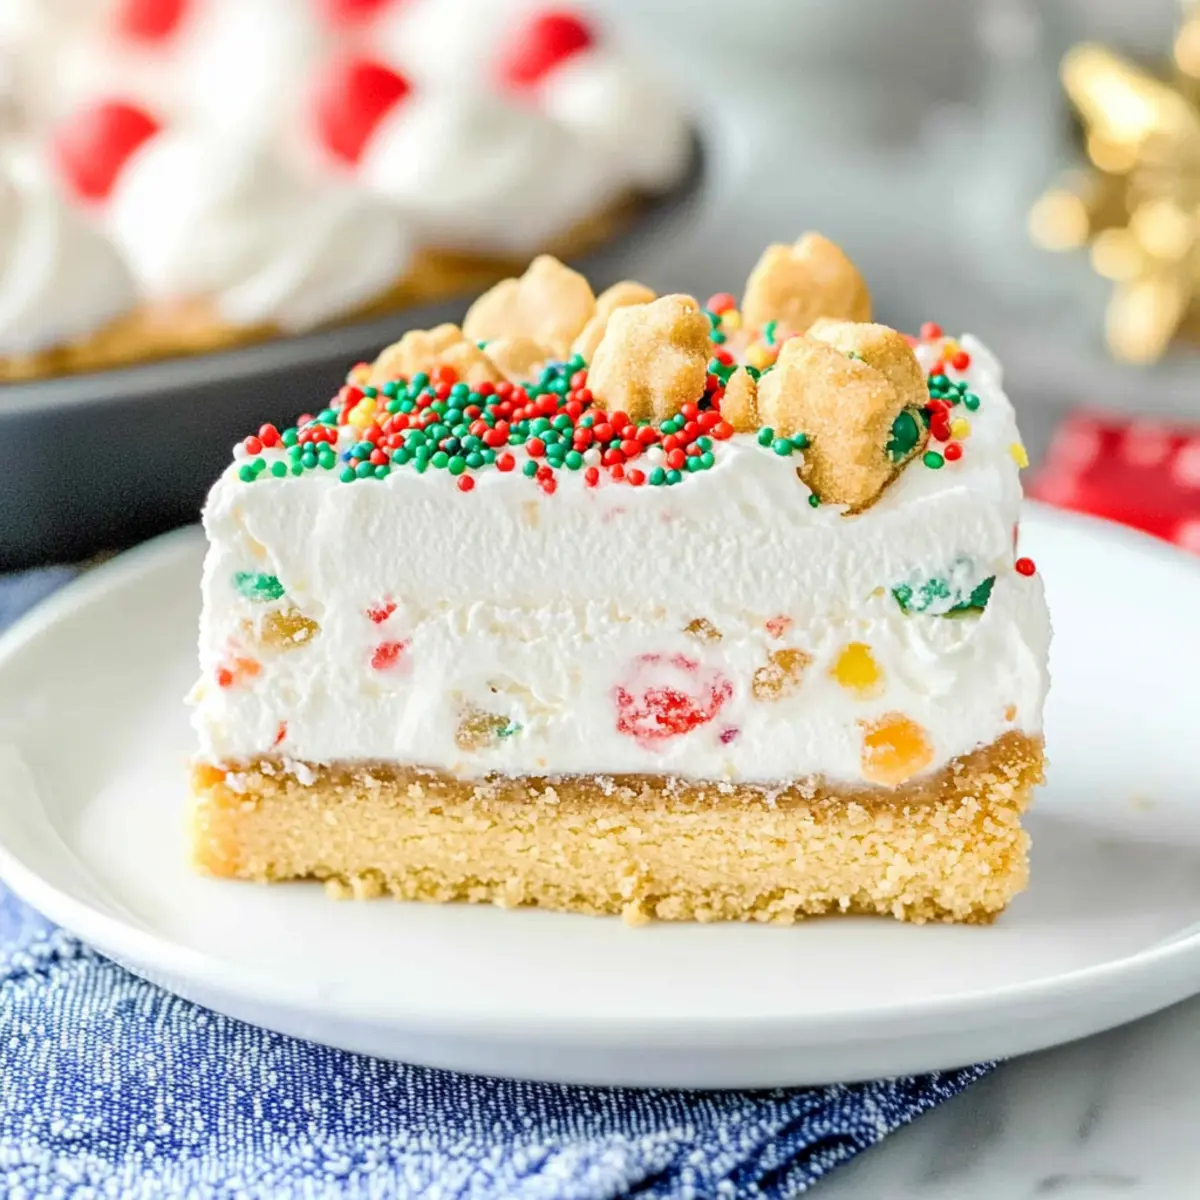
Top off your No Bake Christmas Cookie Lush with the remaining whipped topping. Use a spatula to smooth it out evenly across the pudding layer. For an extra crunch, crush the remaining 12 Oreo cookies and sprinkle them over the top, followed by the leftover holiday sprinkles. This adds both crunch and festive flair to your dessert.
Step 6: Chill the Dessert
Refrigerate the layered dessert for at least 4 hours to allow it to set properly. If you’re short on time, you can freeze it for about 2 hours to achieve firmer slices. The chilling process enhances the flavors and makes the No Bake Christmas Cookie Lush much easier to cut and serve.
Step 7: Serve and Enjoy
When ready to serve, slice the No Bake Christmas Cookie Lush into squares and plate them carefully. Serve chilled for the best texture and flavor. This delightful dessert is perfect for holiday gatherings, and each bite offers a wonderful combination of creamy and crunchy goodness.
Storage Tips for No Bake Christmas Cookie Lush
Fridge: Store leftovers in an airtight container in the refrigerator for up to 4 days. This keeps the layers fresh and creamy.
Freezer: For longer storage, wrap tightly in plastic wrap and foil, then freeze for up to a month. Thaw in the refrigerator before serving for best results.
Reheating: This dessert is best served cold, but if it’s frozen, allow it to sit out for about an hour before slicing for a smoother texture.
Wrapping: If layering in a freezer-safe container, place parchment paper in between layers to prevent sticking. Enjoy your delightful No Bake Christmas Cookie Lush!
Make Ahead Options
These No Bake Christmas Cookie Lush treats are perfect for busy home cooks looking to simplify holiday preparations! You can prepare the cookie crust and cream cheese layer up to 24 hours in advance, storing them in the refrigerator to maintain their delicious texture. Simply press the crust into the baking dish and spread the cream cheese layer on top. When you’re ready to serve, mix the pudding layer and top everything with whipped topping; then chill for another 4 hours for optimum flavor and texture. This time-saving approach ensures you’ll impress your guests with minimal last-minute effort, delivering a delightful dessert just as delicious as if made fresh that day!
What to Serve with No Bake Christmas Cookie Lush?
As you prepare to delight your guests with this festive layered dessert, consider what will complement its luscious flavors and creamy textures.
-
Rich Hot Cocoa: A warm cup of hot cocoa pairs beautifully with the cool, creamy layers, perfect for winter gatherings.
-
Gingerbread Cookies: Adding crunchy gingerbread cookies brings a delightful holiday spice that complements the sweetness of the lush.
-
Fresh Berries: Juicy strawberries or raspberries add a burst of freshness and acidity, balancing the richness of the dessert.
-
Eggnog: Creamy eggnog, whether spiked or non-alcoholic, enhances the festive spirit, making each bite feel even more special.
-
Festive Cheesecake Bites: For a cohesive dessert spread, include small cheesecake bites to echo the lush’s cheesecake layer while providing a different texture.
-
Chocolate Mint Cookies: These cookies, with their cool minty flavor, are a delicious nod to the mint extract in the cream cheese layer.
-
Spiced Nuts: A bowl of spiced pecans or walnuts adds a satisfying crunch that contrasts nicely with the creamy components of the pouch.
-
Pumpkin Pie: Embrace the holiday vibe by pairing it with a slice of pumpkin pie for a classic finishing touch that resonates with seasonal flavors.
-
Vanilla Ice Cream: A scoop of vanilla ice cream alongside the lush adds an extra layer of indulgence and creaminess.
No Bake Christmas Cookie Lush Variations
Feel free to let your imagination run wild as you tailor this dessert to your personal taste—each bite could bring a delightful surprise!
-
Different Cookies: Swap vanilla Oreos for chocolate or peanut butter sandwich cookies for an exciting twist. Each cookie choice will create a unique flavor profile, enhancing your lush experience.
-
Fruit Add-Ins: Add a layer of fresh berries or fruit preserves between the cream cheese and pudding layers for a pop of refreshing flavor. Imagine the vibrant colors and delicious contrasts they’ll add!
-
Alternative Pudding Flavors: Experiment with butterscotch or chocolate pudding instead of cheesecake for a rich, decadent twist. Transitioning flavors can turn an ordinary dessert into a new favorite!
-
Non-Dairy Option: Use dairy-free cream cheese and whipped topping, alongside your favorite non-dairy milk to fit vegan preferences. Your guests won’t even realize it’s dairy-free!
-
Spicy Holiday Flavor: Introduce a pinch of cinnamon or nutmeg into the cream cheese layer to evoke the warmth of holiday spices. It’ll add that cozy, festive feel we all adore.
-
Nutty Crunch: Incorporate crushed nuts into the cookie crust or sprinkle them on top for extra texture. Almonds or walnuts can beautifully complement the flavors of this lush dessert.
-
Chocolate Drizzle: Drizzle melted chocolate over the top before serving for an indulgent touch. The combination of creamy, crunchy, and chocolate will elevate every bite.
If you’re looking for more delicious recipes that can easily cater to festive gatherings, don’t miss out on my tasty Baked Feta Pasta with Vegetables for a savory side or the sweet goodness of Cheesecake Stuffed Baked Apples for that perfect holiday dessert!
Expert Tips
-
Room Temperature Cream Cheese: Ensure your cream cheese is softened for easy blending, avoiding any lumps in your No Bake Christmas Cookie Lush.
-
Chill for Perfect Slices: Always refrigerate the dessert for at least 4 hours; this helps it stabilize and makes slicing easier, ensuring clean cuts.
-
Customize Wisely: Feel free to substitute any cookie or pudding flavor; however, consider how these changes could alter the overall texture and balance of your No Bake Christmas Cookie Lush.
-
Use Quality Ingredients: Opt for full-fat cream cheese and quality whipped topping for a richer flavor and creamier texture in your dessert.
-
Don’t Overmix the Pudding: While whisking the pudding mix, be mindful not to overmix; doing so can lead to a grainy texture rather than a smooth layer.
No Bake Christmas Cookie Lush Recipe FAQs
How do I select ripe ingredients for my No Bake Christmas Cookie Lush?
When selecting cream cheese, opt for full-fat varieties as they provide the best flavor and texture. Ensure it’s at room temperature for easy blending. For whipped topping, choose a brand without added sugars to maintain balance in your dessert. Fresh holiday sprinkles should be vibrant and free from clumps to enhance the festive look!
How should I store leftovers of No Bake Christmas Cookie Lush?
Leftovers should be stored in an airtight container in the refrigerator for up to 4 days. This will keep your luscious layers fresh and maintain their creamy texture. If you’re planning to extend its shelf life, wrap the dessert tightly with plastic wrap and foil, then freeze for up to a month. Remember to thaw it in the refrigerator before serving for the best results.
Can I freeze No Bake Christmas Cookie Lush?
Absolutely! To freeze, wrap the dessert tightly in plastic wrap and then in aluminum foil to prevent freezer burn. It can be stored in the freezer for up to 3 months. When you’re ready to serve, remove it from the freezer and allow it to thaw in the refrigerator for about 6-8 hours or overnight for optimal texture.
What should I do if the cream cheese layer is lumpy?
To avoid lumps in your cream cheese layer, ensure your cream cheese is at room temperature before blending. If you do encounter a lumpy texture, you can blend it again using an electric mixer for a minute or two until smooth. Additionally, try incorporating the powdered sugar gradually while mixing to help achieve a creamier consistency without lumps.
Are there any dietary considerations for the No Bake Christmas Cookie Lush?
Yes! If you’re serving guests with dietary restrictions, consider substituting with gluten-free cookies and using a non-dairy whipped topping. If allergies are a concern, double-check the labels of your ingredients to ensure there are no nuts or other allergens. This way, everyone can enjoy this festive treat without worry!
Can I make this dessert in advance for a holiday gathering?
Very! The No Bake Christmas Cookie Lush is perfect for making a day ahead of time. Simply prepare it according to the instructions, then let it chill in the refrigerator to enhance the flavors. This not only saves you time on the day of your gathering but also allows the layers to set perfectly, creating a delightful dessert that will impress your guests!

No Bake Christmas Cookie Lush for a Festive Holiday Treat
Ingredients
Equipment
Method
- Prepare the Baking Dish by lining a 9x13-inch baking dish with parchment paper.
- Make the Cookie Crust: Crush 36 vanilla Oreo cookies into fine crumbs and mix with melted butter and ½ tablespoon of holiday sprinkles. Press into the prepared baking dish and refrigerate for 10 minutes.
- Create the Cream Cheese Layer: Blend softened cream cheese with powdered sugar and peppermint extract until smooth. Fold in one container of whipped topping and ½ tablespoon of sprinkles. Spread evenly over the chilled crust.
- Prepare the Pudding Layer: Whisk together cheesecake instant pudding mix and cold milk until the mixture thickens. Fold in another ½ tablespoon of holiday sprinkles and spread over the cream cheese layer.
- Assemble the Final Layer by topping with the remaining whipped topping and crushed Oreo cookies with leftover holiday sprinkles.
- Chill the Dessert in the refrigerator for at least 4 hours to set properly.
- Serve and Enjoy by slicing into squares and enjoying chilled.
Leave a Reply