
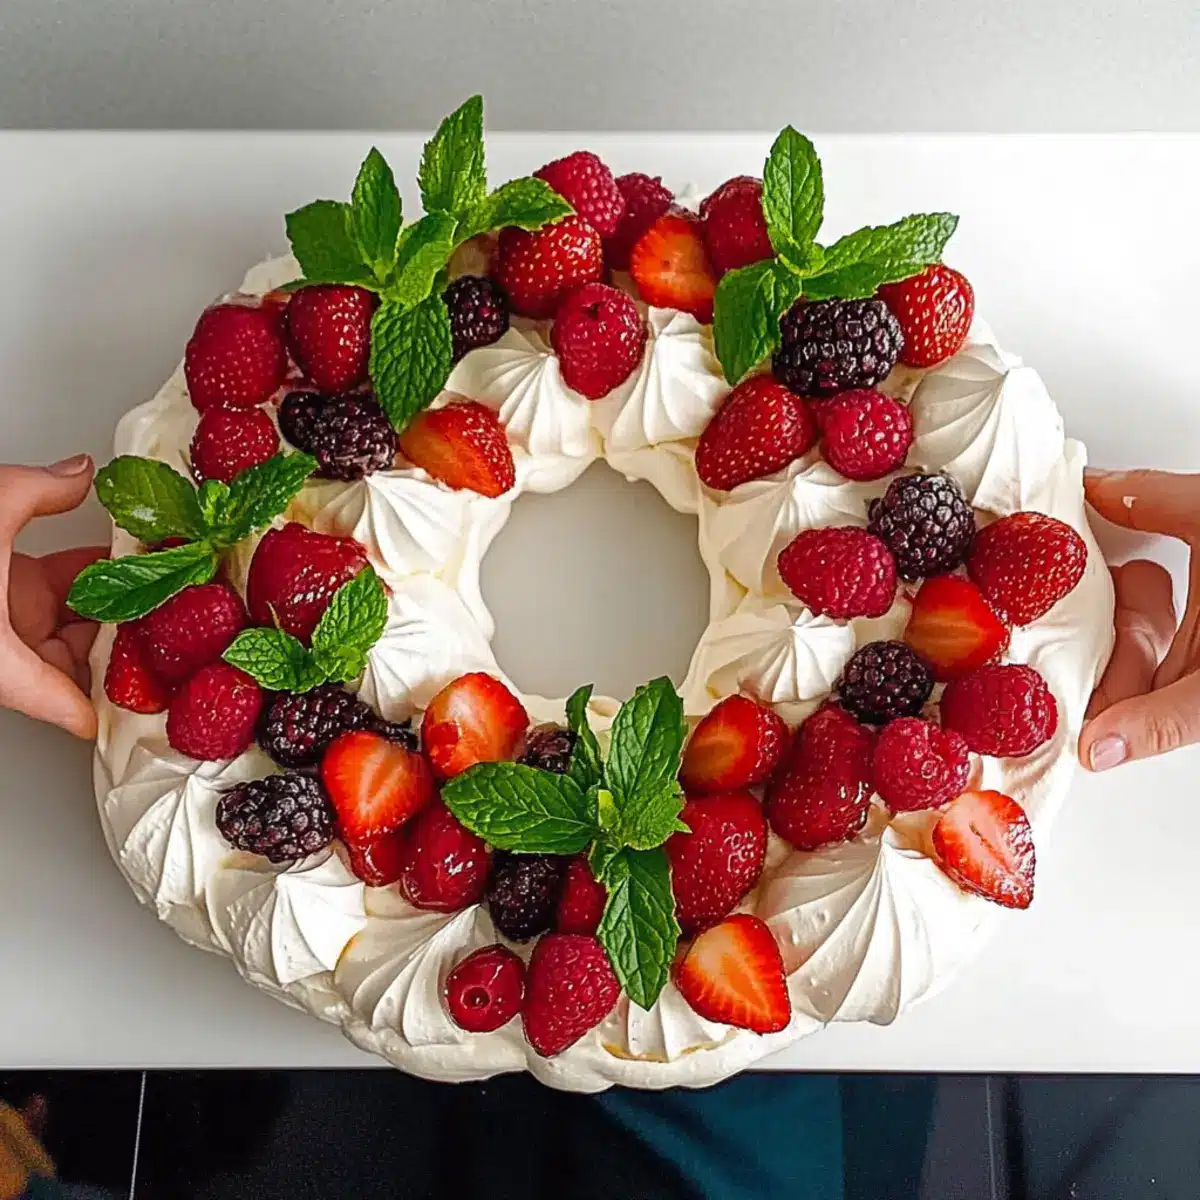
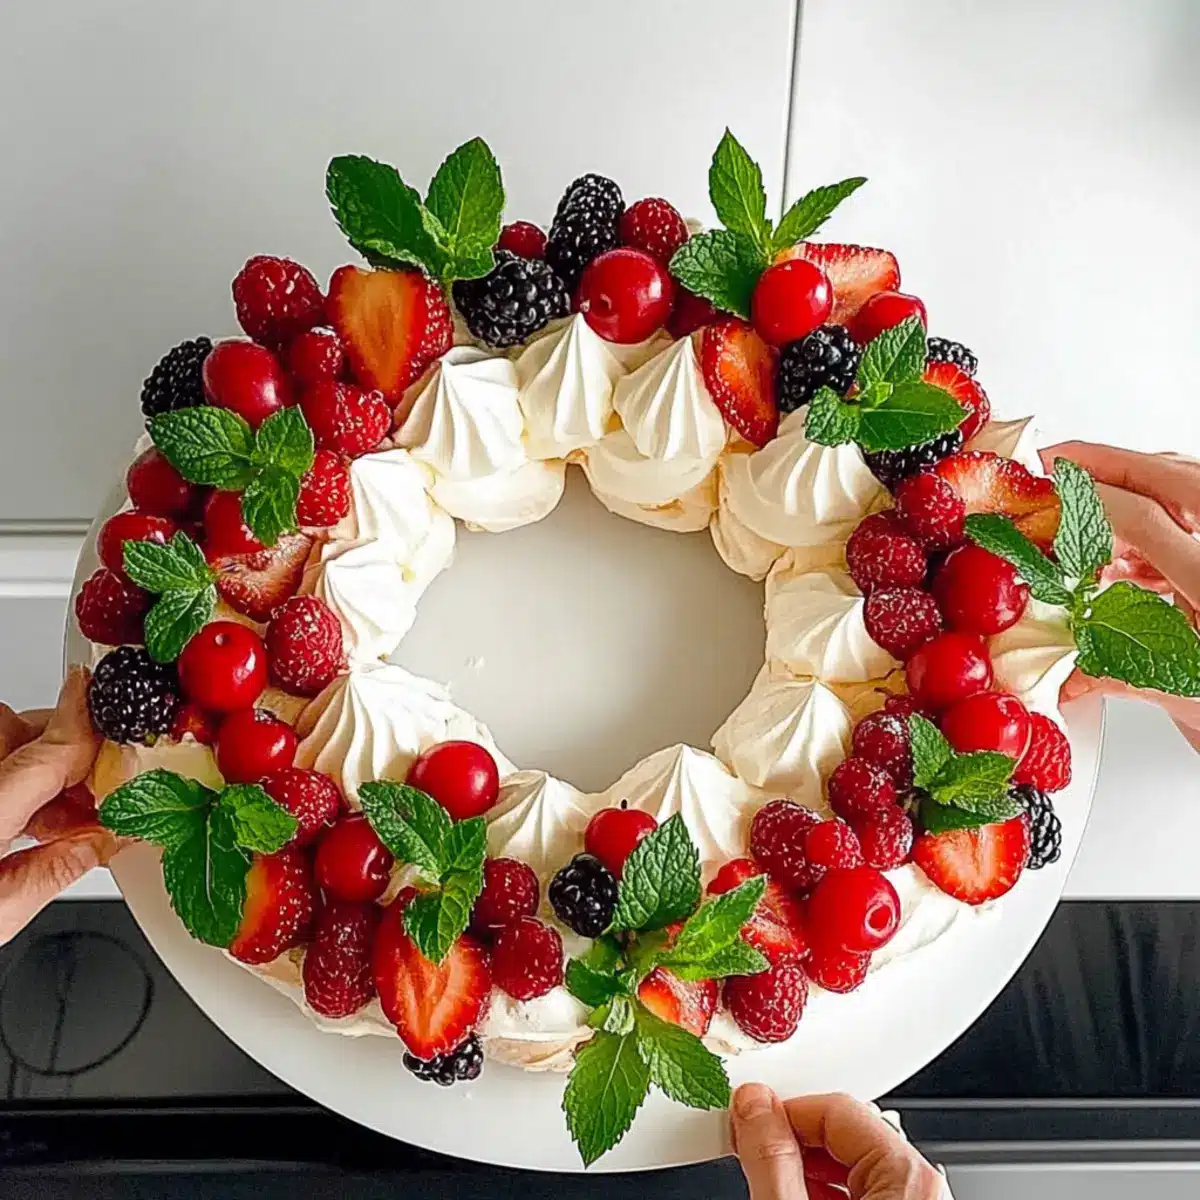
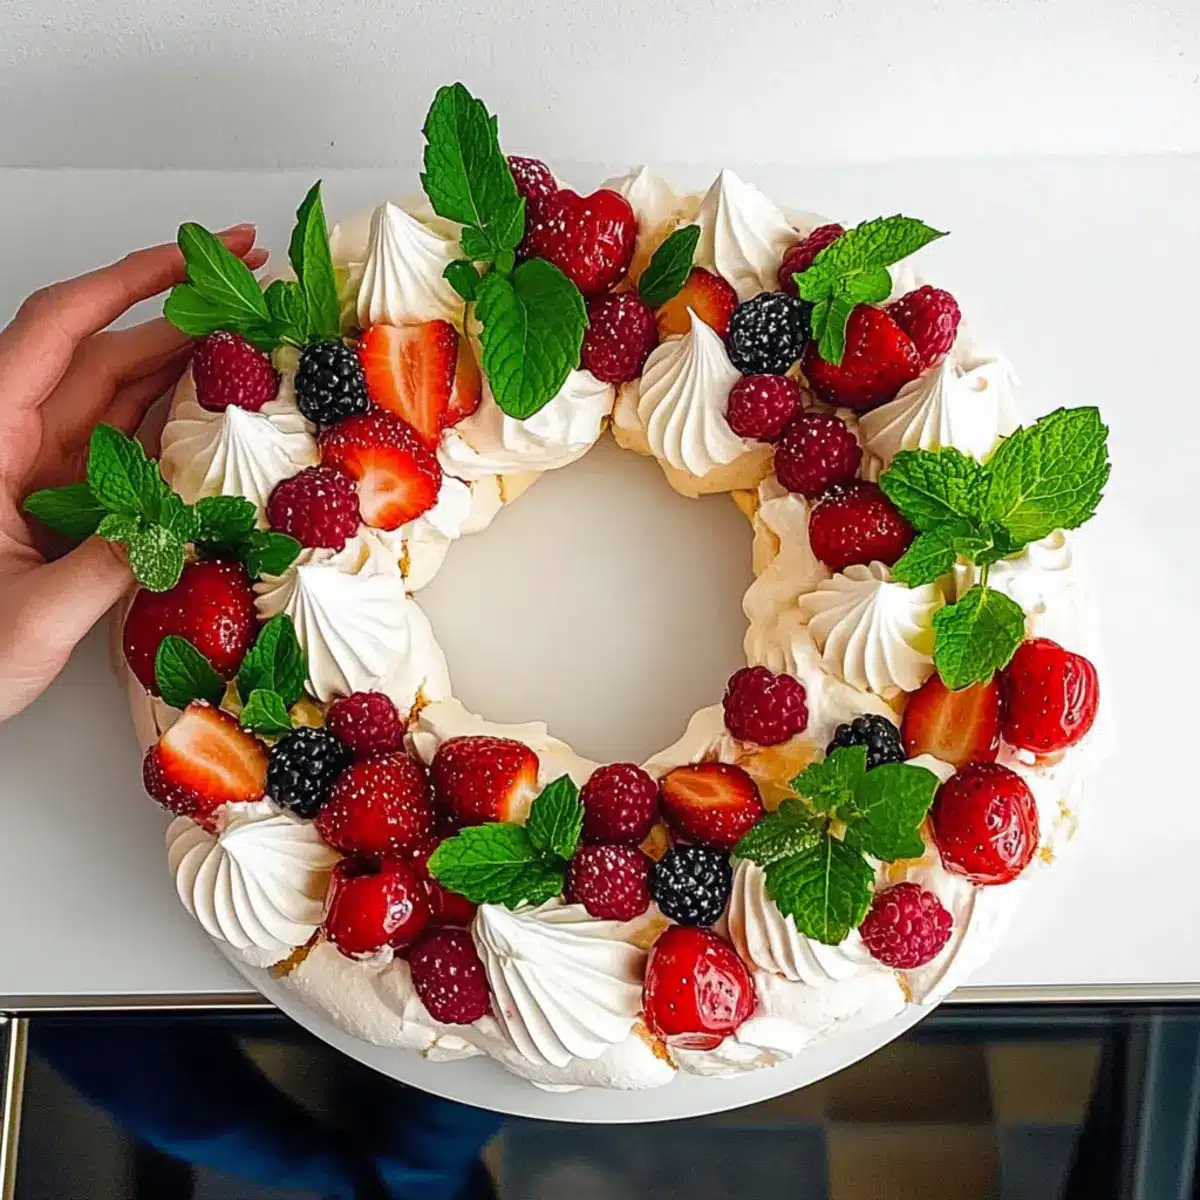
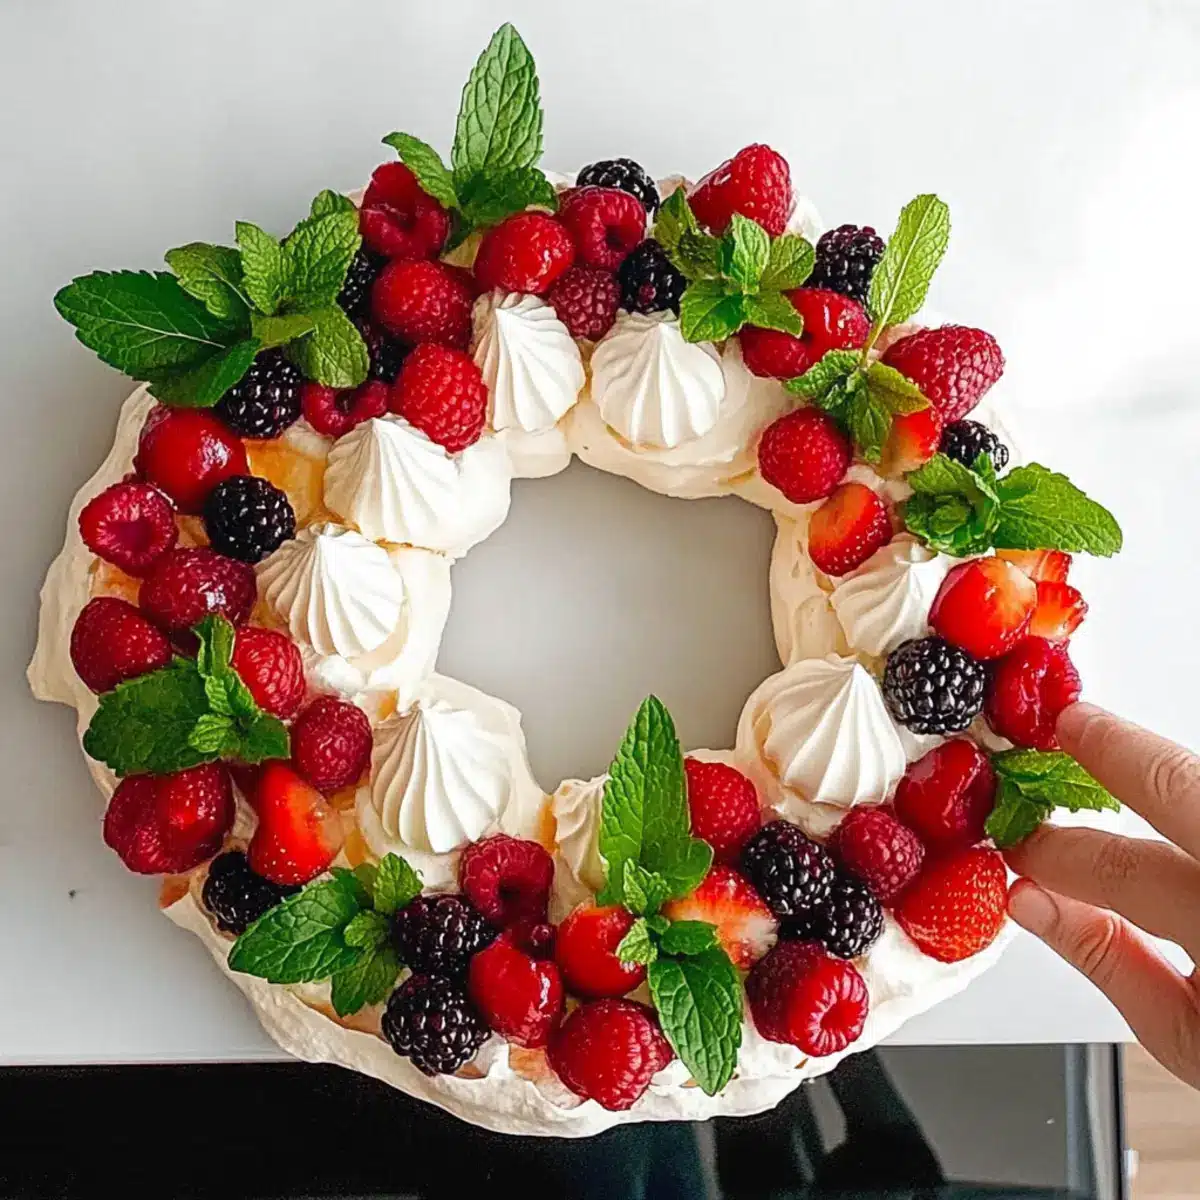
The kitchen is suddenly alive with anticipation, buzzing around the idea of a stunning holiday centerpiece that’s surprisingly simple to create. This Festive Pull Apart Pavlova Wreath isn’t just a feast for the eyes; it’s a light, airy Christmas dessert that checks all the boxes for flavor and elegance. With its delicate meringue shells inviting you to pull apart each piece, it offers a unique combination of textures—crisp on the outside, with a plush, marshmallow-like center. Not only is this dessert a total crowd-pleaser, but it’s also gluten-free and perfect for those busy holiday days when you want to impress without the stress. Picture layers of whipped cream and luscious fresh fruit crowning your gorgeous wreath, making it a symphony of color and taste. Are you ready to dazzle your guests and make this delightful pavlova the highlight of your festive table?
Why is Pavlova Wreath a must-try?
Visual Stunner: This pavlova wreath is a showstopper that instantly elevates your holiday table.
Texture Delight: Crisp shells and a soft, chewy center create a delightful balance in every bite.
Easy to Make: With simple steps, even beginners can master this festive dessert!
Customizable Toppings: Top it with your favorite seasonal fruits for a personal touch—think pomegranate seeds or mango!
Crowd-Pleasing: Its flavors and presentation charm guests of all ages, ensuring it’s a hit at any gathering.
Pavlova Wreath Ingredients
• Get ready to create this stunning Pavlova Wreath with these essential ingredients!
For the Meringue
- Egg Whites – Use extra-large egg whites for better volume and texture in your pavlova.
- Icing Sugar (Powdered Sugar) – Make sure to sift it before use to keep your meringue stable and free from clumps.
- Cornstarch – This ingredient stabilizes the meringue, ensuring it holds its shape beautifully.
- Vanilla Extract – Infuse a warm flavor but feel free to substitute with almond extract for a unique twist.
For the Cream Filling
- Heavy Cream (Whipping Cream) – Whip up to a medium-stiff peak for a luscious filling; coconut cream works well for a dairy-free option.
- Icing Sugar (for cream) – Sweetens the whipped cream perfectly, though you can adjust this to your taste if you prefer less sweetness.
For the Toppings
- Fresh Fruit (Berries, Mint) – Add any seasonal fruits for flavor and visual appeal; pomegranate seeds or mango make excellent alternatives.
Feel free to mix and match based on what’s available or in season, and get ready to wow your guests with this beautiful Pavlova Wreath!
Step‑by‑Step Instructions for Festive Pull Apart Pavlova Wreath
Step 1: Preheat Oven
Begin by preheating your oven to 90°C (195°F). While the oven heats up, line two baking sheets with parchment paper, ensuring they are ready for the meringue mixture. This low temperature is essential for creating that perfect crispy exterior while maintaining a soft center, which is a hallmark of a delightful pavlova wreath.
Step 2: Prepare Meringue
In a stand mixer, combine the egg whites and beat them on medium speed until they become foamy. Gradually add the sifted icing sugar, a spoonful at a time, continuing to beat until the mixture turns bright white and achieves stiff peaks, about 8-10 minutes. Carefully fold in cornstarch and vanilla extract, ensuring everything is well combined without deflating your airy meringue.
Step 3: Shape Meringues
Transfer your fluffy meringue mixture into a piping bag fitted with a round tip. Pipe small mounds, approximately 5 cm wide, onto the prepared baking sheets, leaving a few inches between each mound. Alternatively, you can spoon the mixture if you prefer. Use a teaspoon to gently create a small dent in the center of each meringue to hold the cream later.
Step 4: Bake
Once your meringues are shaped, place the baking sheets in the preheated oven. Bake them for 60 minutes or until they look dry and crisp on the outside. After the baking time is up, turn off the oven and let the meringues cool inside for approximately 2 hours. This gentle cooling process ensures your pavlova wreath maintains that wonderful texture.
Step 5: Whip Cream
In a separate bowl, add the heavy cream along with icing sugar and an optional splash of vanilla extract. Using a hand mixer, whip the cream to medium-stiff peaks, which should take about 3-5 minutes. Be careful not to overwhip, as you want a smooth, fluffy cream to fill your delightful pavlova wreath without any large air bubbles.
Step 6: Assemble Wreath
Once the meringues have cooled, it’s time to assemble your festive pavlova wreath! Carefully arrange the mini pavlovas in a circular shape on a serving platter. Spoon or pipe the whipped cream into the dents of each meringue, then lavishly top them with fresh fruit and mint leaves for a stunning presentation.
Step 7: Serve
Serve your beautiful pavlova wreath immediately to appreciate the delightful textures and vibrant flavors. While it’s best enjoyed fresh, you can store it in the refrigerator for up to 36 hours; however, be mindful that the cream and fruit may start to soften over time. Prepare to impress your guests with this showstopper at your holiday gatherings!
Make Ahead Options
Preparing this delightful Pavlova Wreath ahead of time can be a game-changer for busy holiday hosts! You can make the meringues up to 3 days in advance; simply store them in an airtight container at room temperature to keep their crispiness. Additionally, you can whip the cream and refrigerate it overnight, allowing for easy assembly later. On the day of serving, just fill the cooled meringues with the creamy mixture and top with fresh fruits just before your guests arrive for that vibrant presentation. This not only saves time but also ensures your guests enjoy every delicious bite without the last-minute hassle!
Storage Tips for Pavlova Wreath
Room Temperature: Keep meringues in an airtight container at room temperature for up to 2 days. This will help retain their crisp texture.
Fridge: Store any assembled pavlova wreath in the fridge for up to 36 hours. To maintain the best texture, serve as soon as possible after assembling.
Freezer: For longer storage, freeze individual meringue shells for up to 3 months in an airtight container. Thaw at room temperature before assembling.
Reheating: There’s no reheating needed for pavlova, but if you have leftover cream, gently rewhip it before using. Enjoy the delightful textures of your Pavlova Wreath!
Pavlova Wreath Variations & Substitutions
Feel free to personalize your pavlova wreath with these exciting variations that are sure to spark joy and delight in every bite!
-
Tropical Twist: Swap fresh berries for tropical fruits like mango or kiwi, adding an exotic flair to your dessert. The juicy sweetness balances beautifully with the light meringue.
-
Chocolate Drizzle: Enhance your wreath with a rich chocolate drizzle or a sprinkle of crushed pistachio for a delightful contrast of flavors. Each bite becomes a surprise, mingling chocolate notes with the sweetness of fruit.
-
Nutty Flavor: Add slivered almonds or walnuts as a crunchy topping for texture. This nutty crunch pairs wonderfully with the cream and fruit, elevating each taste sensation.
-
Citrus Zest: Experiment with flavored extracts like orange or almond for your whipped cream. Just a drop can infuse bursts of flavor that complement the meringue beautifully.
-
Spicy Kick: For those who love a bit of heat, add a sprinkling of chili flakes or a dash of cayenne in your cream. Surprisingly, this kick can balance the sweetness and create an enticing flavor journey.
-
Herbal Infusion: Incorporate fresh herbs like basil or rosemary into the toppings for a unique twist. Their aromatic notes blend surprisingly well with fruit, creating a memorable treat.
-
Seasonal Surprises: Replace the traditional toppings with seasonal fruits like pomegranate seeds or apples for a festive feeling. The vibrant colors and flavors will surely impress your guests!
-
Dairy-Free Delight: Opt for coconut cream instead of heavy cream for a refreshing dairy-free variation. It adds a tropical element that pairs wonderfully with the sweetness of the baked meringue.
Each of these variations can transform your pavlova wreath into a uniquely delightful centerpiece for any celebration. Enjoy the creativity in making it your own, and remember, the most important ingredient is the love you fold into each delightful bite!
Tips for the Best Pavlova Wreath
-
Perfect Egg Whites: Ensure your mixing bowl and beaters are completely clean and dry. Any grease can prevent the egg whites from whipping properly to create that fluffy, airy texture essential for your pavlova wreath.
-
Sifting Sugar: Always sift your icing sugar before adding it to the meringue mixture. This helps prevent clumps and provides a smoother, more stable meringue for your festive dessert.
-
Gentle Cream Whipping: Whip the heavy cream at medium-low speed to avoid over-aerating it. Whipping too quickly can create large air bubbles, leading to a weeping cream that can affect your pavlova wreath’s presentation.
-
Cooling Time: Be patient with cooling the meringues. Leaving them in the oven as it cools is crucial to achieving the perfect chewy center and preventing cracks in your meringue.
-
Timing with Fruit: Assemble the pavlova wreath shortly before serving. Fresh fruit can release moisture over time, which may soften the meringue. Enjoy it at its best for that satisfying crisp texture!
What to Serve with Festive Pull Apart Pavlova Wreath
The perfect finale to your holiday meal, this delightful dessert shines on its own while still inviting some charming companions.
-
Creamy Vanilla Ice Cream: The silky texture of ice cream enhances the pavlova’s crispness, creating a delightful contrast that melts in your mouth.
-
Fresh Berry Compote: A tangy compote of mixed berries adds a luscious layer of flavor, accentuating the sweetness of the meringue and cream.
-
Festive Mulled Wine: Infuse your gathering with warmth and spice by serving mulled wine, which complements the sweetness of the pavlova with hints of cinnamon and orange.
-
Chocolate Drizzle: A rich chocolate drizzle adds an indulgent twist, balancing the lightness of the pavlova—drizzling it over the fruit elevates the experience.
-
Sparkling Water with Lime: A refreshing, zesty drink like sparkling water with lime cleanses the palate beautifully between bites of the pavlova.
-
Almond Biscotti: These crunchy cookies are perfect for dipping into the whipped cream, adding a delightful texture and nutty flavor that harmonizes with the meringue.
-
Coconut Macaroons: For a chewy counterpart, consider coconut macaroons that echo the lightness of the pavlova while introducing a tropical flair—perfect for the festive season!
-
Hazelnut Latte: Serve alongside a warm hazelnut latte to enjoy the nutty richness that complements the airy pavlova and adds comfort to your holiday gathering.
Festive Pull Apart Pavlova Wreath Recipe FAQs
How do I select the best egg whites for my pavlova?
Absolutely! For the best meringue, opt for extra-large egg whites. They tend to provide better volume and stability, ensuring your pavlova wreath has that airy texture we all cherish. Fresh eggs are also recommended, as older egg whites can be harder to whip into stiff peaks.
What is the best way to store my assembled pavlova wreath?
Store any assembled pavlova wreath in the fridge for up to 36 hours. To keep the textures intact, serve it as soon as possible after assembling, as fruit can release moisture that softens the meringue over time.
Can I freeze the meringue shells?
Yes, you can! To freeze individual meringue shells, simply place them in an airtight container and keep them in the freezer for up to 3 months. When you’re ready to use them, thaw them at room temperature for best results. This allows you to make your pavlova wreath ahead of time!
What should I do if my meringue is not forming stiff peaks?
No worries! If your meringue isn’t forming stiff peaks, first ensure that your mixing bowl and beaters are completely clean and free of grease. If everything is clean, try whipping the egg whites at a slightly higher speed and be patient. Adding a pinch of cream of tartar can also help stabilize the meringue and promote volume.
Are there any dietary concerns I should be aware of with the pavlova wreath?
The festive pull apart pavlova wreath is gluten-free and vegetarian, making it a great dessert option for those with common dietary restrictions. However, if you’re serving guests with allergies, be mindful of any fruit toppings or optional ingredients, like icing sugar, in the whipped cream. Always check for cross-contamination if guests have severe allergies.
How can I tell when my meringues are baked to perfection?
Great question! After baking your meringues for about 60 minutes, they should appear dry and crisp on the outside. To ensure they are perfect, gently tap the surface—you want them to feel hard rather than soft. Once baked, let them cool inside the oven for around 2 hours; this helps maintain the right texture without cracks.
Delightful Pavlova Wreath: A Festive Treat for Celebrations
Ingredients
Equipment
Method
- Preheat your oven to 90°C (195°F) and line two baking sheets with parchment paper.
- In a stand mixer, beat the egg whites until foamy, gradually add sifted icing sugar, and beat until stiff peaks form, about 8-10 minutes.
- Fold in cornstarch and vanilla extract carefully.
- Pipe small mounds on the prepared baking sheets, making dents in the center of each.
- Bake for 60 minutes or until dry and crisp; cool in the oven for 2 hours.
- Whip cream with icing sugar to medium-stiff peaks.
- Assemble the wreath by placing meringues in a circle, filling dents with whipped cream, and topping with fresh fruit.
- Serve immediately to enjoy the textures and flavors.
Leave a Reply