
There’s something magical about the smell of freshly baked bread wafting through the house, isn’t there? When it comes to homemade pizza, the secret to that restaurant-quality experience lies in the dough. This Artisan Pizza Dough recipe will elevate your pizza nights, delivering a crispy, chewy crust that pizza lovers yearn for. What’s even better? It’s not only simple and economical, but it also allows you to unleash your inner pizzaiolo right in your kitchen. Whether you’re gathering family for a cozy dinner or impressing guests at your next gathering, this dough transforms ordinary toppings into a gourmet feast. Curious how to craft the perfect pizza base that rivals your favorite pizzeria? Let’s dive in!

Why Is Artisan Pizza Dough So Special?
Flavorful, Rustic Charm: This artisan pizza dough offers a delightful combination of crispy edges and a chewy center that will make your taste buds dance.
Easy to Master: Even if you’re new to baking, the straightforward steps will guide you to pizzeria-level success.
Make-Ahead Convenience: Prepare in advance and store it in the fridge or freezer for quick weeknight meals; just pull it out when you’re ready to bake!
Versatile Base: Customize your dough by adding herbs or swapping in whole wheat flour for a healthier twist, making it perfect for personal preferences.
Whether you’re planning a cozy family night or a pizza party, this recipe stands out as your go-to for homemade goodness! For some delicious topping inspiration, check out Muffin Breakfast Pizzas and Taco Pizza Heaven.
Artisan Pizza Dough Ingredients
• Discover how simple ingredients can create pizza magic!
For the Dough
- Bread Flour – Provides structure and chewiness; substitute half with whole wheat flour for added fiber.
- Salt – Enhances flavor and strengthens dough structure; it’s essential for that perfect taste.
- Instant Dry Yeast – Leavens the dough, giving it the perfect rise; can be swapped with active dry yeast if activated beforehand.
- Warm Water (105°F/40°C) – Activates yeast and hydrates the dough; be cautious, as too hot water can kill your yeast.
- Olive Oil – Adds richness and helps create a tender crust; feel free to use extra for greasing.
- Optional Sugar or Honey – Helps activate the yeast while adding a touch of sweetness; can be omitted if preferred.
For Serving
- Toppings – Classic choices like sauce, cheese, or pepperoni dance beautifully on your pizza, but feel free to get creative with roasted veggies or unique cheeses for a gourmet twist!
Feel empowered to embrace your inner pizzaiolo with this fantastic artisan pizza dough!
Step‑by‑Step Instructions for Artisan Pizza Dough
Step 1: Activate the Yeast
In a mixing bowl, combine 1 cup of warm water (105°F/40°C) with 1 tablespoon of sugar or honey. Sprinkle 2¼ teaspoons of instant dry yeast over the surface and gently stir. Allow it to sit for 5-10 minutes until it becomes foamy and bubbles appear, indicating that your yeast is activated and ready to bring your artisan pizza dough to life.
Step 2: Mix the Dough
Once the yeast is activated, add 3 cups of bread flour and 1 teaspoon of salt to the bowl. Drizzle in 2 tablespoons of olive oil, and mix all the ingredients together with a wooden spoon or your hands until a shaggy dough forms. You want a consistency that feels slightly sticky but holds together, ensuring a delightful texture in your artisan pizza dough.
Step 3: Knead the Dough
Transfer the shaggy dough onto a floured surface. Using your hands, knead the dough for 8-10 minutes. Apply firm pressure, folding and pushing the dough until it becomes smooth and elastic. This kneading process develops the gluten, which is crucial for achieving that quintessential chewiness in your artisan pizza crust.
Step 4: First Rise
Shape the kneaded dough into a ball and place it in a greased bowl, turning to coat the dough in oil. Cover with a clean kitchen towel or plastic wrap and set it in a warm area to rise for 1-2 hours, or until doubled in size. If you prefer to enhance the flavor, refrigerate the dough for 8-48 hours after the first rise for cold fermentation.
Step 5: Punch Down & Divide
Once your dough has risen beautifully, gently punch it down to release excess air. On a floured surface, turn the dough out and divide it into two or more portions, depending on your desired pizza size. Shape each portion into a tight ball, covering them with a towel and allowing them to rest for 15-20 minutes, which relaxes the gluten for easier shaping.
Step 6: Shape the Dough
After resting, take one dough ball and place it on a floured surface. Using your hands, gently stretch and shape it into your desired thickness and style—be it a round or rectangular base. Aim for a uniform thickness while keeping the edges slightly thicker for that lovely crust, ensuring you craft an artisan pizza dough that is both visually appealing and delicious.
Step 7: Preheat Oven
While shaping the dough, preheat your oven to 500°F (260°C). If using a pizza stone or cast iron skillet, place it in the oven while it heats for about 30 minutes to achieve that crispy, restaurant-quality crust. This step is key to ensuring your artisan pizza dough bakes evenly and develops a heavenly texture.
Step 8: Top & Bake
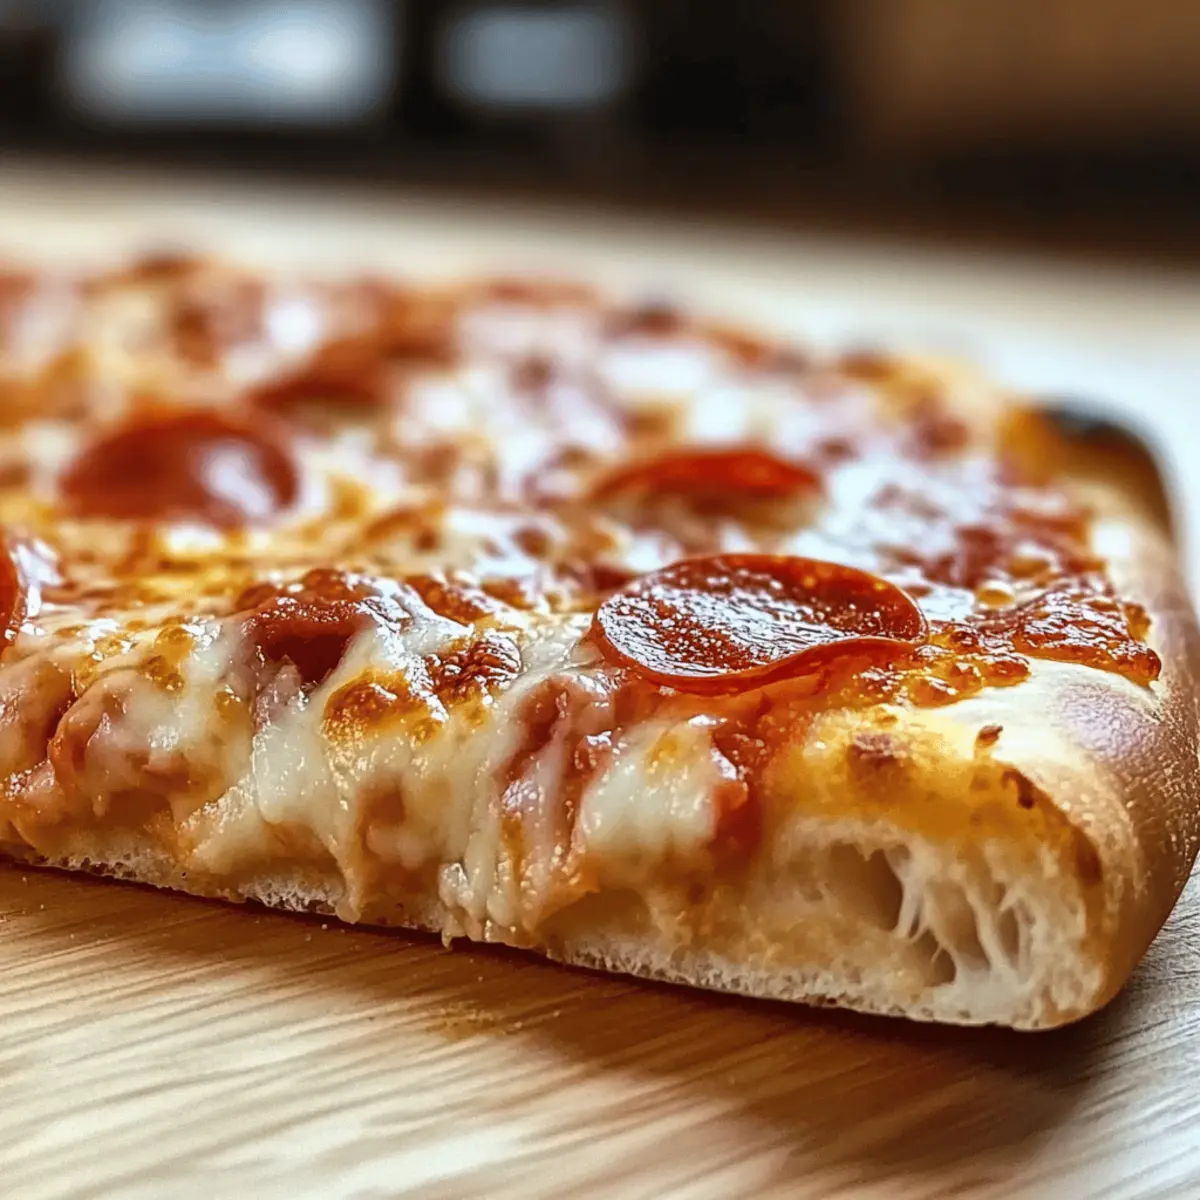
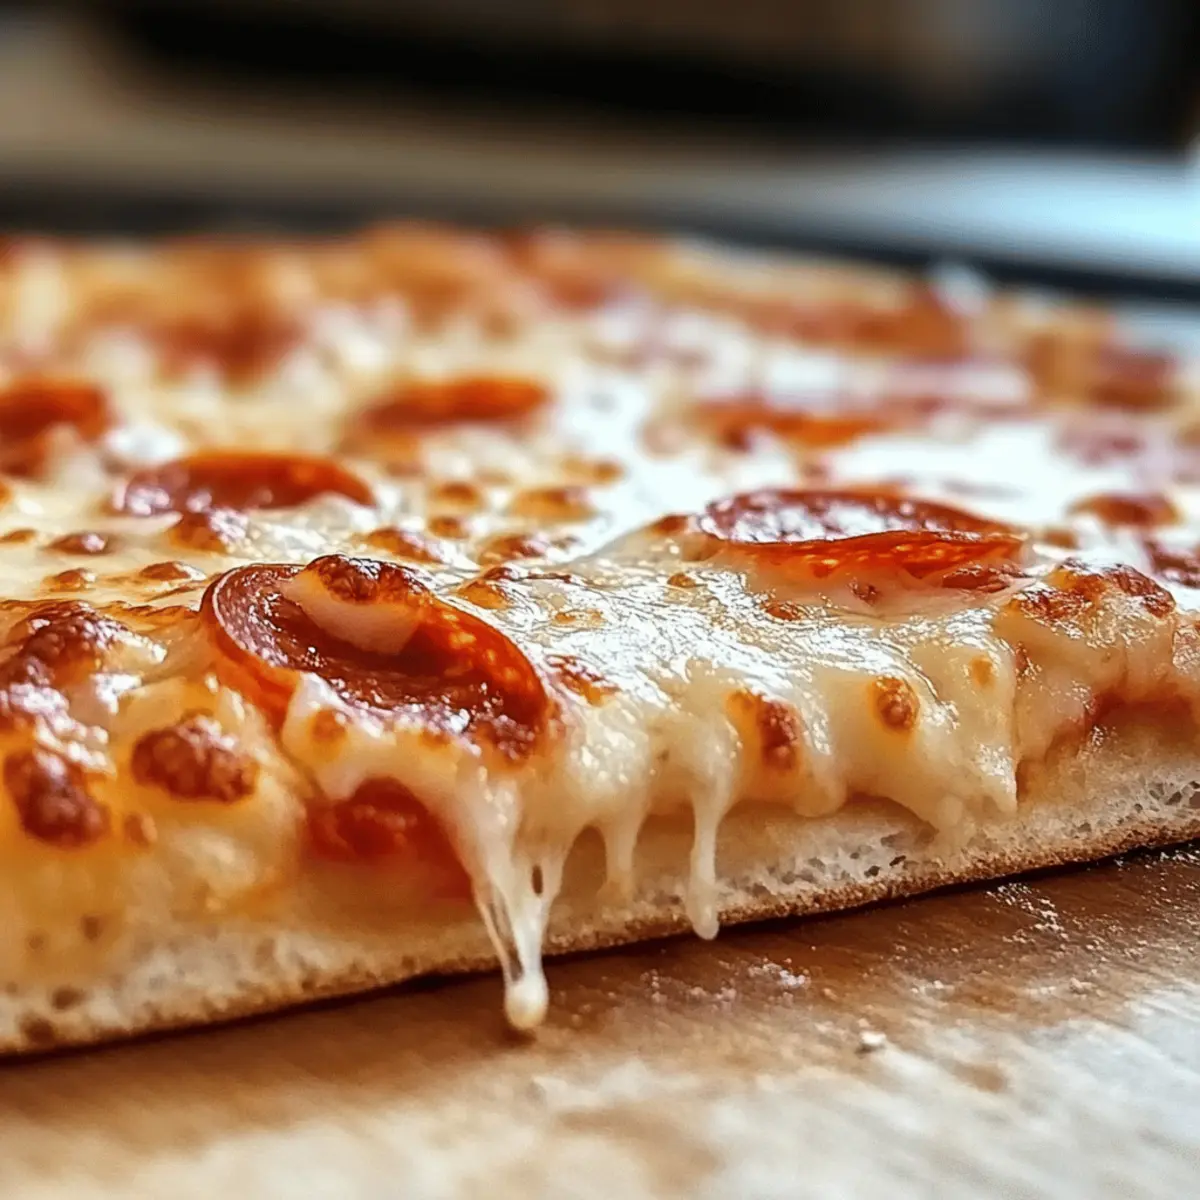
Once your oven is ready, place the shaped dough on parchment paper or a floured pizza peel. Add your favorite toppings, being careful not to overload, to maintain that crispy crust. Slide the pizza onto the preheated stone or skillet and bake for 8-12 minutes, or until the edges are golden, and the cheese is bubbling and slightly browned to perfection.
Step 9: Rest & Serve
After baking, carefully remove the pizza from the oven and let it rest for 2-3 minutes. This cooling phase allows the cheese to set slightly, making slicing easier. Take a moment to marvel at your homemade artisan pizza before slicing it into wedges, ready to serve and enjoy the deliciousness of your hard work!

Artisan Pizza Dough Variations
Feel free to let your creativity shine with these delightful variations that will enhance your pizza-making experience!
-
Whole Wheat Swap: Replace half the bread flour with whole wheat for a healthier, nuttier flavor. Your dough will have a charming rustic vibe.
-
Herbed Delight: Mix in garlic powder or Italian seasoning directly into the dough for a flavor-packed base that elevates your favorite toppings. Surprise your family with every bite!
-
Thick Crust Option: Let the dough rise in the pan for 30 minutes before baking to achieve a thick, pillowy crust. Perfect for those who love a substantial pizza edge.
-
Cheesy Crust: Incorporate grated Parmesan or mozzarella into the dough for a cheesy goodness that adds an extra layer of flavor. This twist will keep everyone coming back for more.
-
Spicy Kick: Add crushed red pepper flakes to the dough for a touch of heat, making it the perfect base for spicy toppings. Ignite your taste buds and bring some zing to your pizza night!
-
Garlic Infusion: Brush the dough with minced garlic and olive oil before baking for a fragrant aroma that fills your kitchen. The result? A rustic, flavorful crust that’s hard to resist.
-
Sweet Dough: For dessert pizzas, add a tablespoon of sugar or honey to the dough. It creates a subtly sweet base that pairs beautifully with fruits and creamy toppings. Treat yourself to something truly special!
To explore more unique topping combinations, don’t forget to check out Honey Flatbread Pizza for a sweet twist!
Expert Tips for Artisan Pizza Dough
-
Choose the Right Flour: Using bread flour ensures a chewier crust. If you opt for all-purpose flour, the crust will be softer, so stick to bread flour for that authentic artisan texture.
-
Control Water Temperature: Always check that your warm water is around 105°F (40°C) to activate the yeast without killing it. Too hot and it’s game over!
-
Prioritize Cold Fermentation: For a depth of flavor, consider refrigerating the dough after the first rise for 8-48 hours. It makes a noticeable difference in taste!
-
Avoid Overloading Toppings: More isn’t always better when it comes to toppings. Overloading can lead to a soggy crust; simplicity is key for that crispy artisan pizza dough!
-
Don’t Skip the Resting Time: Let your shaped dough rest for 15-20 minutes after dividing. It helps relax the gluten, making it easier to stretch without snapping back.
Make Ahead Options
These Artisan Pizza Dough preparations are perfect for busy home cooks looking to save time during hectic weeknights! You can mix and knead the dough, then refrigerate it for up to 48 hours after the first rise, allowing the flavors to deepen and the dough to remain just as delicious. Alternatively, divide and shape the dough into balls, wrapping them tightly and freezing for up to 3 months. When you’re ready to bake, simply thaw the dough overnight in the refrigerator, then let it come to room temperature for 30 minutes before shaping and baking. This approach ensures you enjoy fresh, pizzeria-quality pizzas with minimal effort!
What to Serve with Artisan Pizza Dough
Transform your pizza night into a feast everyone will remember with delightful accompaniments that enhance your homemade creation.
-
Garlic Bread: A crispy, buttery treat that pairs perfectly with pizza, adding a touch of indulgence to your meal.
-
Fresh Arugula Salad: Bright and peppery, this salad’s crisp textures and zesty vinaigrette offer a refreshing contrast to the rich pizza.
-
Caprese Salad: Juicy tomatoes, creamy mozzarella, and fragrant basil—this classic Italian salad complements the dough’s rustic charm beautifully.
-
Tiramisu: End your meal on a sweet note with this luscious Italian dessert, providing a luxurious finish to your pizza feast.
-
Craft Beer: Choose a hoppy IPA or a light lager to cleanse your palate and balance the flavors of the artisan pizza.
-
Sparkling Lemonade: A zesty, refreshing drink that cuts through the richness of your pizza while keeping the meal light and cheerful.
-
Stuffed Mushrooms: These savory bites with cheese and herbs are perfect as appetizers, setting the stage for a cozy pizza night.
-
Roasted Vegetables: Enhancing your pizza with hearty, caramelized veggies introduces flavors that work in harmony with the artisan dough.
-
Homemade Pesto: Drizzle or dip your crust in this vibrant sauce, enriching each bite with fresh basil and garlic notes.
-
Italian Wine: Pair with Chianti or Pinot Grigio for an authentic touch that elevates both the pizza and the experience.
How to Store and Freeze Artisan Pizza Dough
Room Temperature: Store unbaked artisan pizza dough in a greased bowl, covered with plastic wrap or a kitchen towel for up to 2 hours, allowing it to rise before baking.
Fridge: Keep leftover dough in an airtight container or well-wrapped for up to 3 days. This allows for further flavor development while remaining usable for your next pizza night!
Freezer: For longer storage, wrap the dough tightly in plastic wrap and then in aluminum foil. It can be frozen for up to 3 months. Thaw in the fridge overnight and let come to room temperature before shaping.
Reheating: If you’ve par-baked your pizza crust, simply warm it in a preheated oven at 375°F for about 5-10 minutes before adding toppings and baking again.
Artisan Pizza Dough Recipe FAQs
What type of flour should I use for Artisan Pizza Dough?
Absolutely, I recommend using bread flour for optimal chewiness and structure. If you prefer a healthier option, feel free to substitute up to half with whole wheat flour. Just keep in mind that all-purpose flour will yield a softer crust, which might not be as crispy.
How should I store leftover pizza dough?
If you have leftover artisan pizza dough, you can keep it in an airtight container or well-wrapped in plastic wrap for up to 3 days in the fridge. This method not only keeps it fresh but also allows the flavors to develop more. If you’re planning on using it later, you can freeze it tightly wrapped for up to 3 months.
Can I freeze the dough, and how do I do it?
Very! To freeze artisan pizza dough, follow these steps: After the first rise, punch down the dough and divide it into desired portions. Wrap each portion tightly in plastic wrap, then place them in a freezer bag or airtight container. Make sure to label them with the date. When you’re ready to use, thaw it overnight in the fridge and bring it to room temperature before shaping.
What should I do if my dough isn’t rising?
If your dough isn’t rising, check a few things: Make sure your yeast is fresh and activated properly—if it didn’t foam when mixed with warm water, it may be dead. Also, ensure that the environment is warm enough for the dough to rise; you can try placing it in a slightly warm oven or covering it with a heated blanket for optimal conditions.
Is this pizza dough recipe suitable for people with gluten sensitivities?
Unfortunately, this artisan pizza dough is not gluten-free. If you’re sharing with someone who has gluten sensitivities, I recommend exploring gluten-free flour alternatives. Brands like Bob’s Red Mill offer gluten-free pizza crust mixes that are easy to work with and delicious.
How long can I keep the dough at room temperature before baking?
You can store unbaked artisan pizza dough at room temperature for up to 2 hours, covered with plastic wrap or a kitchen towel. This allows it to rise slightly. If longer is needed, it’s best to refrigerate the dough to prevent it from over-proofing.
Crispy Artisan Pizza Dough for Perfect Homemade Pizzas
Ingredients
Equipment
Method
- Combine warm water and sugar or honey in a mixing bowl. Sprinkle instant dry yeast and stir gently. Allow to sit for 5-10 minutes until foamy.
- Add bread flour and salt to the bowl. Drizzle olive oil and mix until a shaggy dough forms.
- Knead the dough on a floured surface for 8-10 minutes until smooth and elastic.
- Shape the kneaded dough into a ball and place it in a greased bowl to rise for 1-2 hours until it's doubled in size.
- Punch down the risen dough, divide it into portions, and let the portions rest covered for 15-20 minutes.
- Shape each dough ball into your preferred thickness and style.
- Preheat your oven to 500°F (260°C) and place a pizza stone or skillet inside to heat for 30 minutes.
- Add your desired toppings to the shaped dough and bake on the preheated stone or skillet for 8-12 minutes until edges are golden.
- Let the pizza rest for 2-3 minutes before slicing and serving.
Leave a Reply