
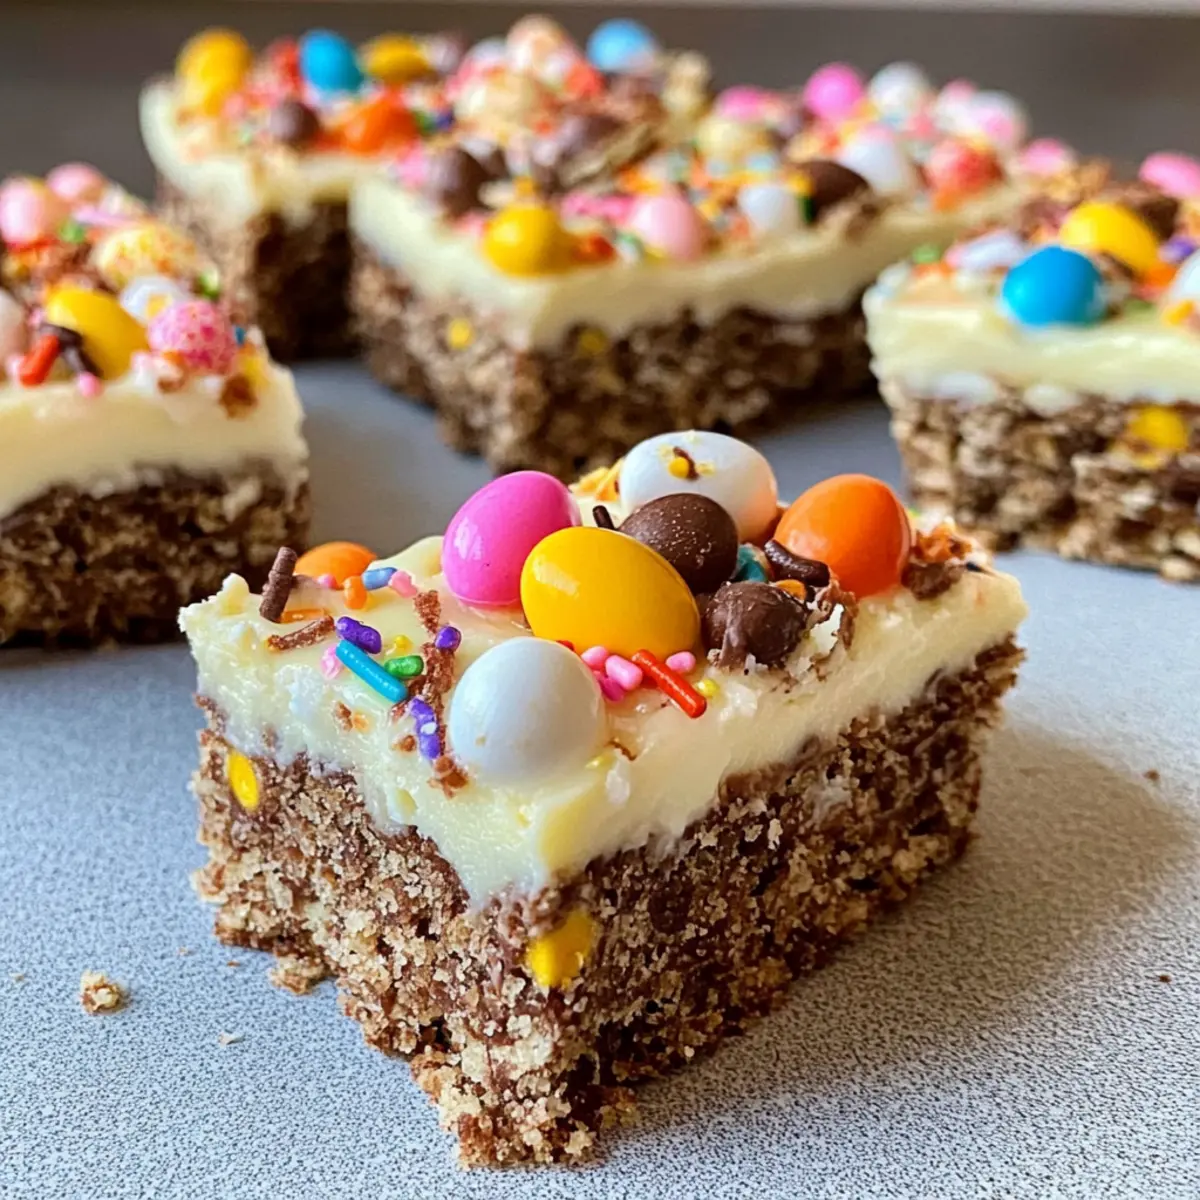
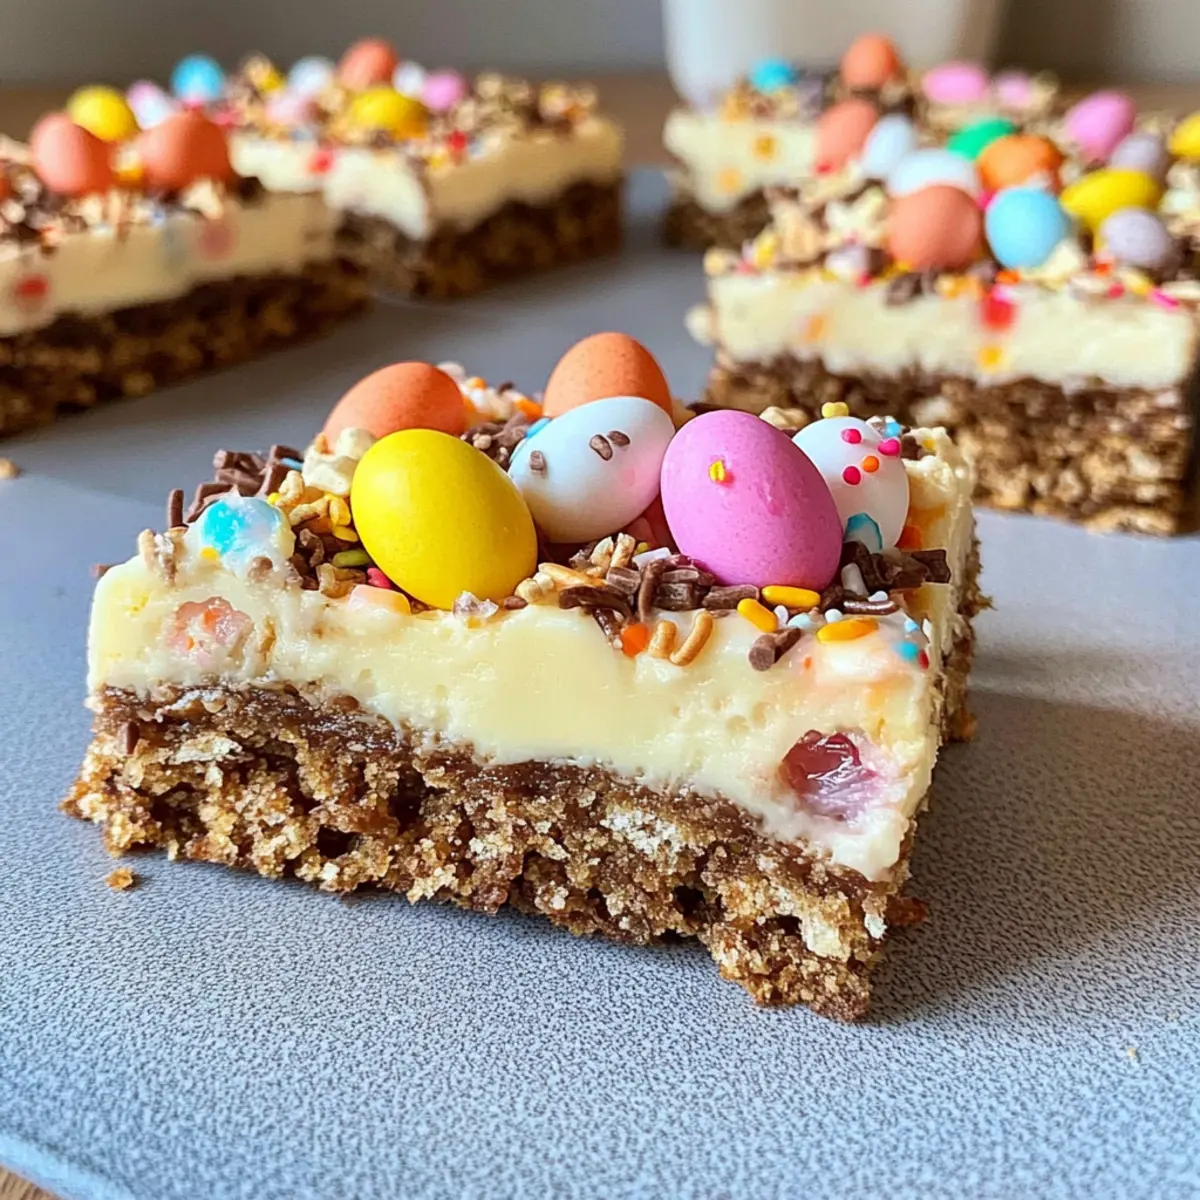
As I stood in my kitchen, a wave of nostalgia washed over me, recalling the joyous Easters spent with family, surrounded by colorful treats and laughter. This year, I’ve decided to recreate that magic with a delightful No-Bake Chocolate Easter Egg Slice that’s simply irresistible. This charming dessert is not only kid-friendly but can also be made gluten-free, ensuring everyone gets to indulge. Plus, its make-ahead nature means you can whip it up in advance, freeing up precious time during your holiday gatherings. The combination of crunchy chocolate goodness topped with a playful array of colorful candies will surely win over any crowd. Ready to bring a touch of whimsy to your table? Let’s dive into this easy recipe that promises to delight both young and old!
Why is this No-Bake Slice a Must-Try?
Versatile and Fun: This No-Bake Chocolate Easter Egg Slice can be tailored for any taste, allowing you to switch up toppings based on your favorite candies.
No Baking Required: Forget about preheating the oven! You can whip this up with minimal hassle, making it perfect for busy home chefs looking to impress without the fuss.
Kid-Friendly Delight: With its playful presentation and delightful crunch, kids will adore helping with the decoration, making it a fun family activity.
Make-Ahead Magic: Easily prepared in advance, this treat can be tucked away in the fridge for the perfect last-minute dessert, leaving you free to enjoy holiday festivities.
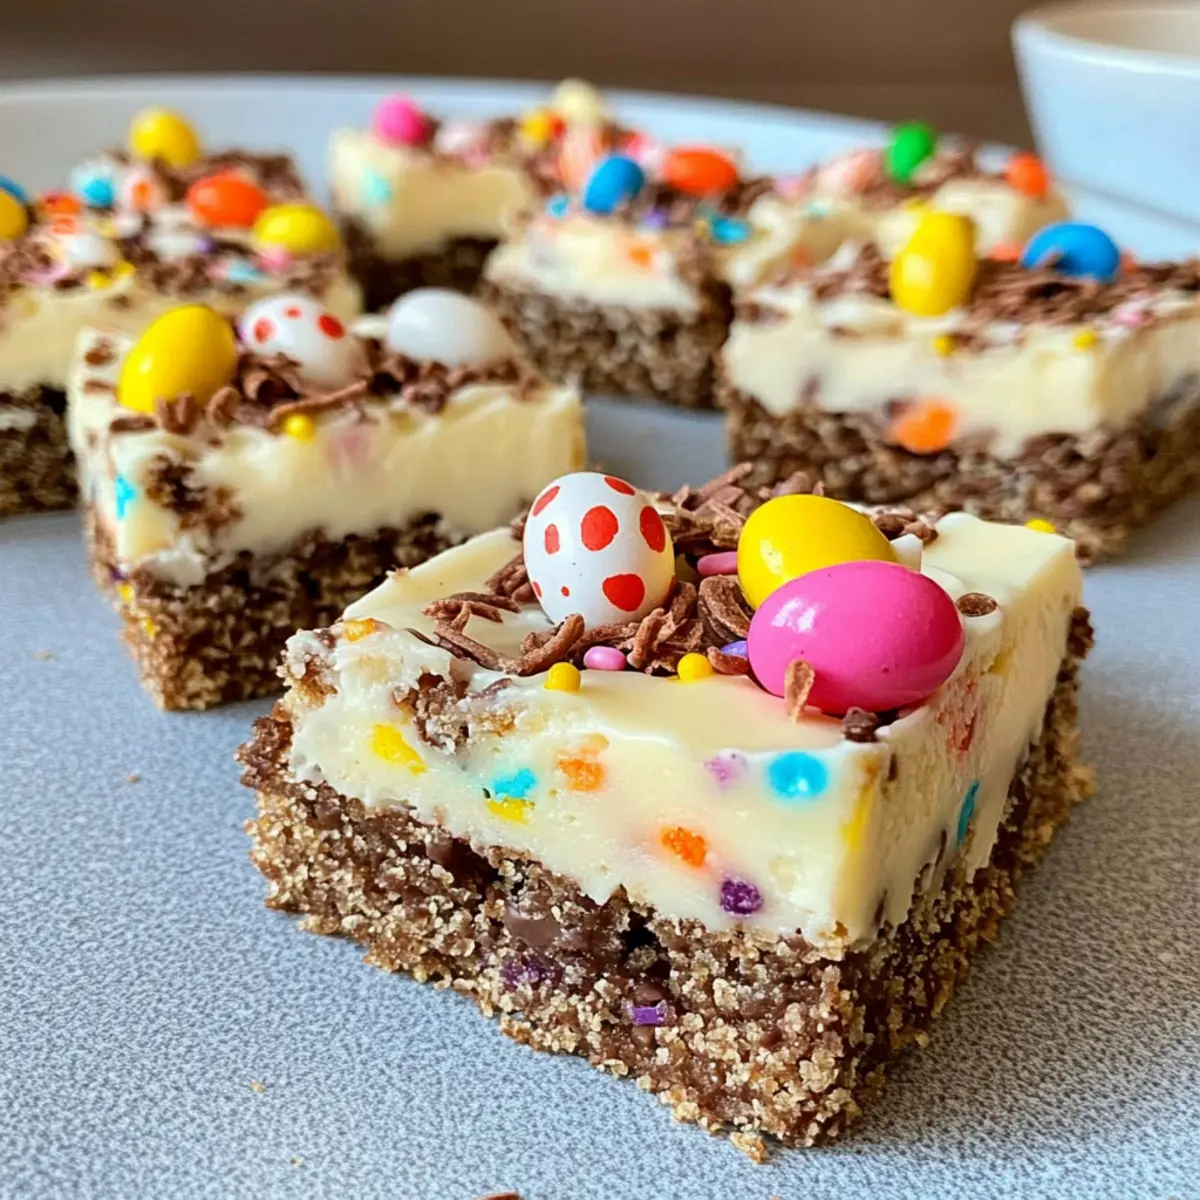
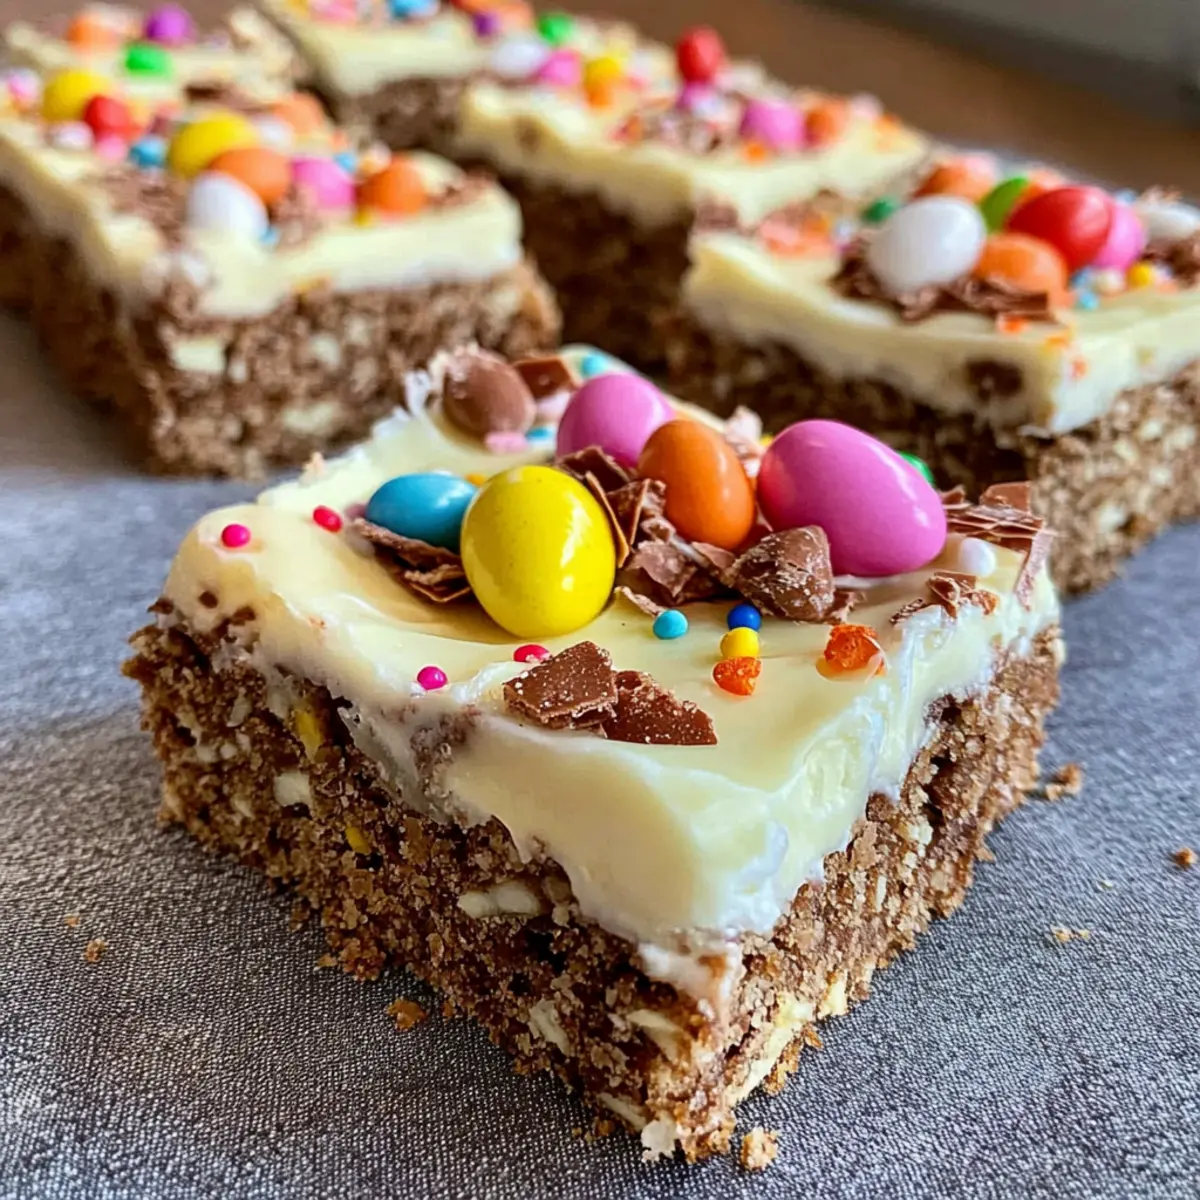
Gorgeous Presentation: The vibrant colors of mini eggs and sprinkles create a show-stopping dessert that not only tastes amazing but looks stunning on any table.
Ready to amp up your dessert game? You might also enjoy our scrumptious Crab Cake Egg rolls or the comforting flavor of a Hawaiian Roll Grilled cheese.
No-Bake Chocolate Easter Egg Slice Ingredients
For the Base
- Dark Chocolate – Adds a rich sweetness; choose high-quality chocolate for best flavor.
- Condensed Milk – Provides necessary creaminess and acts as a binder; no substitutions recommended.
- Butter – Creates a smooth, cohesive mixture; margarine can be used for dairy-free options.
- Milk Arrowroot Biscuits – Forms the base; can be substituted with plain biscuits like Superwines or Digestives.
- Cornflakes or Rice Bubbles – Adds texture and crunch; cornflakes offer a crispier bite.
For the Topping
- White Chocolate – Creates a glossy, sweet topping; consider milk chocolate for a different taste.
- Vegetable Oil – Thins the white chocolate for easier spreading; optional but helps achieve a smooth finish.
Decorative Elements
- Mini Caramello Eggs/Creme Eggs – Decorative, flavorful additions; substitute with your favorite Easter candies.
- Mini Eggs and Smarties – Enhance presentation with color; switch with other chocolate or candy pieces.
- Sprinkles – Add a festive touch; mix and match colors for fun decoration.
This No-Bake Chocolate Easter Egg Slice is not only easy to prepare but will wow your guests with its delightful contrast of flavors and textures!
Step‑by‑Step Instructions for No-Bake Chocolate Easter Egg Slice
Step 1: Prepare the Tin
Begin by lining a 19 x 29 cm slice tin with baking paper, ensuring that it covers the bottom and sides for easy removal later. Press the paper into the corners and up the sides, allowing some overhang for lifting out the slice once set. This will prevent sticking and make serving your decadent No-Bake Chocolate Easter Egg Slice a breeze.
Step 2: Melt the Chocolate Mixture
In a microwave-safe bowl, combine the dark chocolate, sweetened condensed milk, and butter. Heat the mixture in the microwave for 30-second intervals, stirring well in between until melted and smooth—this should take about 1.5 to 2 minutes total. The chocolate should be glossy and fully combined with the butter and condensed milk, creating a rich base for your slice.
Step 3: Combine the Dry Ingredients
Once your chocolate mixture is melted, remove it from the microwave and stir in the crushed Milk Arrowroot biscuits and cornflakes or rice bubbles. Mix gently until everything is evenly coated and the ingredients are well combined. Avoid over-mixing to keep the texture light and crunchy, then press the mixture firmly into your lined slice tin using the back of a spoon to create an even surface.
Step 4: Melt the White Chocolate
While your base sets a bit, it’s time to melt the white chocolate for the topping. In a clean microwave-safe bowl, heat the white chocolate for about 30 seconds, then add a small amount of vegetable oil to help with spreading. Stir until smooth and glossy, heating in additional 15-second bursts if needed until fully melted—this should take no more than a minute in total.
Step 5: Pour and Spread the Topping
Once melted, pour the white chocolate mixture over the pressed base in the tin. Use a spatula or the back of a spoon to spread the chocolate evenly, making sure it covers the entire surface. The white chocolate will create an inviting, sweet glaze on your No-Bake Chocolate Easter Egg Slice, enhancing its visual appeal.
Step 6: Decorate with Toppings
Before the white chocolate sets, it’s time to have some fun! Decorate the top with halved Caramello eggs, colorful mini eggs, and Smarties, scattering them generously for a festive look. Feel free to add sprinkles for an extra pop of color. This adds a playful touch and makes your slice visually stunning for any gathering.
Step 7: Chill to Set
Refrigerate your slice for at least 4 hours, or ideally overnight, to ensure it sets firmly. This chilling time allows all the flavors to meld beautifully together, resulting in a rich and satisfying No-Bake Chocolate Easter Egg Slice. Avoid the temptation to cut too soon for the best results!
Step 8: Serve and Enjoy
Once set, let the slice sit at room temperature for about 20 minutes before cutting. This will make slicing easier and create clean edges. Use a sharp knife, wiping it between cuts, to serve your delightful No-Bake Chocolate Easter Egg Slice. Share with friends and family, and enjoy the joy it brings!
Expert Tips for No-Bake Chocolate Easter Egg Slice
-
Quality Matters: Use high-quality dark chocolate and white chocolate for the best flavor; it makes a significant difference in the overall taste of your No-Bake Chocolate Easter Egg Slice.
-
Don’t Overmix: Once you add the cornflakes or rice bubbles, mix gently. Over-mixing can lead to a dense texture, so keep it light and fluffy!
-
Press Firmly: Ensure you press the base mixture firmly into the tin to avoid crumbling when you slice it later. A compact base provides better structure.
-
Chill Longer: For optimal results, refrigerate overnight. Although it can set in four hours, longer chilling results in a firmer texture that’s easier to slice.
-
Cut with Care: Use a sharp knife for clean slices and wipe it between cuts. This ensures beautiful edges for your No-Bake Chocolate Easter Egg Slice.
-
Customize Wisely: Feel free to experiment with toppings! Swap candies based on preferences, but avoid adding too many different types; keep the balance for best flavor.
How to Store and Freeze No-Bake Chocolate Easter Egg Slice
Fridge: Store your slice in an airtight container in the refrigerator for up to one week. This keeps it fresh and prevents it from absorbing other odors.
Freezer: If you want to make it ahead of time, freeze the slice for up to three months. Wrap it tightly in plastic wrap and foil to prevent freezer burn.
Thawing: To enjoy, simply transfer the frozen slice to the fridge the night before you plan to serve it. Let it thaw in the refrigerator for the best texture.
Serving Suggestions: Once thawed, allow the No-Bake Chocolate Easter Egg Slice to sit at room temperature for about 20 minutes before slicing for cleaner cuts and a velvety texture.
No-Bake Chocolate Easter Egg Slice Variations
Get ready to unleash your creativity and make this No-Bake Chocolate Easter Egg Slice your own with these tasty twists!
-
Dairy-Free Delight: Substitute butter with coconut oil and use dark chocolate that’s dairy-free for a vegan option. The tropical hint of coconut will pair beautifully with the chocolate.
-
Biscuit Bliss: Swap the Milk Arrowroot biscuits for gluten-free alternatives like almond flour cookies or any plain gluten-free biscuits. You won’t miss a beat with those crunchy bases.
-
Nutty Crunch: Add a handful of chopped nuts like almonds or hazelnuts into the base for an extra crunch. The crunchy texture combined with chocolate is simply divine.
-
Fruity Flair: Toss in some dried fruits like cranberries or apricots for a pop of flavor. The tangy sweetness complements the chocolate beautifully, adding a refreshing twist.
-
Spicy Kick: Add a sprinkle of cinnamon or a pinch of cayenne pepper to the chocolate mixture for a warming heat. It’s a surprising addition that elevates the chocolate experience to new heights.
-
Chocolate Layered Surprise: Layer milk chocolate and white chocolate by pouring half of the melted white chocolate first and then topping it with the dark chocolate. The double-layered effect is sure to wow your guests!
-
Seasonal Swap: Use seasonal candies like Easter-themed chocolate bunnies or pumpkin spice chocolates when it’s fall. This makes your dessert appropriate for any holiday gathering.
-
Serving Suggestion: Pair this delightful slice with fresh strawberries or a scoop of ice cream for a gorgeous contrast that will have everyone coming back for seconds!
Feel free to explore these variations, and have fun creating your own! If you’re inspired by unique flavor combinations, why not check out our delightful Crab Cake Egg rolls or savor the comforting goodness of a Hawaiian Roll Grilled cheese?
What to Serve with No-Bake Chocolate Easter Egg Slice
Elevate your dessert experience with delightful pairings that complement this indulgent chocolate treat.
-
Vanilla Ice Cream: A cool, creamy base that contrasts brilliantly with the rich chocolate slice, offering a delightful temperature and texture difference.
Enhancing the slice with a scoop of vanilla ice cream brings a delightful creaminess that balances out the crunchiness of the chocolate egg base. -
Fresh Berries: Juicy strawberries or raspberries add a bright, tart contrast, enhancing the sweetness of your dessert.
The tangy notes from fresh berries create a refreshing zing that cuts through the rich chocolate, making each bite more vibrant. -
Whipped Cream: Light and airy, this classic topping elevates the slice’s presentation and adds an extra layer of sweetness.
Drizzling a generous swirl of whipped cream transforms your No-Bake Chocolate Easter Egg Slice into a luxurious indulgence, adding a fluffy element. -
Chocolate Sauce: For the ultimate chocolate lover, a drizzle of warm chocolate sauce over the top elevates the experience.
This luscious addition complements the existing chocolate flavor while introducing a smooth, rich decadence that is hard to resist. -
Mint Tea: A warm, herbal beverage like mint tea refreshes the palate after indulging in a rich dessert.
Sipping on this soothing tea can enhance the flavors of your chocolate slice, providing a calming balance to your sweet treat. -
Coffee: A bold cup of coffee pairs wonderfully with chocolate, offering a sophisticated and stimulating counterpoint to the dessert’s sweetness.
The bitterness of coffee highlights the chocolate’s richness, creating a delightful harmony of flavors. -
Chocolate-Covered Strawberries: These offer an extra touch of decadence and match the playful spirit of your dessert.
The crunch of the chocolate outside leads to a burst of fresh strawberry flavor, complementing the No-Bake Chocolate Easter Egg Slice beautifully. -
Fruit Salad: A light, colorful fruit salad brings freshness and a crisp texture that brightens the dessert table.
The assortment of flavors in the salad contrasts nicely with the slice’s richness, providing a refreshing contrast in each bite.
Make Ahead Options
This No-Bake Chocolate Easter Egg Slice is an absolute gem for meal prep, letting you get ahead of the game during busy holiday weeks! You can prepare the base (steps 1-3) up to 24 hours in advance and store it in the refrigerator, ensuring it remains fresh and perfectly textured. Just cover the slice tin tightly with plastic wrap to maintain its quality. The topping (step 4) can also be melted and prepared a day before serving. When you’re ready to impress your guests, simply spread the white chocolate topping (step 5), add your colorful decorations (step 6), and chill it for another 4 hours or overnight to set. This way, you’ll have a stunning dessert without the last-minute rush!
No-Bake Chocolate Easter Egg Slice Recipe FAQs
What type of chocolate should I use for the best flavor?
Absolutely! For the richest flavor, I recommend using high-quality dark chocolate. The depth of flavor will enhance your No-Bake Chocolate Easter Egg Slice, making each bite even more indulgent. Brands known for their premium chocolate will give you the best results.
How long can I store the No-Bake Chocolate Easter Egg Slice?
You can store your slice in an airtight container in the refrigerator for up to one week. It’s great to have this treat ready for quick snacking during the busy holiday season!
Can I freeze leftovers, and if so, how?
Certainly! To freeze your No-Bake Chocolate Easter Egg Slice, wrap it tightly in plastic wrap, followed by foil, to prevent freezer burn. It can stay fresh in the freezer for up to three months. When you’re ready to enjoy, just move it to the fridge the night before to thaw.
What should I do if my slice is too soft after chilling?
If your No-Bake Chocolate Easter Egg Slice is too soft after chilling, it may need a longer chilling time. I suggest refrigerating it overnight to allow it to firm up properly. Be sure to press the base firmly into the tin when preparing it, as this creates a better structure.
Are there any dietary considerations I should take into account?
Yes! If you’re making this for guests with dietary restrictions, feel free to swap out the biscuits for gluten-free alternatives to make the No-Bake Chocolate Easter Egg Slice gluten-free. Additionally, you can use dairy-free margarine in place of butter to make it suitable for a dairy-free diet.
What can I use as toppings if I can’t find mini eggs or Smarties?
Don’t worry; you have options! If mini eggs or Smarties are unavailable, feel free to use any seasonal candies you love, such as chocolate-covered raisins or even chopped dried fruits for a twist on the traditional look. Just ensure they complement the chocolate flavor for the best result!
Irresistible No-Bake Chocolate Easter Egg Slice to Wow Your Guests
Ingredients
Equipment
Method
- Begin by lining a 19 x 29 cm slice tin with baking paper, covering the bottom and sides.
- In a microwave-safe bowl, combine the dark chocolate, sweetened condensed milk, and butter. Heat in 30-second intervals until melted and smooth.
- Stir in the crushed Milk Arrowroot biscuits and cornflakes or rice bubbles until evenly coated. Press the mixture firmly into the lined slice tin.
- Melt the white chocolate for the topping with optional vegetable oil, stirring until smooth.
- Pour the white chocolate mixture over the base and spread evenly.
- Decorate the top with halved Caramello eggs, mini eggs, Smarties, and sprinkles before the white chocolate sets.
- Refrigerate for at least 4 hours to set firmly.
- Once set, let the slice sit at room temperature for about 20 minutes before cutting.
Leave a Reply