
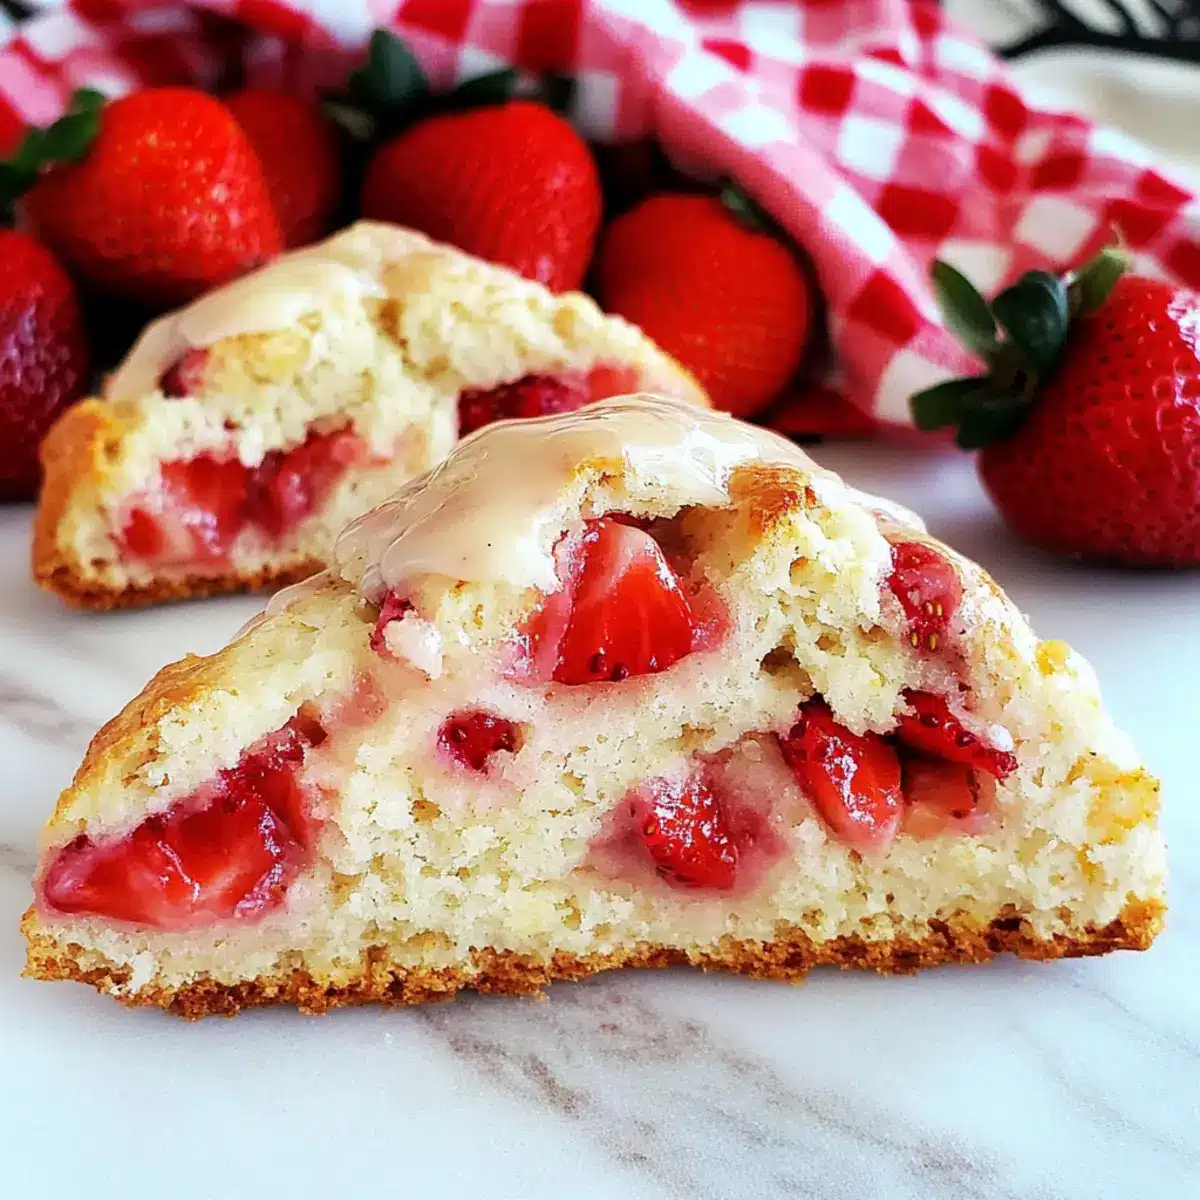
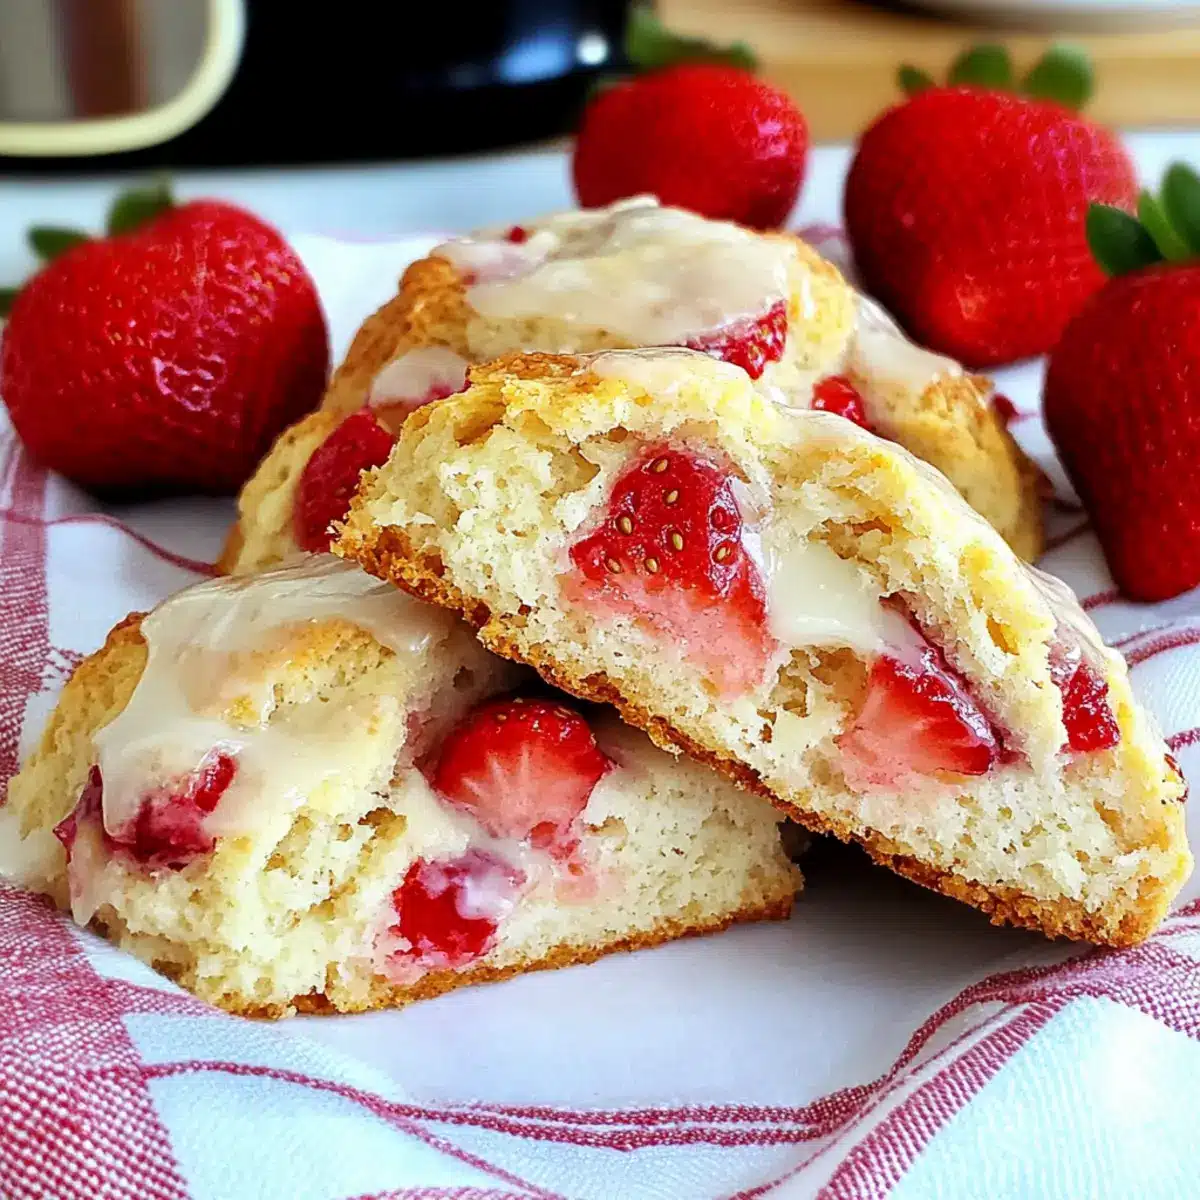
The aroma of freshly baked Strawberry Scones wafting through the kitchen is like a warm embrace on a sunny morning. Trust me, these tender, buttery delights are just the joy your breakfast or brunch needs! Featuring chunks of juicy strawberries and a bright lemon glaze, this easy Strawberry Scones recipe is perfect for both seasoned bakers and those just starting out on their culinary journey. With minimal prep time and maximum enjoyment, these scones are not only a crowd-pleaser but also a fantastic way to celebrate the flavors of summer. Plus, they can be whipped up in advance and enjoyed throughout the week! What’s your favorite way to serve scones—alongside coffee or hidden under a generous dollop of clotted cream?

Why Are Strawberry Scones So Irresistible?
Freshly baked Strawberry Scones radiate warmth and joy, making them a delightful centerpiece for any breakfast. Flavorful and fruity, each bite bursts with juicy strawberries and a zesty lemon glaze. Quick and easy, this recipe is designed for everyone, whether you’re a seasoned baker or just starting out! Versatile for any occasion, these scones can be paired with coffee, tea, or even a lavish brunch spread. Plus, for a different twist, consider trying Strawberry Crunch Cheesecake or bake some decadent Fried Strawberry Cheesecake for dessert! Make-ahead friendly, they’re ideal for busy mornings ahead, ensuring you can enjoy homemade goodness anytime.
Strawberry Scones Ingredients
• Simple and essential, here’s what you need!
For the Batter
- Buttermilk – Provides moisture and tenderness; substitute with milk mixed with vinegar or lemon juice if needed.
- Large Egg – Binds the ingredients and enhances the scone’s structure.
- All-Purpose Flour – The key building block; only use all-purpose flour for the best results.
- Granulated Sugar – Adds a touch of sweetness without overpowering the scones.
- Baking Powder – Essential for leavening; ensures the scones rise properly without using baking soda.
- Fine Sea Salt – Enhances flavor; reduce if using table salt.
- Cold Unsalted Butter – Creates flakiness; it’s vital to keep it cold and cut into small cubes.
- Chopped Strawberries – Provide bursts of fresh fruit flavor; always use fresh strawberries for optimal taste.
For the Glaze
- Powdered Sugar – Adds sweetness for glazing and beautifies the scones.
- Fresh-Squeezed Lemon Juice – Brings brightness to the glaze; can be swapped with milk if preferred.
Step‑by‑Step Instructions for Strawberry Scones
Step 1: Prepare the Buttermilk Mixture
In a measuring pitcher, whisk together 1 cup of buttermilk and one large egg until combined. Set this mixture aside for later use. This step is essential as it adds moisture and helps bind the ingredients together, ensuring your Strawberry Scones have a tender crumb once baked.
Step 2: Mix the Dry Ingredients
In a stand mixer, combine 2 cups of all-purpose flour, 1/4 cup of granulated sugar, 1 tablespoon of baking powder, and 1/2 teaspoon of fine sea salt. Mix these dry ingredients on low speed for about 30 seconds to evenly distribute them. This base mixture will provide structure to your scones, making this step crucial for a balanced texture.
Step 3: Cut in the Cold Butter
Add 1/2 cup of cold, cubed unsalted butter into the flour mixture. Mix on low speed until the mixture resembles coarse crumbs, about 2-3 minutes. The key here is to maintain cold butter, which will create flaky layers in your Strawberry Scones, ensuring they turn out light and airy.
Step 4: Combine Wet and Dry Ingredients
Gradually pour in the buttermilk mixture while mixing until just combined, approximately 1 minute. Be careful not to overmix; the dough should be slightly wet but coherent. Gently fold in 1 cup of chopped fresh strawberries, allowing their sweet flavor to infuse the dough with bursts of fruity goodness in each bite.
Step 5: Chill the Dough
Turn the dough out onto a lightly floured surface and gently shape it into a ball. Wrap the dough in plastic wrap and chill it in the refrigerator for 1 to 2 hours. Chilling the dough is crucial; it solidifies the butter, resulting in beautifully flaky Strawberry Scones.
Step 6: Prepare for Baking
Preheat your oven to 400°F (200°C). On a floured surface, roll out the chilled dough to about 1 inch thick. Using a sharp knife or a bench scraper, cut the dough into 8 wedges. This ensures even baking, as each scone will develop a lovely golden crust during the baking process.
Step 7: Bake the Scones
Place the cut scones on a baking sheet lined with parchment paper, spacing them at least 1 inch apart. Bake in the preheated oven for 15-18 minutes, or until the scones are lightly golden on top and fragrant. This step transforms the dough into light and fluffy Strawberry Scones, filling your kitchen with an irresistible aroma.
Step 8: Cool and Glaze
Once baked, transfer the scones to a wire rack to cool completely. In the meantime, prepare the glaze by whisking together 1 cup of powdered sugar and 2 tablespoons of fresh-squeezed lemon juice until smooth. The glaze adds a delightful sweetness that complements the strawberry flavor beautifully.
Step 9: Drizzle and Serve
Once the scones have cooled, drizzle the lemon glaze generously over each one, allowing it to drip down the sides for a charming presentation. Let the glaze set for about an hour before serving. Your homemade Strawberry Scones are now ready to be enjoyed with a cup of tea or coffee—perfect for any breakfast or brunch occasion!
How to Store and Freeze Strawberry Scones
Room Temperature: Store uneaten Strawberry Scones in an airtight container for up to 2 days to maintain their freshness and flakiness.
Fridge: If you need them to last a little longer, place the scones in the fridge, where they can be stored for up to 4 days. Remember to wrap them to prevent drying out.
Freezer: For longer-term storage, freeze the cooled Strawberry Scones after baking. They can last for up to 3 months if properly wrapped in plastic wrap and placed in a freezer-safe bag.
Reheating: To enjoy your scones warm, reheat in the microwave for about 30-40 seconds, or until heated through, ensuring they retain their delightful texture.
What to Serve with Easy Strawberry Scones with Lemon Glaze
Experience a delightful breakfast spread by pairing these buttery, strawberry-filled scones with complementary flavors and textures.
-
Fresh Fruit Salad: A vibrant mix of seasonal fruits adds a refreshing touch, enhancing the sweet strawberries and brightening your brunch table.
-
Clotted Cream: Rich and creamy, clotted cream perfectly balances the sweetness of the scones while adding a luxurious texture. Spread generously for indulgent bites!
-
Greek Yogurt Parfait: Layered with granola and fresh berries, this parfait complements the scones’ sweetness and provides an earthy crunch.
-
Coffee or Tea: A warm cup of your favorite brew elevates the experience, allowing the fragrant flavors of both the drink and scones to blend beautifully.
-
Lemonade: A chilled, zesty lemonade creates a refreshing contrast, with its citrus notes harmonizing perfectly with the strawberry and lemon glaze.
-
Honey Butter: This sweet spread adds a creamy richness to each scone, enhancing both flavor and texture for a delectable combination.
-
Mini Quiches: These savory bites bring a delightful contrast to the sweet scones, creating a well-rounded brunch with various flavors and textures.
-
Dark Chocolate Drizzle: For an alluring dessert touch, drizzle melted dark chocolate over the scones to create an elegant sweet-and-savory twist.
Expert Tips for Strawberry Scones
-
Cold Butter Is Key: Ensure your butter is very cold when cutting it into the dough. This creates those flaky layers in your Strawberry Scones that we all love!
-
Don’t Overmix: Gently mix the dough until just combined. Overmixing can lead to tough scones, so handle it delicately to maintain tenderness.
-
Use Fresh Strawberries: Always opt for fresh strawberries instead of frozen. Their moisture content and flavor greatly affect the final taste of your Strawberry Scones.
-
Chill the Dough: Be sure to chill the dough for 1-2 hours. This step is vital for achieving the perfect texture, as it helps solidify the butter for flaky results.
-
Cut Evenly: When shaping the scones, cut them evenly for consistent baking. This ensures each Strawberry Scone cooks through at the same rate while developing a lovely golden crust.
Make Ahead Options
These delightful Strawberry Scones are perfect for busy home cooks looking to save time! You can prepare the dough up to 24 hours in advance by following the mixing steps and then wrapping it tightly in plastic wrap before refrigerating. For the best results, chill the scones for 1-2 hours to ensure a flaky texture, then cut into wedges and freeze, which helps maintain their quality. Bake straight from the freezer, adding 2-3 extra minutes to the baking time. When you’re ready to enjoy them, simply glaze and let them set—your strawberry scones will still be just as delicious and fresh!
Strawberry Scones Variations & Substitutions
Feel free to get creative and make these delicious Strawberry Scones your own—each twist brings a new vibe to your breakfast table!
-
Raspberry or Blueberry Substitution: Swap out strawberries for fresh raspberries or blueberries for a delightful berry medley. The tartness of the raspberries adds a beautiful contrast, while blueberries provide their sweet burst.
-
Vanilla Glaze Upgrade: Transform the lemon glaze into a rich vanilla glaze by adding a teaspoon of vanilla extract. It infuses an aromatic warmth that complements the fruity flavor of the scones perfectly.
-
Add a Zesty Kick: Mix in some lemon zest with the dry ingredients for an even brighter flavor. This little touch can elevate your scones into a spectacular breakfast experience, enhancing the citrusy notes.
-
Gluten-Free Option: Replace all-purpose flour with a gluten-free flour blend to accommodate dietary restrictions. Keep in mind that some flour blends might require additional moisture, so a little more buttermilk may be needed.
-
Chocolate Chips Sensation: For a sweeter twist, fold in mini chocolate chips along with the strawberries. The combo of chocolate and strawberries creates a truly delectable treat that will have everyone coming back for seconds!
-
Chilled Creamy Delight: Serve the scones with a dollop of freshly whipped cream or clotted cream for an indulgent touch. It adds a rich creaminess that balances the sweet and tart flavors beautifully.
-
Spicy Cinnamon Twist: Incorporate cinnamon chips or a sprinkle of ground cinnamon into the mixture for a warm, cozy flavor that will leave you reminiscing about autumn baking on a sunny morning.
-
Nutty Sense: Add crushed nuts, like almonds or walnuts, for a delightful crunch and added texture. The nuttiness pairs exquisitely with the strawberries, amplifying the overall experience.
For more delightful dessert ideas, you might want to explore making decadent Fried Strawberry Cheesecake or bake up some irresistible Strawberry Crunch Cheesecake for a sweet ending to your meal! Enjoy exploring different flavors and combinations!

Strawberry Scones Recipe FAQs
What kind of strawberries should I use for Strawberry Scones?
Absolutely use fresh strawberries for your scones! They provide the ideal burst of flavor and moisture. Look for strawberries that are vibrant red, firm, and free from dark spots or bruising. If you find any strawberries with blemishes or soft spots, choose others, as they won’t bake well.
How do I store leftover Strawberry Scones?
To keep your scones fresh, store them in an airtight container at room temperature for up to 2 days. If they need a little extra longevity, transfer them to the refrigerator, where they’ll stay good for about 4 days. Just make sure they’re well-wrapped to maintain their delightful texture!
Can I freeze Strawberry Scones?
Yes, you can! To freeze your scones, let them cool completely after baking, then wrap each one in plastic wrap. Place the wrapped scones in a freezer-safe bag or air-tight container, ensuring to squeeze out as much air as possible. They’ll stay delicious for up to 3 months. When you’re ready to enjoy, just reheat them in the microwave for about 30-40 seconds!
What if my scones come out too dense or tough?
Don’t worry; we all have our off days in the kitchen! If your Strawberry Scones are too dense, it could be due to overmixing the dough. Gently mix until just combined to avoid activating too much gluten. Remember to cut in the butter until you reach coarse crumbs—this is crucial for tender scones. And, chilling the dough helps keep the butter cold, leading to the perfect texture.
Are Strawberry Scones suitable for people with allergies?
If you have allergies, it’s essential to be cautious. This recipe contains gluten (from all-purpose flour), dairy (from buttermilk and butter), and eggs. For gluten-free options, consider using a gluten-free flour blend. You can also swap buttermilk for a non-dairy alternative combined with a splash of vinegar for acidity. Just ensure to account for any other dietary restrictions you may have!
Melt-in-Your-Mouth Strawberry Scones for Your Best Breakfast
Ingredients
Equipment
Method
- Prepare the Buttermilk Mixture: Whisk together buttermilk and egg until combined and set aside.
- Mix the Dry Ingredients: Combine flour, sugar, baking powder, and salt in a stand mixer.
- Cut in the Cold Butter: Add cold butter to the flour mixture; mix until it resembles coarse crumbs.
- Combine Wet and Dry Ingredients: Gradually add buttermilk mixture while mixing until just combined; fold in strawberries.
- Chill the Dough: Shape dough into a ball, wrap in plastic wrap, and chill for 1-2 hours.
- Prepare for Baking: Preheat oven to 400°F (200°C), roll out dough to 1 inch thick, and cut into 8 wedges.
- Bake the Scones: Place scones on a lined baking sheet and bake for 15-18 minutes or until golden.
- Cool and Glaze: Transfer baked scones to a wire rack and prepare the glaze.
- Drizzle and Serve: Drizzle glaze over cooled scones, allow to set before serving.
Leave a Reply