
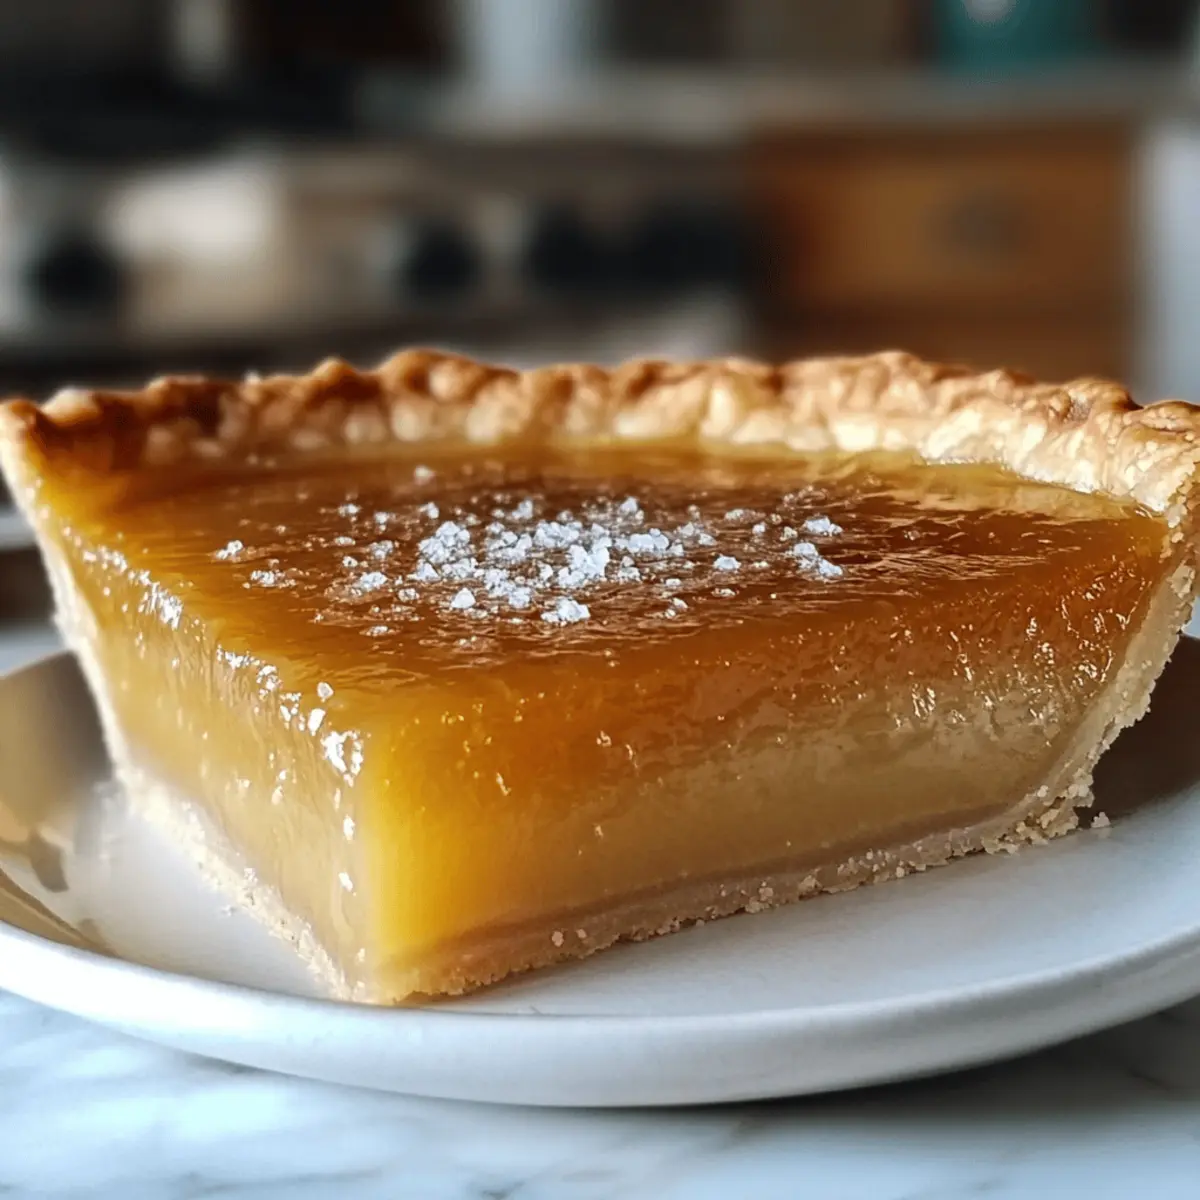
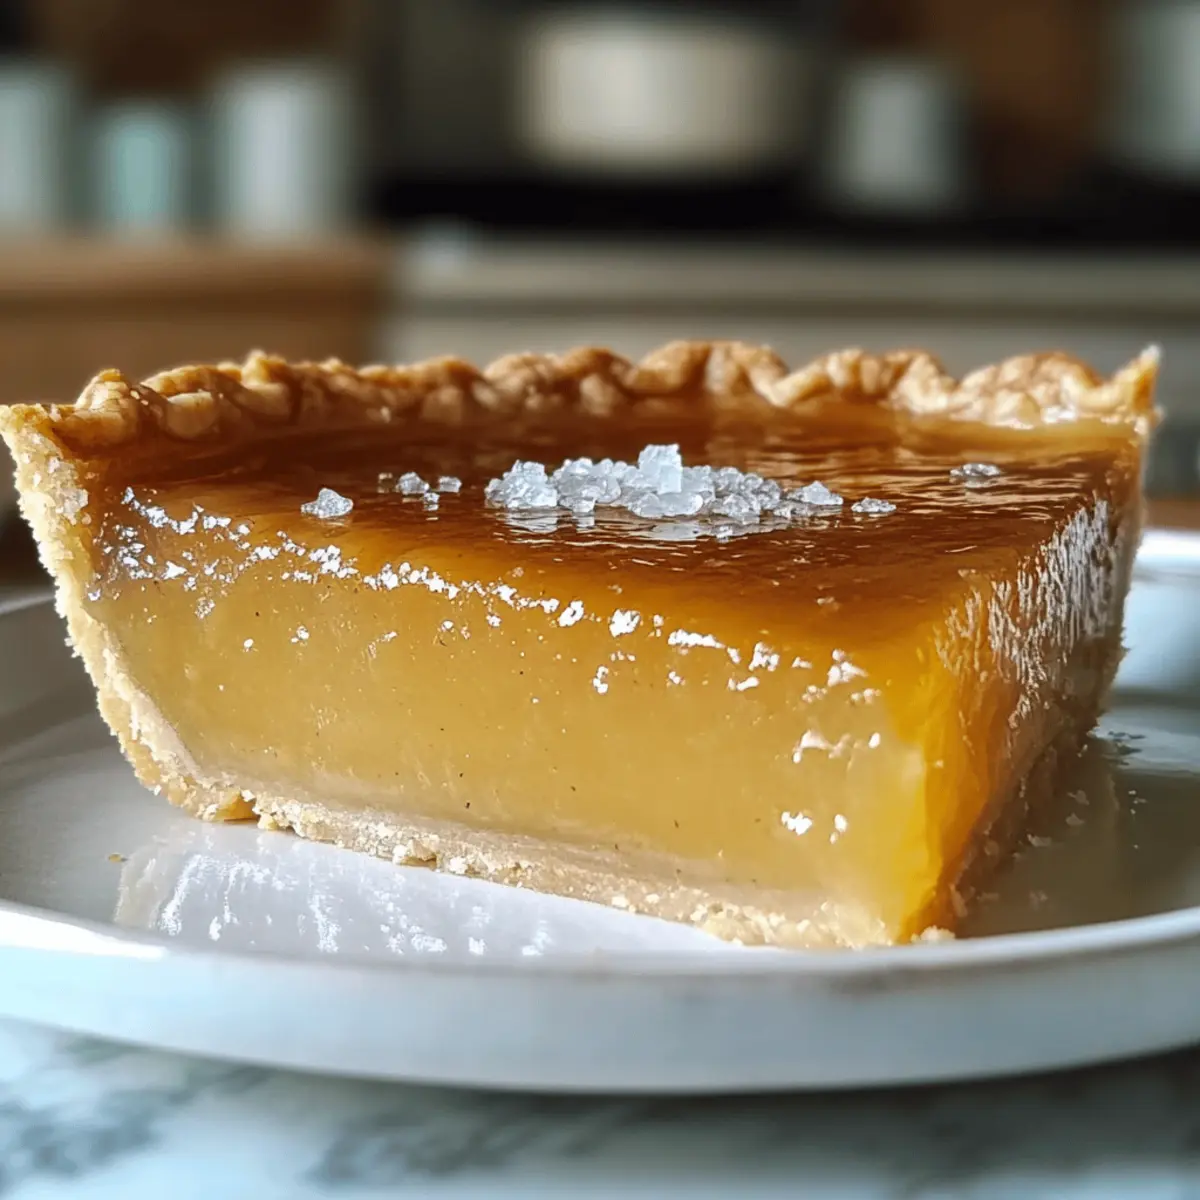
As I pulled my Salted Honey Pie from the oven, the tantalizing aroma filled my kitchen, fusing the warm sweetness of honey with a hint of ocean breeze from the flaky sea salt. This delightful Southern dessert is not just about the taste; it’s an experience that warms both your heart and your home. The creamy honey custard enveloped in a buttery crust is a testament to the magic of homemade goodness, striking the perfect balance between sweet and salty. What I love most is how easy it is to prepare—ideal for any occasion, from casual family dinners to elegant holiday feasts. So, why settle for fast food when you can indulge in a slice of something so elegant yet approachable? Ready to embark on this delicious journey with me? Let’s dive into the recipe!
Why is Salted Honey Pie a Must-Try?
Exceptional Balance: The harmony of sweet honey and flaky sea salt creates a flavor explosion that you won’t forget.
Effortless Preparation: With simple ingredients and straightforward instructions, anyone can whip up this dessert effortlessly.
Versatile Delight: Enjoy it as is, or pair with fresh berries or whipped cream for an extra touch—perfect for any occasion!
Crowd-Pleasing Appeal: This pie is sure to impress guests at parties or family gatherings, making it a go-to dessert for your next event.
Take a Look: Want more delicious ideas? Check out my Hot Honey Flatbread for a savory twist or indulge in Honey Pepper Chicken for a flavorful main course!
Salted Honey Pie Ingredients
• Here are the essential ingredients you’ll need for a delectable Salted Honey Pie!
For the Pie Crust
- 9-inch Pie Crust – Use a homemade or store-bought crust as a convenient base for your pie.
For the Filling
- ½ cup Unsalted Butter – Adds richness and flavor; make sure to melt and cool it slightly before combining.
- ¾ cup Granulated Sugar – This provides the necessary sweetness to balance the honey.
- ¼ cup Fine Grind Cornmeal – Offers structure without any grit for that smooth texture.
- ¼ teaspoon Salt – Enhances the overall flavor profile, making the pie irresistible.
- 1 tablespoon White Vinegar or Lemon Juice – The acidity brightens the custard, creating a harmonious blend.
- 1 teaspoon Vanilla Extract – A key flavor enhancer that elevates the whole pie.
- ½ cup Honey (preferably Wildflower or Clover) – The star ingredient, this honey gives depth to your Salted Honey Pie.
- 3 Large Eggs – Binds the filling together; use them at room temperature for the smoothest texture.
- ½ cup Heavy Cream – Introduces that creamy element we all adore.
- Flaky Sea Salt (such as Maldon) – The finishing touch that adds that delightful burst of flavor just before serving.
Get ready to impress with this scrumptious dessert that marries sweet and salty in every heavenly bite!
Step‑by‑Step Instructions for Salted Honey Pie
Step 1: Prepare Pie Crust
Start by preheating your oven to 375°F (190°C). If you’re using a homemade pie crust, roll it out and fit it into a 9-inch pie plate. Chill the crust for about 15 minutes, then line it with foil or parchment paper. Fill with pie weights and bake for 12–15 minutes until the edges turn golden. Remove the weights and foil, and bake for an additional 5 minutes until lightly browned. Allow it to cool slightly.
Step 2: Make Filling
In a large bowl, whisk together the melted and slightly cooled butter with granulated sugar, cornmeal, and salt. Next, add in the white vinegar or lemon juice, vanilla extract, and honey, combining until smooth and well blended. This delightful mixture will serve as the creamy filling for your Salted Honey Pie, setting the stage for a perfect pie.
Step 3: Incorporate Eggs
Add the three large eggs, one at a time, whisking thoroughly after each addition to ensure a smooth texture. After the eggs are well incorporated, pour in the heavy cream. Continue whisking until the filling is completely smooth and glossy, ready to be poured into the pre-baked pie crust for that luscious honey custard layer.
Step 4: Bake Pie
Carefully pour the filling into the cooled pie crust, making sure to level it out. Place the pie on a baking sheet and bake in the preheated oven at 350°F (175°C) for 40–50 minutes. Keep an eye on it, as the center should be just set; it will jiggle slightly when you gently shake it, signaling that your Salted Honey Pie is nearly done.
Step 5: Cool
Once out of the oven, let your Salted Honey Pie cool completely on a wire rack for at least 2 hours. This crucial step allows the filling to firm up, resulting in clean slices when you’re ready to serve. As it cools, the sweet aroma of honey will fill your kitchen, making this pie even more irresistible.
Step 6: Garnish
Right before serving, sprinkle a generous amount of flaky sea salt over the top of your Salted Honey Pie. This final touch enhances the sweet and salty balance, making for an unforgettable flavor experience. Cut into slices and serve with fresh berries or a dollop of whipped cream for added delight!
How to Store and Freeze Salted Honey Pie
Fridge: Cover tightly with plastic wrap or aluminum foil and refrigerate for up to 4 days. Allow the pie to come to room temperature before serving or enjoy it chilled for a refreshing treat.
Freezer: Wrap the cooled pie securely in plastic wrap and then in foil. It can be frozen for up to 2 months. Thaw overnight in the fridge before serving for best results.
Reheating: If you prefer to enjoy your Salted Honey Pie warm, place individual slices in the microwave for about 10-15 seconds. For a crispier crust, reheat in a toaster oven until warm.
Serving Suggestion: Add a sprinkle of fresh flaky sea salt right before serving for an enhanced flavor experience that brings out the pie’s sweet and salty notes.
What to Serve with Salted Honey Pie
Indulging in a slice of this sweet-salty delight opens the door to a variety of wonderfully complementary dishes and drinks.
-
Fresh Berries: Juicy strawberries or tangy raspberries add a burst of color and freshness, balancing the richness of the pie beautifully.
-
Whipped Cream: A dollop of light, airy whipped cream not only enhances creaminess but also cuts through the sweetness for a perfect contrast.
-
Lavender Lemonade: The floral notes from this refreshing drink harmonize with the flavors of the pie, creating a delightful sip to accompany each bite.
-
Mint Infused Iced Tea: Crisp and refreshing, mint iced tea adds a cool note, making it an ideal partner for the warmth of Salted Honey Pie.
-
Caramel Sauce Drizzle: A luscious swirl of caramel over each slice harmonizes with the custard’s richness, enhancing the experience.
-
Toasted Pecans: Their crunchy texture and nutty flavor create a pleasing contrast to the creamy filling, offering a delightful mouthfeel.
-
Chocolate Ganache: A glossy chocolate ganache adds an indulgent layer that responds beautifully when paired with the pie’s sweet-salty profile.
-
Espresso or Coffee: A warm cup of espresso or a smooth coffee provides a grounded finish, perfectly complementing the honey flavors of the pie.
-
Scoop of Vanilla Ice Cream: The creamy, cool sweetness of vanilla ice cream pairs beautifully with the warm, silky filling of the pie, creating a magical experience.
Salted Honey Pie Variations & Substitutions
Customize your Salted Honey Pie to make it uniquely yours—whether you crave more flavor, need a swap for dietary preferences, or just want to try something new!
-
Maple Honey: Substitute honey with maple syrup for a rich, earthy flavor. The pie takes on a beautifully deep sweetness, perfect for maple lovers!
-
Gluten-Free Option: Use a gluten-free pie crust instead of traditional pie crust. This makes it accessible for those with gluten sensitivities while maintaining all the deliciousness.
-
Citrus Zest: Add 1 teaspoon of lemon or orange zest to the filling for a vibrant, fresh twist. The citrus brightness complements the sweetness beautifully.
-
Spice it Up: Incorporate ½ teaspoon of ground cinnamon or nutmeg into the filling for a warm, spiced flavor. It adds a cozy, comforting layer that works splendidly in cooler months.
-
Creamy Twist: Mix ¼ cup of cream cheese in the filling for added richness and a slight tang. This results in an amazing texture that takes your pie up a notch!
-
Dairy-Free Delight: Replace heavy cream with coconut cream for a dairy-free alternative. You’ll still get the creamy richness without the dairy, plus a subtle coconut flavor.
-
Berry Burst: Fold in ½ cup of fresh blueberries or chopped strawberries into the filling before baking. Each slice will surprise you with delightful bursts of fruity flavor!
-
Caramel Drizzle: Before serving, drizzle caramel sauce over the top for an indulgent sweet-salty combo. This elevates your pie into a show-stopping dessert!
If you’re intrigued by incorporating delightful honey flavors into other dishes, don’t miss out on my Honey Garlic Glazed Salmon or try my Hot Honey Feta Chicken for sensational flavor!
Make Ahead Options
These Salted Honey Pie preparations are perfect for busy weeknights! You can prepare the pie crust up to 3 days in advance; just roll it out, fit it into your pie plate, cover tightly, and refrigerate. The filling can also be whisked together and stored in the refrigerator up to 24 hours ahead of time to deepen those wonderful flavors. When you’re ready to bake, simply preheat your oven, pour the chilled filling into the pre-baked crust, and bake as directed. This ensures your pie is just as delicious, with a perfectly set custard, saving you precious time for other tasks or family gatherings! Remember to garnish with flaky sea salt just before serving for that final touch of flavor.
Expert Tips for Salted Honey Pie
-
Room Temperature Ingredients: Using eggs and cream at room temperature helps create a smoother filling, enhancing the texture of your Salted Honey Pie.
-
Blind Baking Importance: Don’t skip the blind baking step! This ensures a crisp crust, preventing it from becoming soggy when the filling is added.
-
Cooling Time: Be patient and allow the pie to cool completely for at least 2 hours. This helps the custard set properly for cleaner slices.
-
Quality Honey Matters: Choose high-quality honey for the best flavor profile. The depth of flavor truly shines in your finished Salted Honey Pie.
-
Homemade Crust Tips: If making your own crust, always roll it out evenly and fit it snugly into the pie plate to avoid any leaks during baking.

Salted Honey Pie Recipe FAQs
What type of honey should I use for the Salted Honey Pie?
For the best flavor profile, I highly recommend using high-quality honey such as Wildflower or Clover. These types of honey bring out floral notes that enhance the overall sweetness of the pie. If you prefer a different sweetness profile, you might also experiment with flavored honeys, although they can alter the taste slightly.
How do I store Salted Honey Pie?
Cover your Salted Honey Pie tightly with plastic wrap or aluminum foil, and refrigerate it for up to 4 days. This keeps the pie fresh and delicious. If you prefer it at room temperature, just allow it to sit out for a bit before serving to regain that delightful texture.
Can I freeze Salted Honey Pie, and if so, how?
Absolutely! To freeze your Salted Honey Pie, first, let it cool completely after baking. Then wrap it tightly in plastic wrap followed by a layer of aluminum foil. It can be safely stored in the freezer for up to 2 months. When you’re ready to enjoy it, simply thaw the pie overnight in the fridge for the best results.
Why is my Salted Honey Pie not setting properly?
If your pie isn’t setting, it may need a bit more time in the oven, as every oven can vary in temperature. The center should jiggle slightly when you gently shake the pie, indicating that it’s done. If the filling looks too wobbly after the recommended baking time, return it to the oven for an additional 5 to 10 minutes, checking regularly until it firms up.
Are there any dietary considerations I should know about when serving Salted Honey Pie?
Yes, keep in mind that this pie contains eggs, butter, and cream, so it’s not suitable for vegans or those with dairy allergies. For a dairy-free alternative, you could consider using coconut cream, although the taste profile will change slightly. Always check with guests about allergies related to nuts or specific types of honey to ensure everyone can enjoy this sweet-salty delight!
How can I tell if my pie is properly baked?
The key indicators for a properly baked Salted Honey Pie are the edges should be golden brown, while the center should be slightly set but still jiggle when you gently shake the pie. A firm, jelly-like consistency is what you’re aiming for, just like you would see in a traditional custard pie.

Salted Honey Pie: Your New Favorite Sweet-Salty Slice
Ingredients
Equipment
Method
- Preheat your oven to 375°F (190°C). If using a homemade pie crust, roll it out and fit it into a 9-inch pie plate. Chill the crust for 15 minutes, then line it with foil or parchment paper. Fill with pie weights and bake for 12–15 minutes until edges are golden. Remove the weights and foil, and bake for an additional 5 minutes until lightly browned. Allow to cool slightly.
- In a large bowl, whisk together the melted and slightly cooled butter with granulated sugar, cornmeal, and salt. Add the white vinegar or lemon juice, vanilla extract, and honey, and combine until smooth and well blended.
- Add the eggs, one at a time, whisking thoroughly after each addition. Pour in the heavy cream and whisk until the filling is completely smooth and glossy.
- Pour the filling into the cooled pie crust, leveling it out. Place the pie on a baking sheet and bake in the preheated oven at 350°F (175°C) for 40–50 minutes. The center should jiggle slightly when gently shaken.
- Let your Salted Honey Pie cool completely on a wire rack for at least 2 hours to allow the filling to firm up for clean slices.
- Right before serving, sprinkle flaky sea salt over the top of your Salted Honey Pie to enhance the sweet and salty balance. Serve with fresh berries or whipped cream if desired.
Leave a Reply