
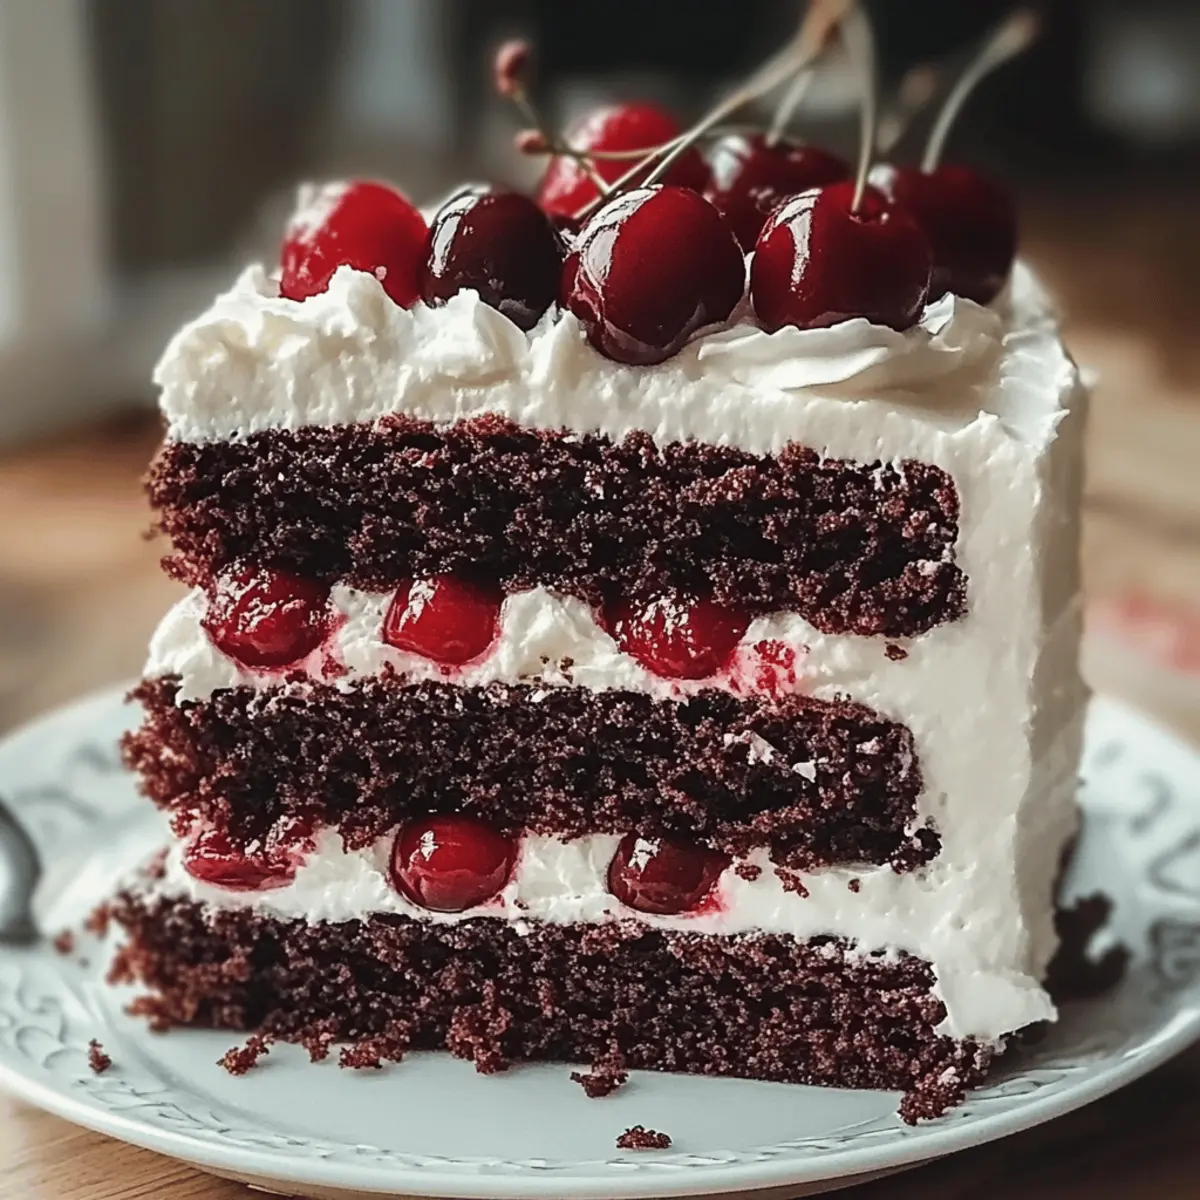
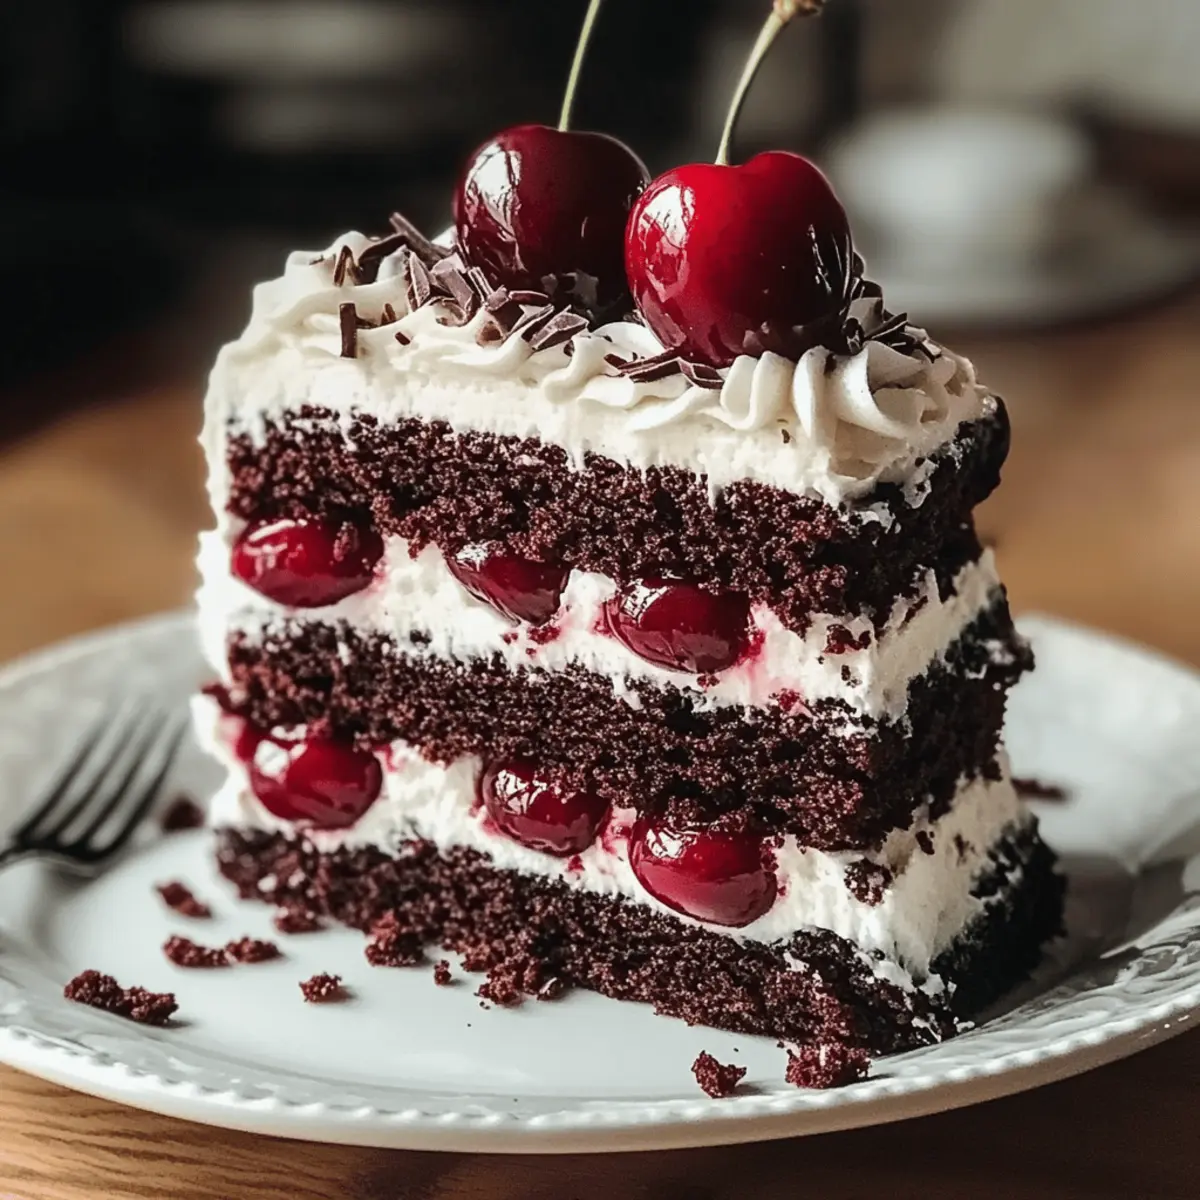
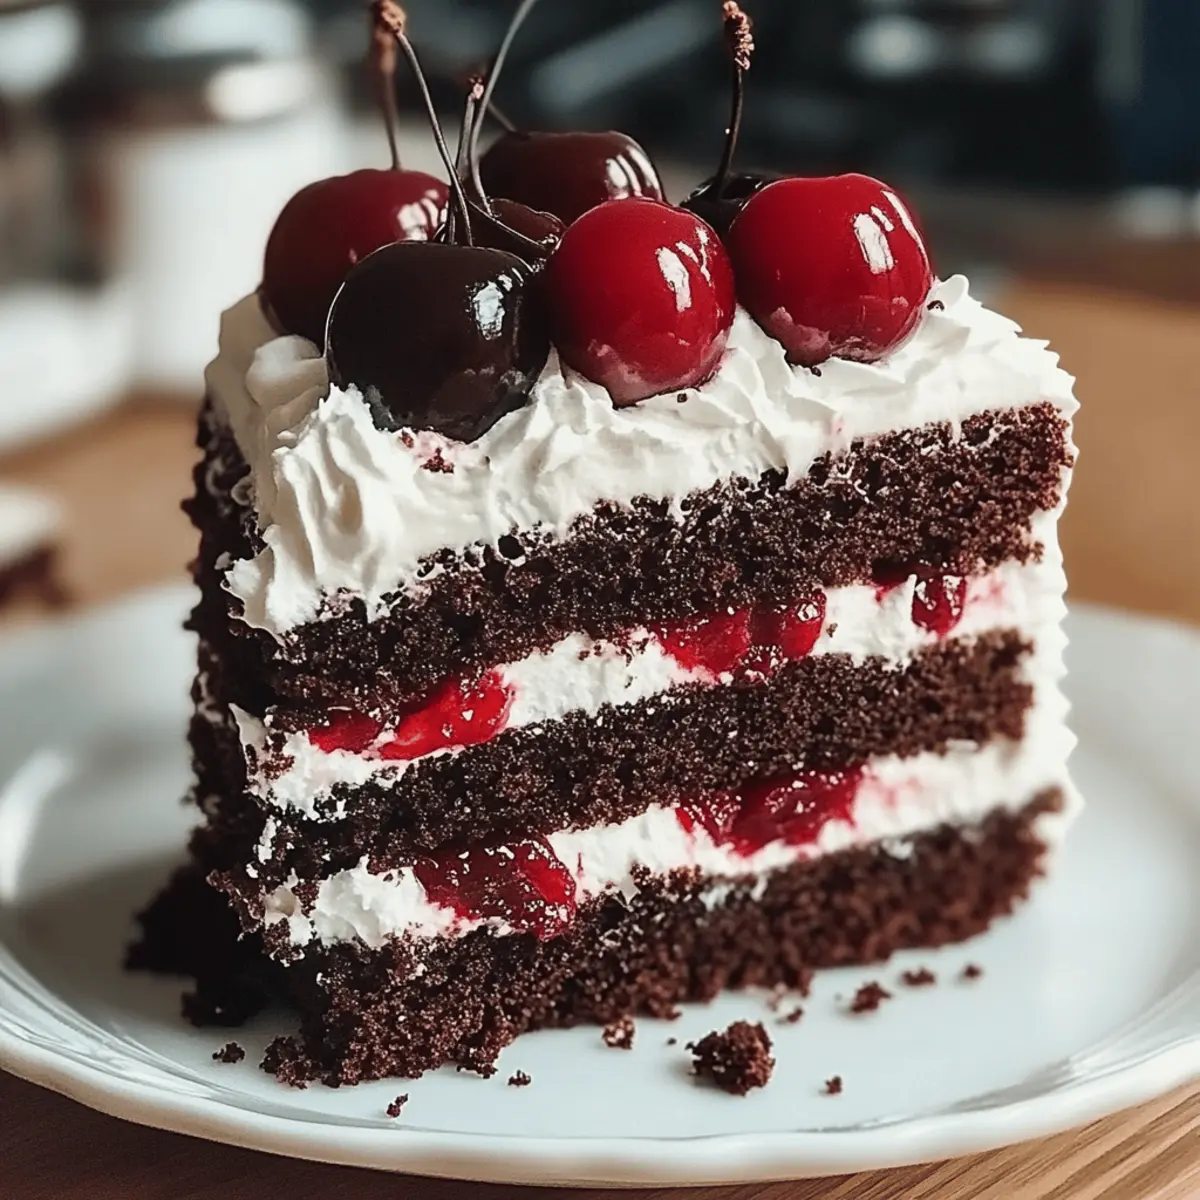
As I stood in my kitchen, a sweet aroma wafted through the air, instantly transporting me to a quaint German café. I was about to embark on making a Classic Black Forest Cake, and I couldn’t help but feel a thrill of excitement! This delightful dessert beautifully marries layers of rich chocolate cake with the tangy burst of Morello cherries and silky whipped cream. Not only is it a showstopper, but its relatively simple prep means you can impress your guests without spending all day in the kitchen. Plus, the combination of textures—think velvety cream on moist chocolate—will have everyone asking for seconds. Are you ready to whip up a slice of this indulgence that truly feels like a celebration?
What Makes This Cake So Irresistible?
Decadent layers of chocolate cake beautifully contrast with the tangy cherries and silky whipped cream, creating a flavor profile that’s utterly divine. Simplicity reigns in this recipe, requiring only basic skills and providing a stunning dessert that will wow your guests. Whether served at a celebration or just as a treat to brighten your day, this Classic Black Forest Cake is sure to steal the show. Pair it with a cup of coffee or a glass of dessert wine for the ultimate experience, just like with my Peach Cake Brown for a delightful end to any meal!
Classic Black Forest Cake Ingredients
For the Cake
- All-Purpose Flour – Provides structure to the cake; substitute with gluten-free flour for a gluten-free option.
- Granulated Sugar – Adds sweetness and moisture; use coconut sugar for a healthier alternative.
- Unsweetened Cocoa Powder – Deep chocolate flavor; opt for high-quality cocoa for better results.
- Baking Powder – Essential leavening agent for a light cake texture.
- Baking Soda – Supports fluffiness and helps the cake rise.
- Salt – Enhances the overall flavor profile.
- Large Eggs – Binds and adds moisture to the cake; no substitutes recommended.
- Whole Milk – Contributes moisture; can replace with almond milk for a dairy-free version.
- Vegetable Oil – Keeps the cake moist; can substitute with canola oil.
- Vanilla Extract – Enhances the flavor depth.
- Boiling Water – Creates a smoother batter; add gradually for best results.
For the Filling and Topping
- Morello Cherries – Their tartness perfectly complements the chocolate; drain and reserve syrup for added flavor.
- Heavy Whipping Cream – For a luscious whipped topping; chilling before whipping yields better peaks.
- Powdered Sugar – Sweetens the whipped cream to perfection.
- Chocolate Shavings – Optional for a decorative touch and extra chocolate flavor.
- More Cherries – Optional, for added visual appeal atop your Classic Black Forest Cake.
Indulge in the delightful combination of flavors and textures with these essential ingredients to create a memorable dessert experience!
Step‑by‑Step Instructions for Classic Black Forest Cake
Step 1: Preheat and Prepare
Begin by preheating your oven to 350°F (175°C). While it heats up, grease and flour two 9-inch round cake pans, ensuring they’re well coated to help the cakes release effortlessly once baked. This preparation sets the stage for your Classic Black Forest Cake, allowing for even baking and easy removal.
Step 2: Mix Dry Ingredients
In a large mixing bowl, combine 1¾ cups of all-purpose flour, 2 cups of granulated sugar, ¾ cup of unsweetened cocoa powder, 1½ teaspoons of baking powder, 1½ teaspoons of baking soda, and 1 teaspoon of salt. Whisk these dry ingredients together until they’re well blended, creating a uniform foundation for your cake batter that will deliver rich chocolate flavor.
Step 3: Combine Wet Ingredients
Add 2 large eggs, 1 cup of whole milk, ½ cup of vegetable oil, and 2 teaspoons of vanilla extract to the bowl with dry ingredients. Mix on medium speed for 2 minutes until the batter is smooth and glossy, ensuring all ingredients are fully incorporated. This step adds moisture and flavor to your Classic Black Forest Cake batter.
Step 4: Incorporate Boiling Water
Gradually stir in 1 cup of boiling water into the batter, mixing gently. The batter will be thin, but this is perfectly normal. This technique helps to create a velvety texture in your cake, enhancing the rich chocolate flavor that is characteristic of a Classic Black Forest Cake.
Step 5: Bake the Cakes
Divide the batter evenly between the prepared pans. Bake in the preheated oven for 30-35 minutes, or until a toothpick inserted into the center comes out clean. The cakes should spring back when lightly pressed; this indicates they’re perfectly baked and ready for the next step in creating your classic dessert.
Step 6: Cool and Remove
Once baked, remove the cakes from the oven and let them cool in the pans for 10 minutes. Afterward, carefully turn them out onto wire racks to cool completely. Ensuring they are fully cooled is crucial for layering and frosting your Classic Black Forest Cake without melting the whipped cream.
Step 7: Slice for Layers
If desired, once the cakes have completely cooled, use a serrated knife to slice each layer horizontally. This step allows for more filling and enhances the presentation of your Classic Black Forest Cake, giving it those delectable layers of cream and cherries.
Step 8: Whip the Cream
In a chilled mixing bowl, combine 2 cups of heavy whipping cream and ¼ cup of powdered sugar. Beat on high speed until soft peaks form, which should take about 3-5 minutes. The chilled bowl and beaters help achieve a fluffy texture, perfect for the decadent topping of your Classic Black Forest Cake.
Step 9: Assemble the Cake
On a cake stand or plate, place one layer of chocolate cake and spread a generous layer of whipped cream over it. Add a layer of drained Morello cherries, then repeat with the next layer. This step layers flavor and texture, making each bite of your Classic Black Forest Cake a delightful experience.
Step 10: Frost and Garnish
Top the final layer of cake with the remaining whipped cream, frosting the top and sides smoothly. Garnish your cake with chocolate shavings and additional cherries for a beautiful presentation. This final touch elevates your Classic Black Forest Cake, enticing everyone’s appetite and making it a showstopper dessert.
Make Ahead Options
These Classic Black Forest Cake layers are perfect for meal prep enthusiasts! You can bake the cake layers up to 3 days in advance, allowing them to cool completely before wrapping them tightly in plastic wrap and refrigerating. The whipped cream can also be prepped up to 24 hours ahead and stored in the refrigerator in an airtight container, ensuring it remains fluffy and fresh. When you’re ready to serve, simply layer the chilled whipped cream and Morello cherries between the cake layers, frost the top and sides, and garnish with chocolate shavings. This way, you can provide a stunning dessert with minimal effort, saving precious time on busy weeknights!
How to Store and Freeze Classic Black Forest Cake
Fridge: Store leftover slices in an airtight container or wrap them in plastic wrap to keep them fresh for up to 4 days while retaining the cake’s moisture.
Freezer: For longer storage, freeze individual slices wrapped tightly in plastic wrap and aluminum foil. This Classic Black Forest Cake can be kept for up to 1 month.
Reheating: When ready to enjoy, thaw overnight in the fridge or at room temperature for 1-2 hours. For a warm treat, place slices in the microwave for 10-15 seconds.
Serving Tip: Always serve chilled for the best flavor and texture experience, enhancing the delicious combination of chocolate and cherries!
Expert Tips for Classic Black Forest Cake
-
Chill Before Whipping: Ensure your mixing bowl and beaters are chilled before whipping cream. This helps achieve better peaks and a fluffier texture for your classic Black Forest Cake topping.
-
Egg Temperature Matters: Use eggs at room temperature for smoother incorporation into the batter, which can lead to a lighter cake texture.
-
Avoid Overmixing: Be cautious not to overmix the batter once the dry ingredients are combined with wet ones. Overmixing can lead to a dense cake.
-
Layering Tips: When slicing the cakes for layering, ensure they are completely cool to prevent the whipped cream from melting between layers.
-
Storage Solutions: Store leftover cake in airtight containers in the refrigerator for up to 4 days, or freeze for up to a month, keeping the dessert fresh for whenever you’re ready for a slice!
What to Serve with Classic Black Forest Cake?
As you prepare to enjoy your decadent dessert, consider these delightful pairings that will complement the layers of chocolate and cherries beautifully.
-
Rich Coffee: A cup of freshly brewed coffee contrasts the sweetness of the cake while enhancing the chocolate flavors. This combination is sure to energize your dessert experience.
-
Creamy Vanilla Ice Cream: The smooth, creamy texture of vanilla ice cream adds an irresistible chill to the warm chocolate layers, creating a tempting contrast that’s hard to resist.
-
Light Fruit Salad: A medley of fresh, seasonal fruits adds a refreshing brightness that cuts through the richness of the cake, elevating the overall flavor profile and keeping things light.
-
Sparkling Wine: A bubbly glass of sparkling wine pairs wonderfully with the tart cherries, enhancing the celebratory feel of your Classic Black Forest Cake. The fizz and sweetness harmonize perfectly.
-
Chocolate Shavings: For those who adore chocolate, sprinkling extra chocolate shavings on top enhances the indulgence. It’s a simple touch that brings a rich cocoa flavor and a beautiful finish.
-
Whipped Cream Topping: Extra whipped cream is always a good idea! It invites even more opulence and creaminess, making each bite a heavenly experience, especially when layered generously.
Classic Black Forest Cake Variations
Feel free to experiment with these delightful twists to make your Classic Black Forest Cake even more exciting!
-
Sweet Cherry Upgrade: Substitute Morello cherries with fresh or frozen sweet cherries for a sweeter flavor profile. This variation adds a delightful twist to the original tartness.
-
Dark Chocolate Delight: Opt for dark chocolate cocoa powder instead of regular to amplify the deep chocolate experience. The richness will elevate your cake to a whole new level of decadence.
-
Dairy-Free Delight: Replace whipped cream with coconut whipped cream for a creamy dairy-free alternative. This option maintains the luscious texture and beautifully complements the cake.
-
Rich Ganache Layer: Consider adding a layer of silky chocolate ganache between the layers for an indulgent touch. The silky richness will create an unforgettable eating experience.
-
Nutty Flavor: Incorporate finely chopped walnuts or almonds into the batter or as a topping for a pleasant crunch. This adds texture and makes every slice uniquely enjoyable.
-
Fruity Infusion: Swap in strawberry or raspberry puree in place of cherries for a different fruity flavor. This alternative gives a fresh take and can be a lovely twist for summer occasions.
-
Spice It Up: Add a hint of cinnamon or espresso powder to the batter to deepen the flavor profile. A little touch of spice can transform your dessert into something truly special.
-
Garnish Variation: Experiment with different garnishes, such as crushed cookies or grated dark chocolate, alongside your chocolate shavings. These variations not only enhance flavor but also create an appealing visual.
While you’re making this classic dessert, why not check out my Crispy Black Bean Quesadillas or enjoy a slice of Strawberry Crunch Cheesecake for a well-rounded sweet spread? The options are endless!
Classic Black Forest Cake Recipe FAQs
What kind of cherries should I use for the filling?
I recommend using Morello cherries as they offer a wonderful tartness that perfectly complements the chocolate. However, you can also use fresh or frozen sweet cherries if you prefer a sweeter taste in your Classic Black Forest Cake.
How should I store my leftover Black Forest Cake?
Store leftover slices in an airtight container in the refrigerator for up to 4 days. To maintain moisture and freshness, you can also wrap individual slices in plastic wrap. If you’re planning to enjoy it later, placing it in the freezer is a great option, where it can last for up to 1 month!
Can I freeze the Black Forest Cake?
Absolutely! To freeze your Classic Black Forest Cake, slice it and wrap each piece tightly in plastic wrap followed by aluminum foil. This prevents freezer burn and keeps your cake fresh for up to a month. When you’re ready, simply thaw the slices in the fridge overnight and serve chilled.
What should I do if the cake sinks in the middle?
Cake sinking can happen if it’s undercooked or if the batter was overmixed. To avoid this, always check your cakes at the minimum baking time suggested (30-35 minutes) using a toothpick. If it comes out clean or with just a few crumbs, you’re good to go! And remember to mix the batter gently to avoid this issue.
Are there any dietary substitutes I can make?
Yes, there are! You can substitute whole milk with almond milk for a dairy-free version, and coconut sugar can replace regular granulated sugar for a healthier option. If you need a gluten-free cake, use gluten-free flour in place of all-purpose flour. Enjoy experimenting to make this Classic Black Forest Cake fit your needs!
Can pets eat the cake or its ingredients?
It’s best to keep this cake away from pets. Ingredients like chocolate and cherries can be harmful to dogs and cats. Chocolate contains theobromine and caffeine, both of which are toxic to many animals, while cherries can cause gastrointestinal upset. Always check with your vet if you’re unsure!

Decadent Classic Black Forest Cake to Delight Your Senses
Ingredients
Equipment
Method
- Preheat your oven to 350°F (175°C). Grease and flour two 9-inch round cake pans.
- In a large mixing bowl, combine all-purpose flour, granulated sugar, unsweetened cocoa powder, baking powder, baking soda, and salt. Whisk until blended.
- Add eggs, whole milk, vegetable oil, and vanilla extract to the dry ingredients. Mix on medium speed for 2 minutes until smooth.
- Gradually stir in boiling water until well mixed. The batter will be thin.
- Divide the batter evenly between the prepared pans. Bake for 30-35 minutes until a toothpick comes out clean.
- Let the cakes cool in the pans for 10 minutes, then turn out onto wire racks to cool completely.
- If desired, slice each layer horizontally for more filling.
- In a chilled bowl, combine heavy whipping cream and powdered sugar. Beat on high speed until soft peaks form.
- On a cake stand, layer whipped cream and drained Morello cherries between the cake layers.
- Top with remaining whipped cream, garnish with chocolate shavings and additional cherries.
Leave a Reply