
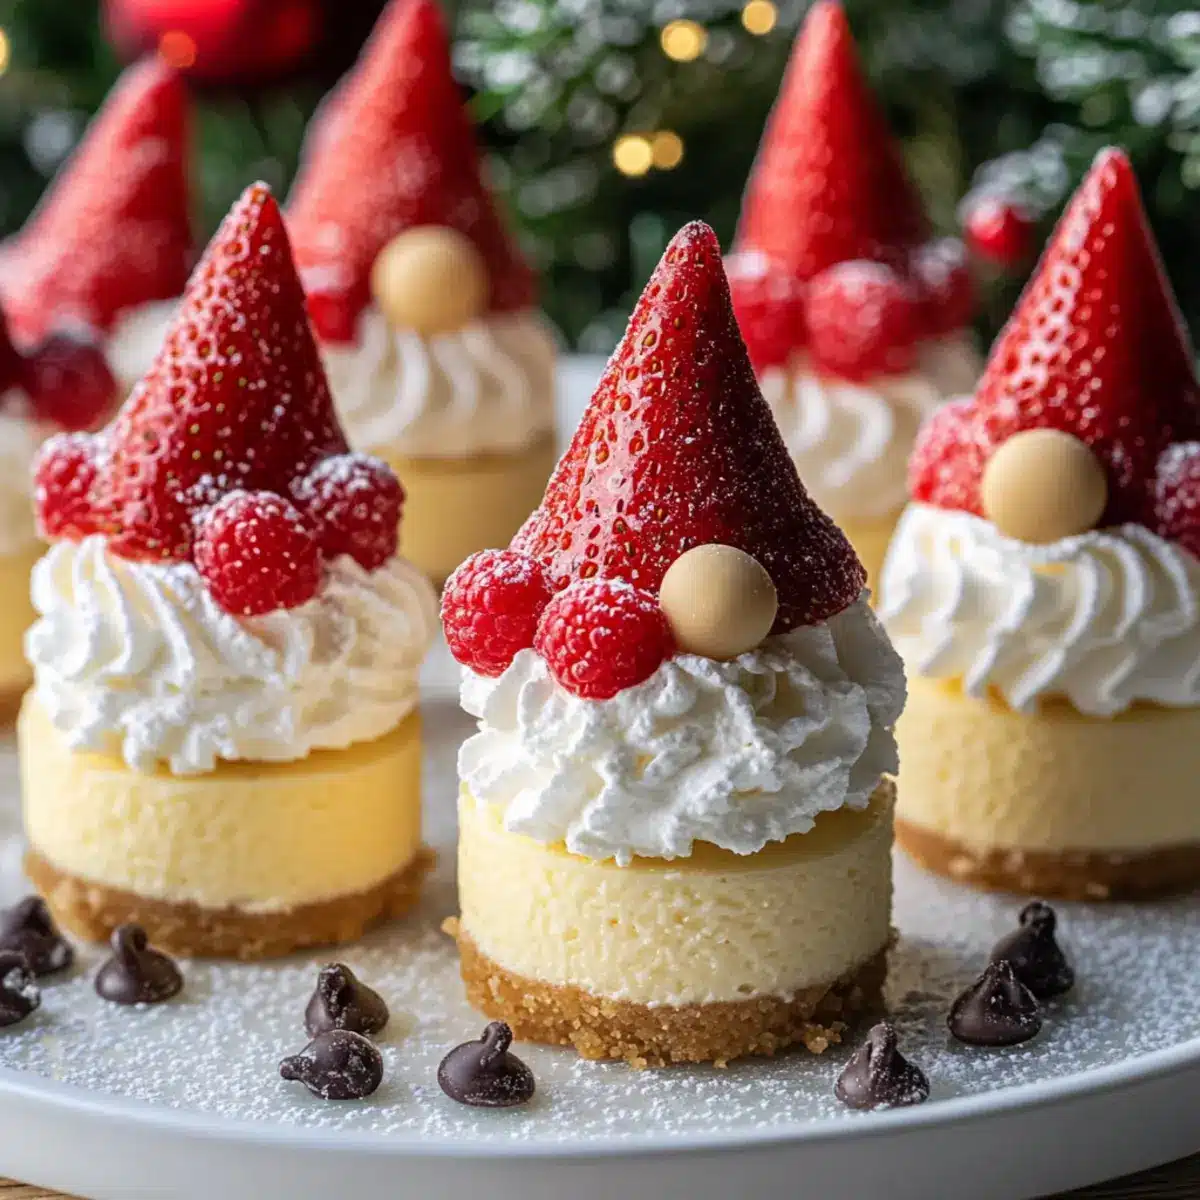
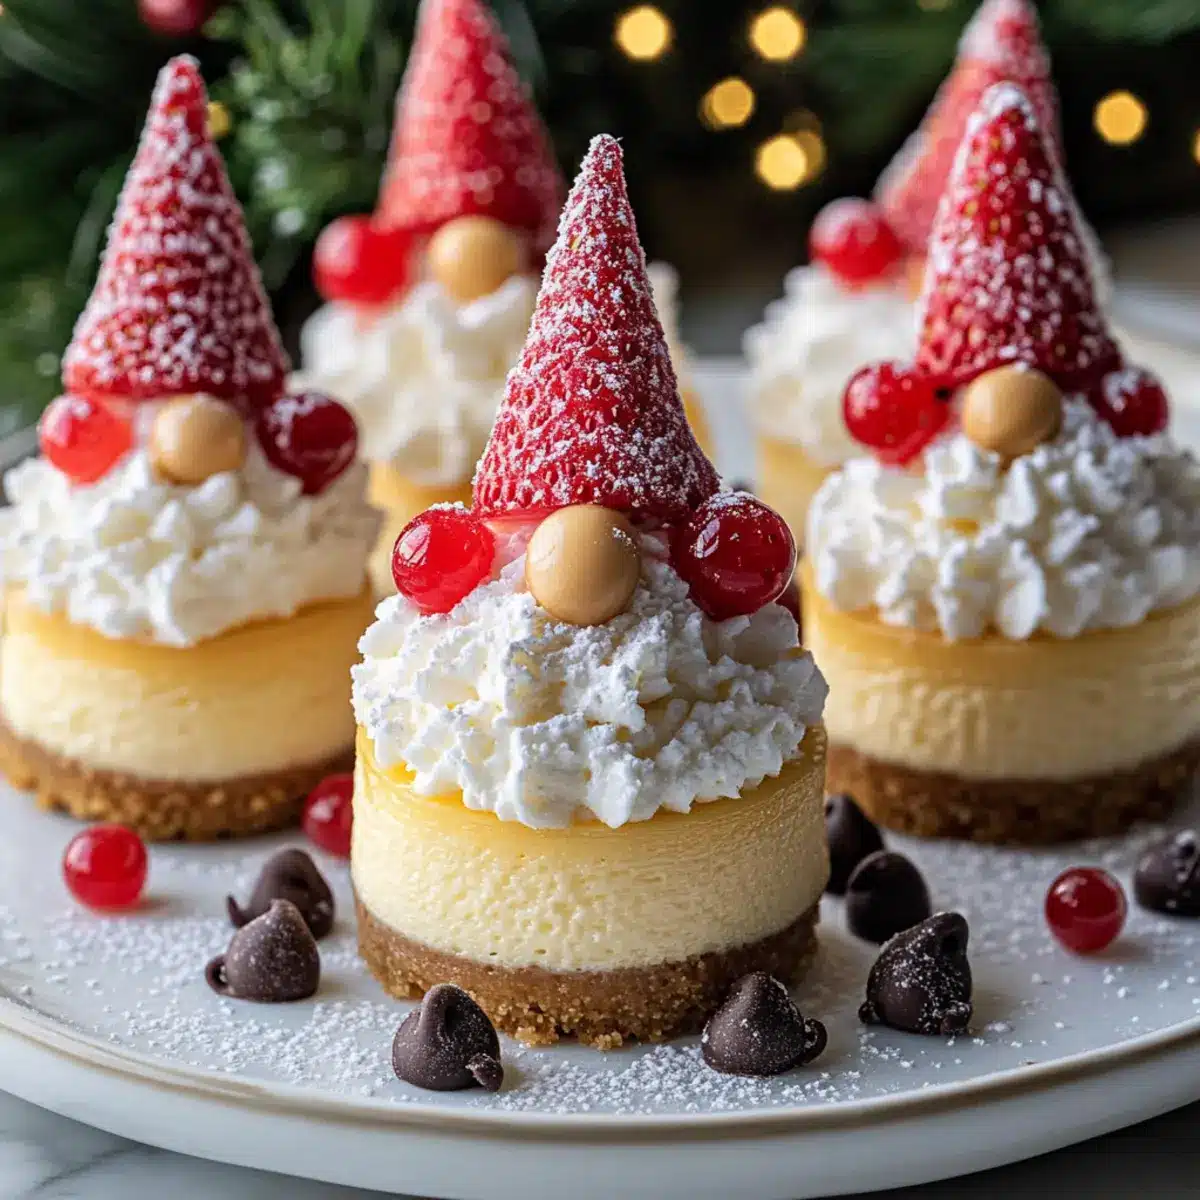
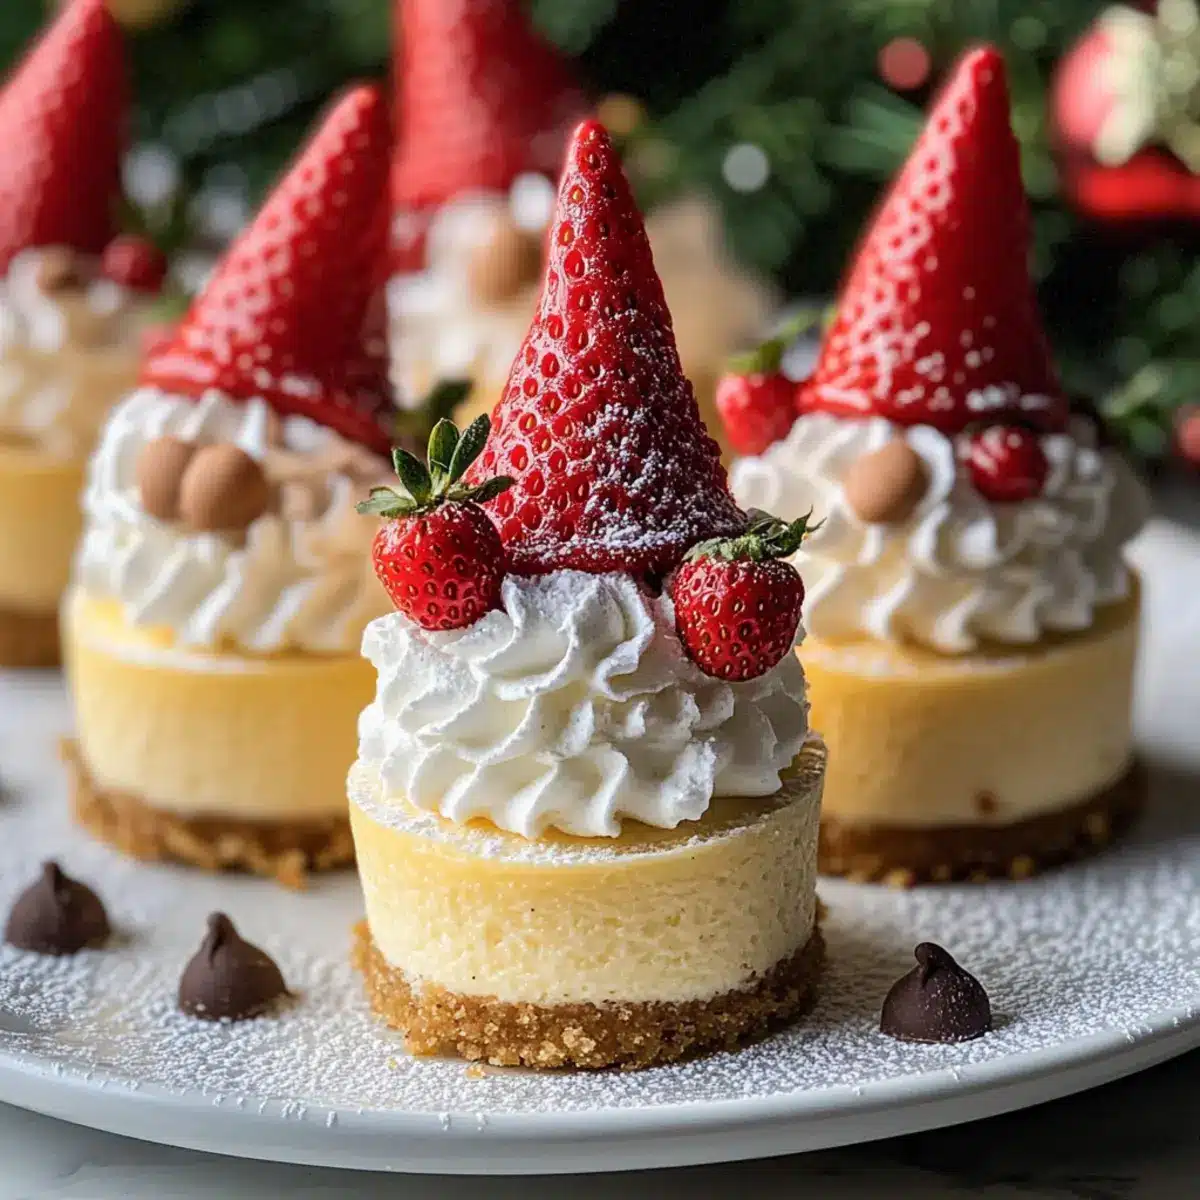
As I placed the final gnome hat atop my delicate Gnome Mini Cheesecakes, a wave of nostalgia washed over me. These delightful no-bake treats are not just a feast for the eyes; they’re a creamy, dreamy holiday dessert that dances on your palate. Whether you’re planning a festive gathering or just looking to elevate your family’s dessert game, these mini cheesecakes are the perfect solution. With a buttery graham cracker crust and the option to make them gluten-free, these whimsical desserts are both easy to whip up and sure to impress your guests. They bring a layer of charm to any celebration, turning your kitchen into a winter wonderland. Curious about how to create your own festive dessert masterpiece? Let’s dive in!
Why Choose Gnome Mini Cheesecakes?
**Whimsical **: These adorable cheesecakes not only taste amazing but also bring joy and fun to any holiday gathering. **Versatile **: Easily adjusted to cater to dietary needs with gluten-free options and simple substitutions, making them inclusive for everyone. Quick Prep: With a no-bake option, you can create these delightful desserts in no time, perfect for busy holiday schedules. Eye-Catching: Dressed up like gnomes, they are visually stunning and make for great conversation starters. Deliciously Rich: The creamy cheesecake filling combined with the buttery crust offers a satisfying texture that will leave guests asking for seconds. Elevate your dessert game and impress your crowd with these charming Gnome Mini Cheesecakes!
Gnome Mini Cheesecakes Ingredients
For the Crust
- Graham Cracker Crumbs – Provides the crust’s structure and a sweet base; substitute with gluten-free crackers if needed.
- Granulated Sugar – Enhances sweetness in the crust; coconut sugar can be used for a healthier twist.
- Unsalted Butter – Binds the crust ingredients together; use coconut oil for a dairy-free option.
For the Filling
- Cream Cheese – The main component that provides richness; low-fat cream cheese can lighten it up.
- Granulated Sugar (for filling) – Adds sweetness; same substitution notes as crust sugar apply here.
- Vanilla Extract – Imparts aromatic flavor; no substitutions needed, but vanilla bean paste can intensify the taste.
- Eggs – Provides structure and stability; for a no-bake version, consider whipped topping or gelatin.
- Sour Cream or Greek Yogurt – Adds tanginess and creaminess, with vegan yogurt being a suitable dairy-free alternative.
For the Decoration
- Strawberries – Perfect for decorating, resembling cute gnome hats; fresh blueberries offer a colorful alternative.
- Whipped Cream – Forms the whimsical gnome’s beard; fresh whip gives the best appearance.
- Mini Chocolate Chips/Candy Pearls – Serve as adorable nose decorations; small nuts can be used as a substitute.
Step‑by‑Step Instructions for Gnome Mini Cheesecakes
Step 1: Preheat and Prepare
Begin by preheating your oven to 325°F (160°C). While the oven warms, arrange cupcake liners in a muffin tin to make your Gnome Mini Cheesecakes ready for baking. This ensures that each mini cheesecake is perfectly formed and easy to serve later.
Step 2: Make the Crust Mixture
In a mixing bowl, combine graham cracker crumbs, granulated sugar, and melted unsalted butter. Stir the mixture until it resembles wet sand, ensuring all the crumbs are coated evenly. This will create a deliciously crunchy base that will support the creamy filling.
Step 3: Press the Crust
Spoon the crust mixture into each cupcake liner, pressing down firmly with the back of a spoon to form an even base. The crust should be compact and hold together well. Bake in your preheated oven for about 5 minutes, just until golden, then allow to cool slightly.
Step 4: Prepare the Cheesecake Filling
In a large mixing bowl, beat the cream cheese until smooth and creamy, using an electric mixer on medium speed. Gradually add the granulated sugar, vanilla extract, and eggs, mixing in one egg at a time to prevent overmixing and cracking. Finally, blend in the sour cream until the filling is fully combined.
Step 5: Fill the Liners
Divide the creamy cheesecake filling evenly among the cupcake liners, filling each about ¾ full. This will allow some room for the cheesecake to expand slightly while baking. Place the muffin tin back into the oven to bake for 18-20 minutes, until the edges are set and the centers have a slight jiggle.
Step 6: Cool in the Oven
Once baked, turn off the oven and let the mini cheesecakes cool inside for approximately 10 minutes. This gentle cooling helps prevent cracks and maintains their smooth surface. Afterward, transfer the tin to a wire rack to cool completely at room temperature for about 30 minutes.
Step 7: Chill the Cheesecakes
Once at room temperature, place the mini cheesecakes in the refrigerator to chill for at least 2 hours, or overnight if you prefer. Chilling is essential for the flavors to meld and results in a firmer texture, enhancing the overall delight of your Gnome Mini Cheesecakes.
Step 8: Decorate Your Gnomes
After chilling, it’s time to get creative! Pipe freshly whipped cream on top of each cheesecake to create adorable beards. Garnish with strawberries for the gnome hats and add mini chocolate chips or candy pearls for eyes. This whimsical decoration makes your Gnome Mini Cheesecakes truly festive and eye-catching.
Step 9: Present and Enjoy
Carefully transfer your decorated Gnome Mini Cheesecakes onto a serving platter. For a special final touch, dust with powdered sugar for a snowy effect. Now, your stunning holiday dessert is ready to impress your family and friends!
How to Store and Freeze Gnome Mini Cheesecakes
Room Temperature: Mini cheesecakes should not be stored at room temperature for longer than 2 hours to maintain their quality and safety.
Fridge: Store decorated Gnome Mini Cheesecakes in an airtight container for up to 4 days in the fridge. This helps keep them fresh and the flavors intact.
Freezer: For longer storage, freeze undecorated Gnome Mini Cheesecakes in an airtight container for up to 1 month. Thaw in the fridge overnight before decorating and serving.
Reheating: These treats are best served chilled, so there’s no need to reheat. Simply take them out of the fridge or freezer and enjoy their deliciousness straight away!
Gnome Mini Cheesecakes Variations & Substitutions
Feel free to get creative with your Gnome Mini Cheesecakes and make them uniquely yours with these fun and easy variations!
- Gluten-Free: Swap graham cracker crumbs with gluten-free graham crackers or almond flour for a tasty alternative.
- Dairy-Free: Use coconut cream and dairy-free yogurt for a vegan-friendly version that still tastes delicious.
- Seasonal Twist: Top with fresh raspberries or kiwi for vibrant “gnome hats” that add color and flavor.
- Flavored Cheesecake: Add a teaspoon of almond or peppermint extract for a festive flair beyond classic vanilla.
- Mini Versions: Make tiny cheesecakes in a silicone mold for a bite-sized treat that’s just as whimsical!
- Nutty Crunch: Incorporate crushed nuts into the crust for an extra layer of texture and flavor—walnuts or pecans work well.
- Chocolate Drizzle: Add melted dark chocolate on top of the whipped cream for a luxurious touch that chocolate lovers will adore.
- Unique Toppings: Experiment with different fruits or even edible flowers to create a stunning visual feast—your imagination is the limit!
No matter which variation you choose, these little delights are sure to bring smiles around your holiday table. For more holiday inspiration, check out our delightful Holiday Dessert Recipes or discover how to make No-Bake Treats that are just as fun!
Expert Tips for Gnome Mini Cheesecakes
- Prevent Cracking: Avoid overmixing after adding eggs, as this can lead to cracks in your cheesecake. Gentle mixing ensures a smooth texture.
- Chill Thoroughly: For the best flavor and texture, chill your Gnome Mini Cheesecakes for at least 2 hours. The longer they chill, the firmer they’ll become.
- Piping Perfection: Use a piping bag for whipped cream decoration to create neat, whimsical gnome beards. It enhances the visual appeal of your festive treats.
- Storage Wisdom: Store undecorated cheesecakes in the freezer for up to a month. Decorate them just before serving to maintain freshness and aesthetics.
- Flavor Variations: Try flavored extracts like almond or peppermint in the filling for unique twists. It’s a fun way to customize your Gnome Mini Cheesecakes!
What to Serve with Gnome Mini Cheesecakes
These charming, creamy desserts deserve delightful accompaniments that enhance their festive spirit and flavor.
- Festive Fruit Salad: A refreshing mix of seasonal fruits adds zesty brightness and a pop of color, balancing the richness of the cheesecakes. Try incorporating pomegranate seeds and citrus slices for a holiday twist.
- Chocolate Drizzle: A warm chocolate ganache drizzle brings an indulgent touch, harmonizing with the cheesecake’s flavors while adding a decadent finish to each bite.
- Spiced Hot Chocolate: Cozy and comforting, this warm beverage makes for a delightful pairing, with spices that complement the sweetness of the desserts. Think cinnamon, nutmeg, and a hint of vanilla.
- Gingerbread Cookies: The spicy, warm flavor of gingerbread cookies provides a nice contrast to the smooth cheesecake; they also emphasize the holiday theme beautifully. Serve them for guests to nibble alongside.
- Whipped Cream: A dollop of freshly whipped cream makes for a classic pairing, amplifying the luscious creaminess of the cheesecakes while adding a touch of elegance to each serving.
- Mini Peppermint Brownies: These fudgy, minty bites can give a delightful crunch and indulgent richness that complements the Gnome Mini Cheesecakes perfectly. The peppermint will add a festive zing!
Make Ahead Options
These Gnome Mini Cheesecakes are perfect for meal prep, allowing you to enjoy more time with loved ones during the holidays! You can prepare the graham cracker crust up to 3 days in advance, storing it in an airtight container at room temperature. The cheesecake filling can also be made ahead and kept refrigerated for up to 24 hours. To maintain the delightful creamy texture, chill the filled mini cheesecakes overnight before decoration. Just before serving, top with fresh whipped cream, strawberries, and mini chocolate chips for a festive touch. With these make-ahead options, you can enjoy delicious, celebrate-ready Gnome Mini Cheesecakes with minimal effort!
Gnome Mini Cheesecakes Recipe FAQs
How do I select ripe strawberries for decoration?
Absolutely! Look for firm, red strawberries without any dark spots or bruises. A ripe strawberry should be vibrant in color and slightly fragrant. If you’re looking for alternatives, fresh blueberries can add a delightful pop of color too!
What is the best way to store Gnome Mini Cheesecakes?
For optimal freshness, store your decorated Gnome Mini Cheesecakes in an airtight container in the refrigerator for up to 4 days. If you’re making them ahead of time, I recommend waiting to add decorations until just before serving. This ensures your whipped cream stays fluffy and the strawberries look fresh.
Can I freeze Gnome Mini Cheesecakes?
Yes, indeed! To freeze, make sure your mini cheesecakes are undecorated. Place them in an airtight container or wrap each cheesecake individually in plastic wrap, then seal in a freezer bag. They can last for up to 1 month in the freezer. When you’re ready to enjoy, simply thaw them in the refrigerator overnight and then add your decorative toppings.
What should I do if my cheesecake cracks during baking?
It’s common for cheesecakes to crack, but it can usually be avoided! Make sure to mix your batter gently, particularly after adding eggs. If cracks appear, a dollop of whipped cream on top can beautifully mask any imperfections, making for an even more delightful presentation.
Are there any dietary considerations for the Gnome Mini Cheesecakes?
Indeed! For a gluten-free option, substitute graham cracker crumbs with gluten-free cookies or gluten-free graham cracker crumbs. If you have dairy allergies, you can use coconut oil instead of butter, dairy-free cream cheese, and non-dairy yogurt or whipped topping. These small adjustments allow everyone to enjoy these whimsical cheesecakes!

Delightful Gnome Mini Cheesecakes for Your Holiday Table
Ingredients
Equipment
Method
- Preheat your oven to 325°F (160°C) and prepare muffin tin with cupcake liners.
- Combine graham cracker crumbs, granulated sugar, and melted unsalted butter in a mixing bowl. Stir until the mixture resembles wet sand.
- Press the crust mixture into each cupcake liner and bake in the preheated oven for about 5 minutes until golden. Allow to cool slightly.
- Beat cream cheese until smooth and creamy. Gradually add the granulated sugar, vanilla extract, and eggs, mixing in one egg at a time. Blend in sour cream until combined.
- Divide the filling evenly among the cupcake liners, filling each about ¾ full and bake for 18-20 minutes until edges are set.
- Turn off the oven, let cheesecakes cool inside for 10 minutes, then transfer to a wire rack to cool at room temperature for 30 minutes.
- Refrigerate the mini cheesecakes for at least 2 hours or overnight to chill.
- Decorate by piping whipped cream for beards, adding strawberries for gnome hats, and using mini chocolate chips or candy pearls for eyes.
- Transfer decorated cheesecakes onto a serving platter and dust with powdered sugar before serving.
Leave a Reply