
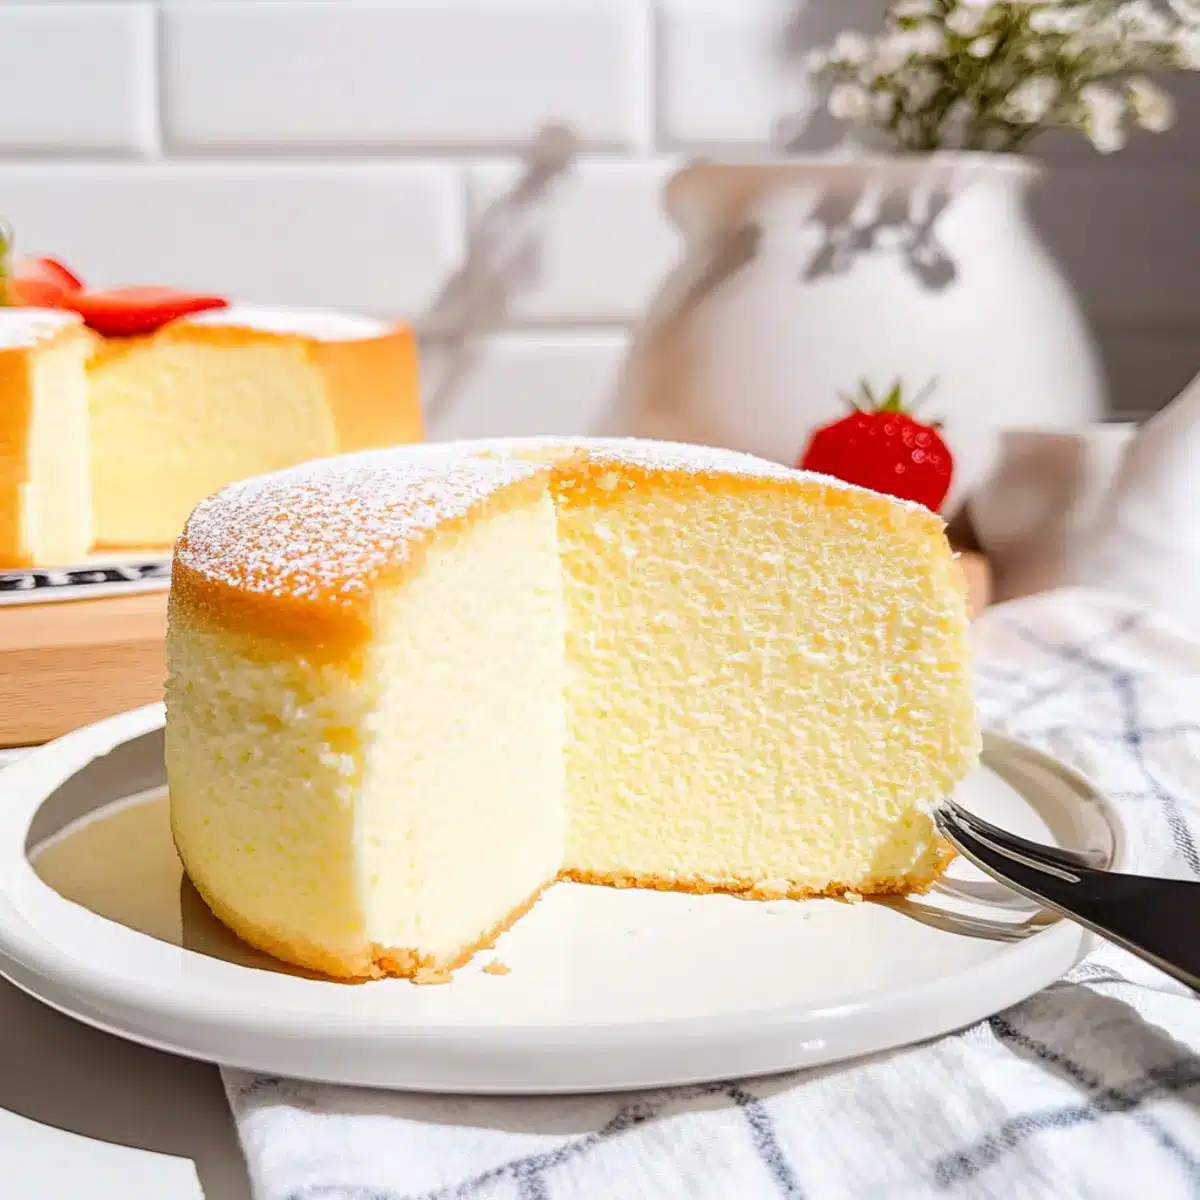
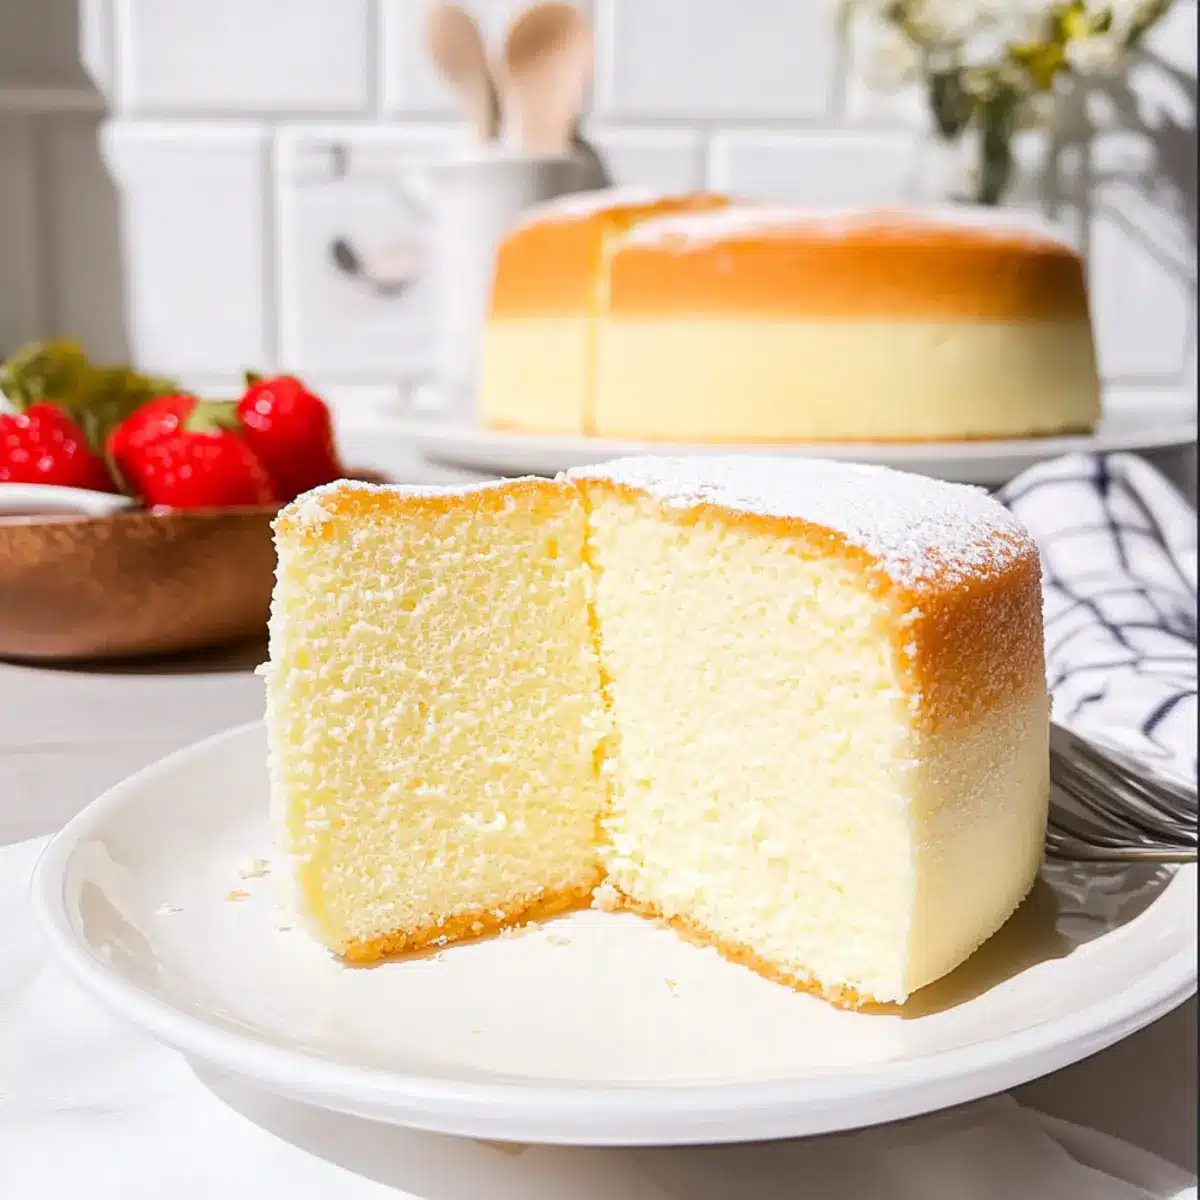
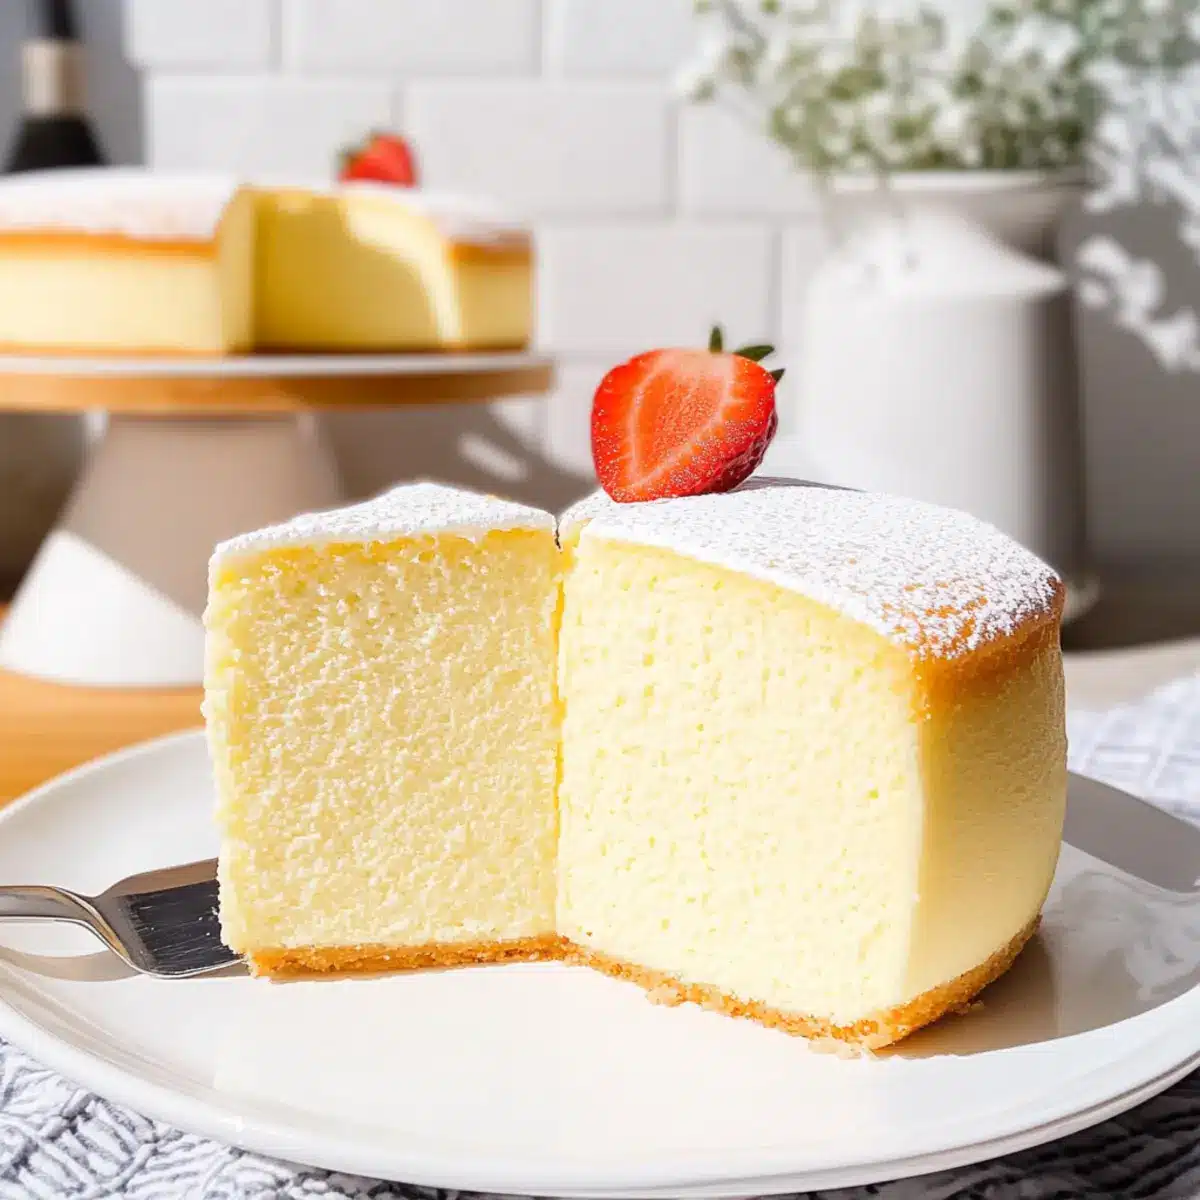
As I cracked open my cookbook, the pages fluttered to a recipe that promised whimsy and delight: Fluffy Japanese Cotton Cheesecake. This isn’t just any dessert; it’s a light, airy marvel that jigs gently on the plate, offering a unique twist to traditional cheesecake. Preparing this soufflé-style treat is a delightful experience that’s surprisingly straightforward and sure to impress your loved ones—no more settling for fast food dessert compromises! Whether you enjoy it simply dusted with powdered sugar or adorned with fresh berries and whipped cream, this recipe provides endless opportunities for customization. Ready to dive into the world of fluffy indulgence? Let’s uncover the secrets to creating this melt-in-your-mouth sensation that beautifully balances sweetness and tang!
Why is Japanese Cheesecake so beloved?
Irresistible texture: This cheesecake embodies lightness with its airy, soufflé-style fluffiness that melts in your mouth—truly a delight!
Endless versatility: Whether you prefer it plain, topped with whipped cream from a delightful dessert like Fried Strawberry Cheesecake, or glazed with apricot jam, customization is at your fingertips!
Quick and easy: You’ll find this recipe is surprisingly approachable, making it a fun project to whip up without spending hours in the kitchen.
Crowd-pleaser: Perfect for gatherings, this cheesecake impresses everyone with its elegant look and fantastic taste, leaving your guests begging for seconds!
Guilt-free indulgence: With lighter ingredients, each slice provides a satisfying solution to sweet cravings without overindulging. Dive into this fluffy Japanese cheesecake, and make your dessert dreams come true!
Japanese Cheesecake Ingredients
• Here’s everything you need to create the lightest and fluffiest Japanese Cheesecake!
For the Batter
- Eggs – Ensure you use large eggs; separating yolks and whites is crucial for that airy texture.
- Cream Cheese – Make sure it’s softened for easy mixing, as it’s the cornerstone of your cheesecake’s creaminess.
- Heavy Cream – Adds rich moisture; full-fat milk can be a good substitute if needed.
- Unsalted Butter – Cut into smaller pieces for quicker melting, contributing to the overall richness.
- Cake Flour – Essential for lightness; substitute with all-purpose flour and cornstarch for a gluten-free option.
- Lemon Zest – Brightens the flavor profile; definitely recommended for a zingy twist!
- Vanilla Extract – Offers a touch of aromatic sweetness that enhances the taste.
- Granulated Sugar – Sweetens the cheesecake and helps stabilize the meringue for that perfect rise.
- Lemon Juice – Fresh juice aids in flavor enhancement and stabilizing whipped egg whites; it’s a must!
For Optional Toppings
- Powdered Sugar – A simple yet elegant dusting for an aesthetic finish.
- Apricot Jam – Adds a glossy glaze; it’s delicious and visually appealing on top!
- Berries – Fresh berries are perfect for tartness and added flavor, enhancing the dessert experience.
- Sweetened Whipped Cream – A dollop can elevate your cheesecake to another level of indulgence!
Prepare these ingredients, and you’re one step closer to mastering the famous Japanese Cheesecake—let those baking adventures begin!
Step‑by‑Step Instructions for Fluffy Japanese Cotton Cheesecake
Step 1: Preheat and Prepare
Begin by preheating your oven to 300°F (150°C). While the oven warms, prepare an 8-inch round cake pan by lining its bottom with parchment paper. Get a larger baking dish ready to serve as a water bath, ensuring it will fit your cheesecake pan comfortably, which allows even cooking and prevents drying.
Step 2: Make the Cream Cheese Base
In a heatproof bowl set over a pot of simmering water, combine 8 oz of softened cream cheese, 1/4 cup of unsalted butter, and 1/4 cup of heavy cream. Whisk the mixture until it becomes smooth and creamy, which should take about 5 minutes. Once incorporated, remove it from heat and stir in 3 egg yolks, sifting in 1/2 cup of cake flour, then adding 1 tsp of lemon zest and 1 tsp of vanilla extract. Mix until well combined.
Step 3: Prepare the Meringue
In a clean mixing bowl, add the 5 egg whites and 1 tbsp of lemon juice. Using an electric mixer, whip the egg whites on medium speed until frothy, about 2 minutes. Gradually add 1/4 cup of granulated sugar while continuing to whisk until medium-soft peaks form. This step is crucial for achieving the airy texture of the Japanese Cheesecake.
Step 4: Fold Meringue into Batter
Gently fold the meringue into the cream cheese base in three separate additions. Use a rubber spatula, carefully incorporating the meringue to maintain the light texture without deflating it. This technique is vital for keeping the fluffiness of the batter, ensuring your fluffy Japanese cotton cheesecake rises beautifully.
Step 5: Bake the Cheesecake
Pour the batter into the prepared 8-inch pan and smooth the top with a spatula. Tap the pan lightly on the counter to eliminate any air bubbles. Place your cheesecake pan inside the larger baking dish you prepared earlier, then fill the outer dish with hot water until it reaches halfway up the sides of the cheesecake pan. Bake in the preheated oven for 80 to 90 minutes until golden brown, and a skewer inserted in the center comes out clean.
Step 6: Cool and Serve
Once baked, remove the cheesecake from the oven and allow it to cool in the pan on a wire rack for about 10 minutes. Carefully turn the cheesecake onto a plate so that it can cool completely upside down, which helps to maintain its shape. Chill in the refrigerator for at least an hour before serving, and enjoy this delightful fluffy Japanese cheesecake plain or topped with your favorite garnishes!
Storage Tips for Japanese Cheesecake
Room Temperature: Japanese cheesecake can sit out for up to 2 hours before it needs refrigerating to maintain its fluffy texture and prevent spoilage.
Fridge: Store leftover cheesecake in an airtight container in the fridge for up to 4 days. This helps retain its lightness while keeping it deliciously fresh.
Freezer: To freeze, wrap individual slices tightly in plastic wrap, then place them in a freezer-safe bag. Your Japanese cheesecake can be frozen for up to 2 months.
Thawing: When ready to enjoy, thaw the cheesecake overnight in the refrigerator or at room temperature for 1-2 hours before serving for the best texture and flavor.
Make Ahead Options
These Fluffy Japanese Cotton Cheesecakes are perfect for meal prep enthusiasts! You can prepare the batter and refrigerate it up to 24 hours in advance, ensuring that the ingredients stay fresh and flavorful. To do this, follow the steps up to where you fold in the meringue, then cover the bowl tightly with plastic wrap and refrigerate. When ready to bake, allow it to sit at room temperature for about 15 minutes before pouring the batter into the pan and baking. This method helps maintain the cake’s airy texture while saving you time on busy days. Enjoy your effortless yet impressive dessert, just as delightful when fresh from the oven!
Expert Tips for Japanese Cheesecake
-
Bain-Marie Baking: Using a water bath is essential for gentle baking, which helps your Japanese cheesecake maintain moisture and prevents cracks.
-
Oven Monitoring: Keep a close eye on your oven’s temperature. Adjust it if the top isn’t achieving that beautiful golden color; even a bit of overbaking can affect texture.
-
Foil Wrapping: Tightly wrap the bottom of your springform pan with foil. This prevents water from leaking in and ensures a perfect bake without sogginess.
-
Gentle Folding: When combining the meringue with the cream cheese mixture, fold gently to retain the airiness. This crucial step keeps your cheesecake light and fluffy.
-
Cooling Time: Allow the Japanese cheesecake to cool upside down. This helps it retain its shape and prevents shrinkage as it cools, leading to a perfect presentation.
-
Taste Test: Don’t hesitate to add more lemon zest or vanilla for extra flavor. These simple enhancements can take your cheesecake from delicious to unforgettable!
What to Serve with Fluffy Japanese Cotton Cheesecake
Creating a delightful dining experience is all about the perfect pairings, and this light dessert will shine even brighter with the right companions.
-
Fresh Berries: The tartness of strawberries, blueberries, or raspberries brightens up the sweetness of the cheesecake, adding a refreshing contrast.
-
Sweetened Whipped Cream: A fluffy dollop not only adds creaminess but also enhances the overall indulgent experience while balancing the cheesecake’s texture.
-
Matcha Green Tea: This earthy drink complements the cheesecake’s delicate flavors with a unique twist, making it a perfect pairing for afternoon tea.
-
Lemon Sorbet: The chilled, zesty sorbet cleanses the palate beautifully between bites, making each taste of the cheesecake feel fresh and exciting.
-
Mint Tea: A warm cup of mint tea offers a soothing and aromatic finish, enhancing the bright lemon notes in the cheesecake for a wonderful after-dinner treat.
-
Chocolate Drizzle: A light drizzle of melted chocolate gives a rich note that contrasts beautifully with the cheesecake’s light fluffiness, inviting a delightful indulgence.
Each pairing brings a new layer of joy to your dessert experience, ensuring that your fluffy Japanese cheesecake is adored by all!
Japanese Cheesecake Variations & Substitutions
Feel free to let your creativity shine as you customize this delightful cheesecake to match your taste preferences!
-
Gluten-Free: Substitute cake flour with a gluten-free blend or a mix of all-purpose flour and cornstarch for a light texture.
-
Flavor Infusion: Add matcha powder or vanilla bean seeds to the batter for a unique twist on traditional flavors. You’ll be amazed at how these subtle changes can elevate the overall experience.
-
Citrus Twist: Swap out the lemon zest for orange or lime zest for a refreshing citrus kick. This will brighten the taste while maintaining that pleasant tartness.
-
Fruit Puree: Incorporate pureed strawberries or mango into the batter for a fruity flavor. It not only adds sweetness but also creates a beautiful color. Just imagine a sun-soaked slice topped with fresh berries to complement your cheesecake!
-
Chocolate Delight: Fold in melted dark chocolate to create a rich, decadent version. This option is perfect for chocolate lovers; it beautifully balances the fluffiness with a rich cocoa flavor.
-
Nutty Crunch: Top with toasted almonds or hazelnuts for a delightful crunchy contrast to the soft cheesecake texture. Adding a sprinkle of nuts can transform each bite into a new adventure.
-
Creamy Layers: Layer your cheesecake with a mix of sweetened ricotta or mascarpone to enhance richness and flavor depth. It’s a great way to upscale your dessert while keeping it equally fluffy.
Don’t forget to pair your Japanese Cheesecake with fabulous sides like sweetened whipped cream or a drizzle of apricot jam, and if you need more inspiration, check out my Cheesecake Stuffed Baked Apples for an exciting twist!
Japanese Cheesecake Recipe FAQs
What type of eggs should I use?
Absolutely! For the best results with your Japanese Cheesecake, it’s important to use large eggs. The egg whites should be separated from the yolks as this step is crucial for achieving that airy, soufflé-like texture that makes this dessert so special. Fresh eggs will whip up better and hold more air for a fluffier result.
How should I store leftover cheesecake?
You can store leftover Japanese Cheesecake in an airtight container in the refrigerator for up to 4 days. This helps keep that delightful fluffy texture intact, ensuring each slice remains soft and airy. Just remember to allow it to come to room temperature for about 30 minutes before serving for the best flavor and consistency!
Can I freeze Japanese Cheesecake?
Absolutely, you can freeze this delightful treat! To do so, wrap individual slices tightly in plastic wrap and then place them in a freezer-safe bag. Your Japanese Cheesecake can be frozen for up to 2 months. When you’re ready to indulge again, simply thaw it overnight in the fridge or let it sit at room temperature for 1-2 hours. This way, you’ll maintain that melt-in-your-mouth texture!
What should I do if my cheesecake cracks during baking?
If your Japanese Cheesecake cracks, don’t panic! This can happen if the temperature is too high or if it’s not baked evenly. To prevent this, make sure to always use a water bath. This gentle baking method keeps the temperature consistent, preventing the surface from drying out and cracking. If it happens, you can disguise cracks with toppings like whipped cream or fresh berries!
Can I make a gluten-free version of this cheesecake?
Very much so! To make your Japanese Cheesecake gluten-free, simply substitute the cake flour with a blend of all-purpose gluten-free flour and cornstarch in equal parts. This will help maintain that light, fluffy structure you adore, while accommodating dietary needs. It’s just as delicious and satisfying!
Is this cheesecake safe for pets?
While the ingredients in Japanese Cheesecake, like cream cheese and eggs, are usually safe in tiny amounts, it’s best to keep desserts like this away from pets. The sugar and dairy can upset their stomachs, so it’s always a good idea to stick to treats specifically made for our furry friends!

Light and Fluffy Japanese Cheesecake for Your Sweet Cravings
Ingredients
Equipment
Method
- Preheat your oven to 300°F (150°C) and prepare an 8-inch round cake pan with parchment paper.
- In a heatproof bowl over simmering water, combine cream cheese, butter, and heavy cream, whisk until smooth.
- Once combined, remove from heat and stir in egg yolks, cake flour, lemon zest, and vanilla extract.
- In a separate bowl, whip egg whites and lemon juice until frothy, then gradually add sugar until medium-soft peaks form.
- Gently fold the meringue into the cream cheese mixture in three additions, being careful not to deflate.
- Pour the batter into the pan, tap to remove air bubbles, and place in a larger baking dish with water.
- Bake for 80 to 90 minutes until golden and a skewer comes out clean.
- Cool in the pan for 10 minutes, then turn upside down to cool completely.
- Chill in the refrigerator for at least an hour before serving.
Leave a Reply