
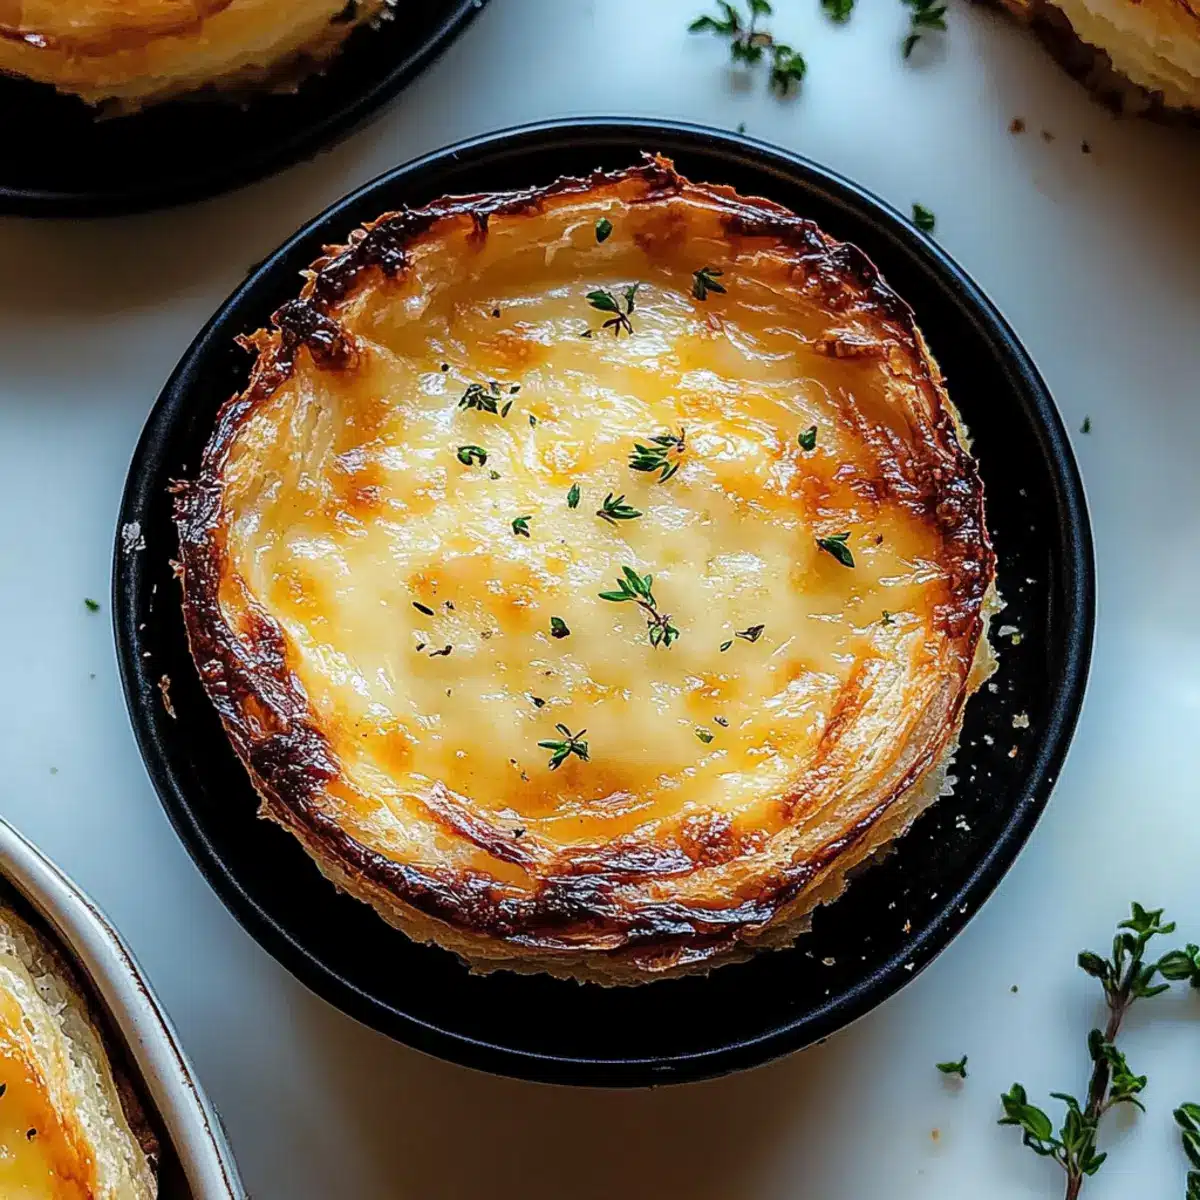
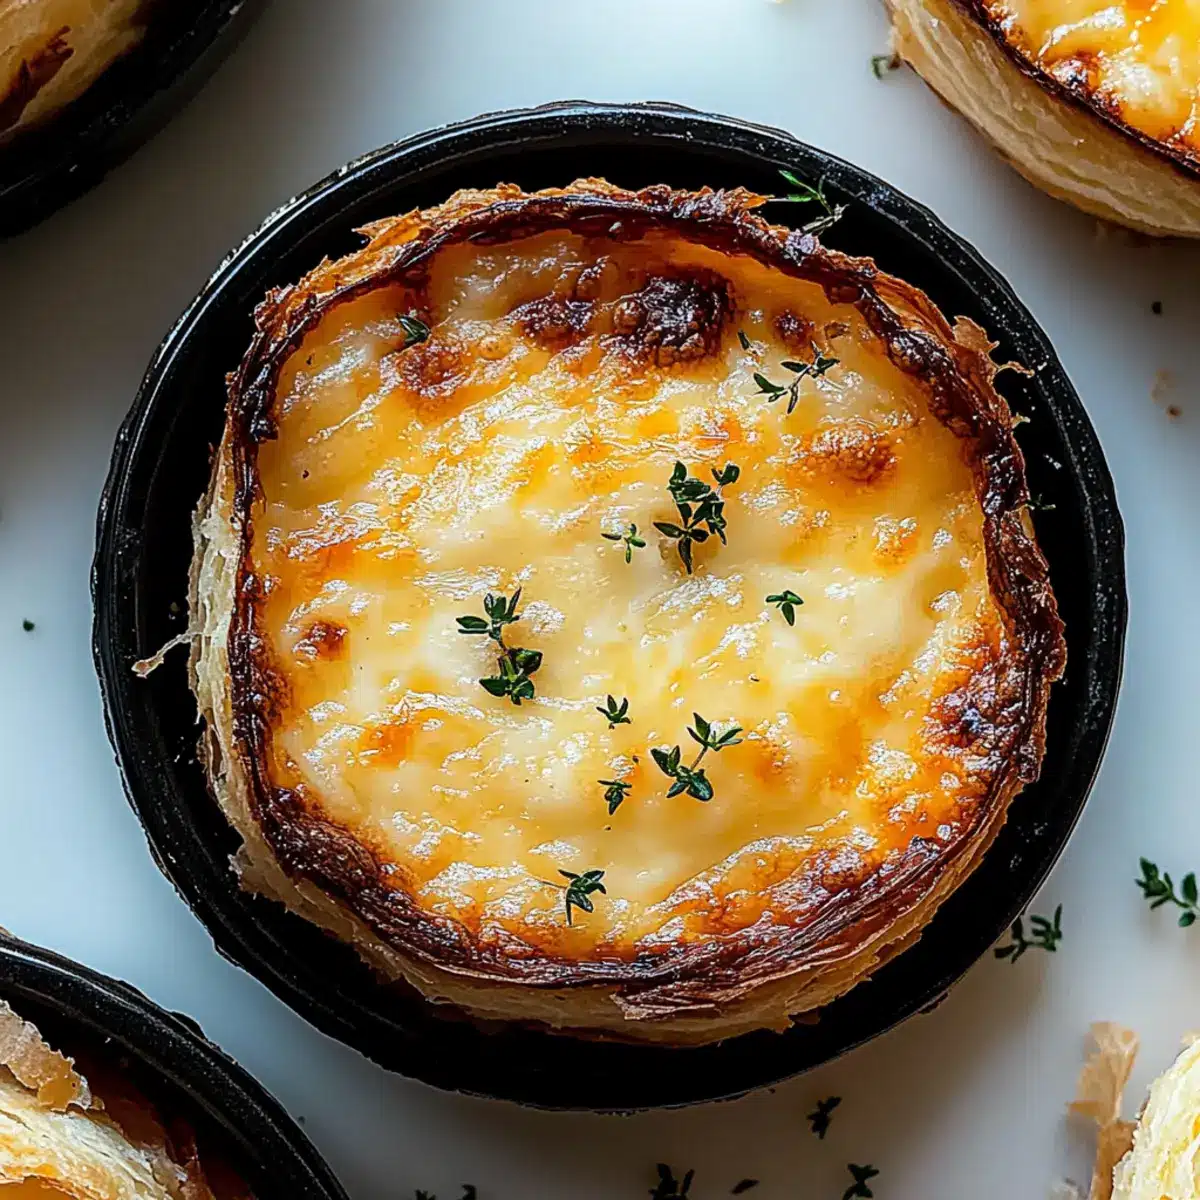
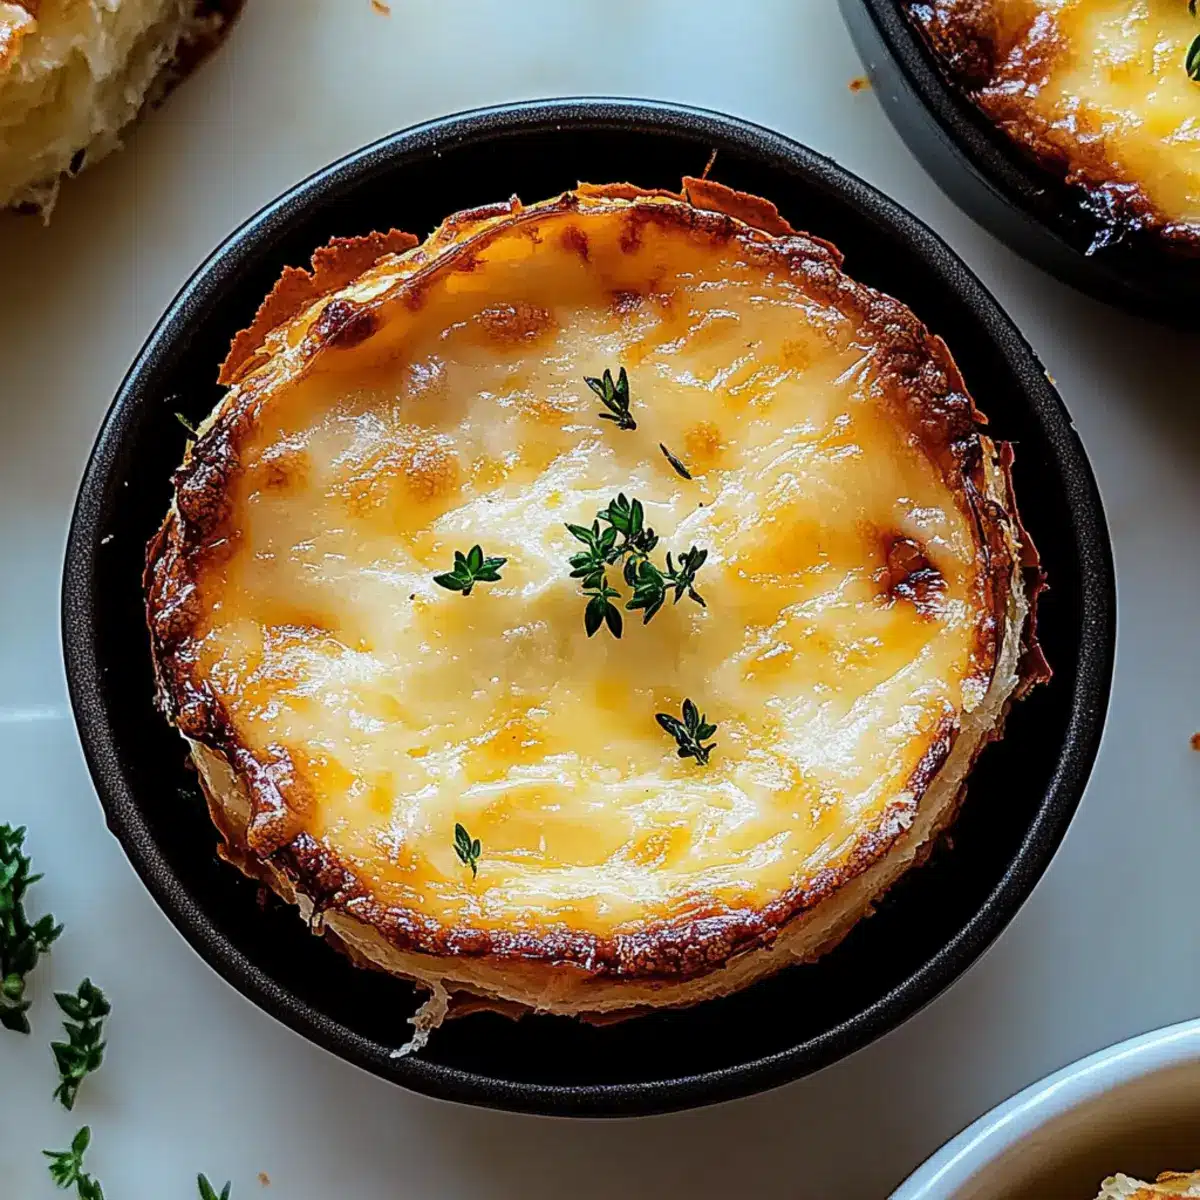
In the midst of a whirlwind day, I stumbled across a delightful mix of flavors that turned my kitchen into a warm haven—enter the Cheesy Garlic Cruffin! This flaky, savory treat is the perfect antidote to fast food fatigue. With gooey cheese nestled within layers of tender dough and an aromatic garlic essence that fills the air, these cruffins elevate any meal into a cozy feast. Not only are they surprisingly easy to prepare, but they also make for an impressive snack to share with friends or family during lazy weekends. If you have a flair for homemade comfort, let’s dive into the delightful world of these cheesy garlic wonders. What will your first batch unleash—an aroma that draws everyone in?
Why You’ll Crave This Cruffin Recipe?
Irresistible Taste: The combination of gooey cheese and aromatic garlic creates an explosion of flavor that will keep you coming back for more.
Flaky Perfection: Each bite offers the delightful crunch of crispy edges concealing a soft center, delivering a texture that’s simply addictive.
Quick Prep Time: With straightforward steps, this recipe fits perfectly into your busy schedule—perfect for a delightful snack anytime!
Crowd-Pleasing Delight: Perfect for gatherings, these cruffins are a hit with both family and friends, rivaling any fast food option. Pair them with a creamy soup or salad for a cozy meal.
Versatile Variations: Customize your cruffins by trying different cheeses or adding vegetables like spinach for extra flavor and nutrition. You’ll suddenly find yourself a cruffin enthusiast!
Cheesy Garlic Cruffin Ingredients
For the Dough
• All-Purpose Flour – This forms the structure for your cruffin; for a gluten-free version, substitute with gluten-free flour.
• Granulated Sugar – Provides a hint of sweetness to balance the savory flavors.
• Salt – Essential for enhancing the overall taste of your cruffins.
• Instant Yeast – Ensures a light texture; you can also use active dry yeast by activating it in warm milk first.
• Warm Milk – Needed to hydrate ingredients and activate the yeast; feel free to use plant-based milk for a dairy-free option.
• Unsalted Butter (melted) – Adds richness and flavor to the dough; coconut oil is a great dairy-free substitution.
• Warm Water – Helps to mix and hydrate the dough.
• Large Egg – Acts as a binder and contributes to the leavening process.
For the Filling
• Grated Parmesan Cheese – Imparts a nutty, savory flavor; you can substitute with aged cheddar if desired.
• Shredded Mozzarella Cheese – This creates that gooey, melty texture you crave; consider cheddar or provolone for a fun twist.
• Minced Garlic – Infuses your cruffins with wonderful garlicky goodness; adjust the quantity according to your taste preferences.
• Unsalted Butter (softened) – Enhances the richness of your filling, making each cruffin a flavor bomb.
• Chopped Fresh Parsley – Adds a bright, fresh element; feel free to omit if you’re looking for simpler flavors.
Explore the magic of these Cheesy Garlic Cruffins and watch your loved ones get excited over this delightful, savory treat!
Step‑by‑Step Instructions for Cheesy Garlic Cruffin
Step 1: Mix the Dry Ingredients
In a large mixing bowl, combine 4 cups of all-purpose flour, 2 tablespoons of granulated sugar, 1 teaspoon of salt, and 2 teaspoons of instant yeast. Use a whisk to ensure even distribution and aeration. This mixture forms the base for your Cheesy Garlic Cruffin, providing structure and enhancing the flavors once baked.
Step 2: Combine the Wet Ingredients
Create a well in the center of your dry mixture and add 1 and ¼ cups of warm milk, ½ cup of melted unsalted butter, and ⅓ cup of warm water. Mix the ingredients together with a wooden spoon or spatula until a shaggy dough forms. The warmth of the liquids will activate the yeast and help the dough rise beautifully.
Step 3: Knead the Dough
Add a large egg to the dough and mix until fully incorporated. Transfer the dough to a lightly floured surface and knead for 8 to 10 minutes until the dough becomes smooth and elastic. You’ll know it’s ready when it springs back to touch lightly. This kneading step is crucial for creating that desirable texture in your Cheesy Garlic Cruffin.
Step 4: Allow the Dough to Rise
Place the kneaded dough in a greased bowl, covering it with a kitchen towel or plastic wrap to maintain warmth. Let it rise for about 1 hour, or until it has doubled in size. You should see the dough puffing up, indicating that the yeast is working its magic to elevate your cruffins.
Step 5: Prepare the Filling
While the dough rises, mix together 4 tablespoons of softened butter, 3 cloves of minced garlic, and ¼ cup of chopped fresh parsley in a small bowl. This savory filling will infuse each layer of your Cheesy Garlic Cruffin with aromatic flavor. Set aside while your dough continues to rise.
Step 6: Preheat the Oven and Prepare the Baking Tin
Preheat your oven to 375°F (190°C). Meanwhile, grease a muffin tin with cooking spray or butter to ensure your cruffins release easily after baking. This step is essential for achieving that perfectly crispy edge once baked and ensures an effortless removal.
Step 7: Shape the Dough
Once the dough has risen, turn it out onto a floured surface and roll it into a large rectangle, about ¼ inch thick. Use a rolling pin for even flattening. Spread your prepared garlic butter mixture evenly over the surface, creating a delicious layer that will melt into the cruffins as they bake.
Step 8: Add Cheese Toppings
Sprinkle ½ cup of grated Parmesan cheese and 1 cup of shredded mozzarella cheese evenly over the garlic butter layer. The combination of these cheeses will provide that irresistible gooey texture and savory taste, integral to your Cheesy Garlic Cruffin experience.
Step 9: Roll and Slice the Dough
Starting from one long edge, tightly roll the rectangle into a log. Once rolled, cut the log into 8-10 equal portions using a sharp knife or dental floss for clean cuts. Place each roll vertically into the greased muffin tin, cut-side up, creating the signature towering shape of your cruffins.
Step 10: Let the Cruffins Rest
Cover the muffin tin with a kitchen towel and allow the sliced cruffins to rest for about 20 minutes. This slight rise will help them become light and airy in texture. Meanwhile, the oven continues to preheat, getting ready for these cheesy delights to bake to perfection.
Step 11: Bake the Cruffins
Carefully place the muffin tin in the preheated oven and bake for 20-25 minutes. Keep an eye on them; they should turn golden brown and emit a delicious aroma that fills your kitchen. The baked Cheesy Garlic Cruffin will have crispy edges with soft centers, ready to impress.
Step 12: Cool and Serve
Once baked, remove the cruffins from the oven and let them cool in the pan for 5 minutes. Gently remove them and place them on a wire rack to cool slightly. Offer a sprinkle of additional parsley on top for a fresh touch. Your homemade Cheesy Garlic Cruffins are now ready to be savored!

Tips for the Best Cheesy Garlic Cruffin
- Fresh Yeast Matters: Ensure your yeast is fresh and properly activated to guarantee the dough rises beautifully and results in a light cruffin.
- Monitor Dough Temperature: Let the dough rise in a warm area to promote optimal fermentation, so it can achieve that airy texture you desire.
- Watch Your Baking Time: Baking times may vary by oven; check for a golden brown color to know they’re perfectly cooked without burning.
- Cool Slightly Before Serving: Allow your Cheesy Garlic Cruffins to cool slightly in the pan to maintain their shape and ensure gooey cheese doesn’t spill out.
- Experiment with Fillings: Feel free to get creative with fillings and cheese; adding herbs or vegetables can elevate flavors and tailor cruffins to your taste.
What to Serve with Cheesy Garlic Cruffin
Experience the warmth of a cozy family meal as you bring together delightful accompaniments that highlight the savory magic of your cruffins.
-
Crisp Garden Salad: A vibrant mix of greens with a tangy vinaigrette balances the richness of the cruffins and adds a refreshing crunch.
-
Creamy Tomato Bisque: This smooth, rich soup creates a comforting contrast, while its acidity complements the garlic and cheese beautifully.
-
Roasted Vegetables: Delight in the smoky flavors of seasonal veggies drizzled with olive oil; they add a satisfying earthiness to your meal.
-
Savory Spinach Dip: A warm and cheesy dip pairs perfectly with the cruffins. Serve with crispy pita chips for a delightful snacking experience.
-
Garlic Herb Butter Pasta: Tossed with olive oil and herbs, this pasta echoes the dominant flavors of the cruffin—making each bite a celebration of garlic bliss!
-
Chilled White Wine: A glass of crisp Sauvignon Blanc or sparkling wine enhances the experience, making your cozy cruffin meal feel extra special.
Let these pairings elevate your Cheesy Garlic Cruffin into the centerpiece of a memorable gathering!
Cheesy Garlic Cruffin Variations
Feel free to make these cheesy garlic cruffins uniquely yours with delightful twists and substitutions!
- Dairy-Free: Replace all dairy with plant-based alternatives like almond milk and vegan cheese for a compassionate cruffin.
- Gluten-Free: Use a 1-to-1 gluten-free baking flour in place of all-purpose flour to satisfy gluten sensitivities and keep flavor intact.
- Herb-Infused: Add fresh herbs like thyme or rosemary to the filling for an aromatic flavor boost that brings a garden-fresh essence to every bite.
- Veggie-Packed: Mix in cooked spinach or sautéed mushrooms in the filling to enrich the cruffins with veggies and add depth.
- Cheese Variety: Swap mozzarella with gouda or aged cheddar for a unique flavor profile; try mixing different cheeses for your perfect blend.
- Kick of Spice: Sprinkle a pinch of red pepper flakes into the filling for a delightful heat that contrasts wonderfully with the melty cheese.
- Sweet & Savory: Throw in some caramelized onions with the garlic mixture, adding a rich sweetness that perfectly complements the savory elements.
These variations not only keep your cruffins interesting but also allow you to cater to different dietary needs and flavor preferences. And if you find yourself craving a comforting meal, why not pair these cruffins with a steaming bowl of Spicy Southern Cheesy pasta or some warm and luscious Sticky Garlic Chicken? Your taste buds will thank you!
Make Ahead Options
These Cheesy Garlic Cruffins are perfect for meal prep enthusiasts! You can prepare the dough and let it rise up to 24 hours in advance by refrigerating it after the initial rise. Simply cover the bowl tightly with plastic wrap to prevent drying, and when you’re ready to bake, allow the dough to come to room temperature for about 30 minutes before proceeding to shape and fill. Additionally, the garlic filling can be made 2-3 days ahead and stored in an airtight container in the fridge. For finishing, just follow the shaping, resting, and baking steps, and you’ll have fresh, delicious cruffins just like they came out of the oven, making them an ideal option for busy weeknights!
How to Store and Freeze Cheesy Garlic Cruffin
Room Temperature: Store leftover cruffins in an airtight container for up to 2 days to maintain their freshness and flaky texture.
Fridge: Refrigerate any remaining cruffins for up to 1 week. Reheat in the oven for a few minutes to restore their crispiness.
Freezer: For longer storage, wrap individual cruffins in plastic wrap and place them in an airtight freezer bag; they can be frozen for up to 2 months.
Reheating: To reheat from frozen, bake at 350°F (175°C) for about 15-20 minutes until heated through and crispy again. Enjoy your Cheesy Garlic Cruffin warm!
Cheesy Garlic Cruffin Recipe FAQs
How do I choose the best garlic for my cruffins?
Absolutely! For the best flavor, choose fresh garlic cloves that are firm and free of dark spots or sprouting. The smaller cloves have a more potent flavor, while larger cloves can be milder. Fresh garlic adds a robust, aromatic essence to your cheesy garlic cruffins, enhancing their overall profile beautifully.
What is the best way to store leftover Cheesy Garlic Cruffins?
Certainly! Store leftover cruffins in an airtight container at room temperature for up to 2 days to enjoy their flaky texture. For longer storage, refrigerate them for up to a week. If you want to keep them longer, wrap each cruffin in plastic wrap and place them in a freezer bag. They can be frozen for up to 2 months, ensuring you always have a cheesy treat ready to go!
Can I make the Cheesy Garlic Cruffins ahead of time?
Very much so! You can prepare the dough and filling ahead of time. After shaping your cruffins, you can place them in the muffin tin, cover, and refrigerate overnight. When you’re ready to bake, simply let them rest at room temperature for 30 minutes, then pop them in the oven. This way, you’ll have fresh, warm cruffins ready to impress!
What should I do if my dough doesn’t rise?
Oh no, that can be frustrating! If your dough doesn’t rise, it may be due to inactive yeast. Ensure your yeast is fresh and properly activated in warm milk before mixing. If you’re using instant yeast, it should be mixed directly with the dry ingredients. Additionally, if your kitchen is too cool, try letting the dough rise in a slightly heated oven (about 100°F/38°C). Just remember to cover it well to keep it warm and draft-free.
Can I use alternative cheeses in my Cheesy Garlic Cruffins?
Absolutely! Feel free to swap mozzarella with other cheeses like aged cheddar or gouda for a different flavor profile. If you’re feeling adventurous, try blending various cheeses for unique textures and tastes. Just keep in mind that the melting qualities will vary, which can alter the gooeyness of your cruffins slightly. Enjoy the experimenting!
Is this recipe suitable for individuals with dairy allergies?
You bet! To make the Cheesy Garlic Cruffins dairy-free, simply substitute the milk with a plant-based alternative, like almond or soy milk, and use coconut oil instead of butter. Additionally, choose dairy-free cheeses for the filling. This way, everyone can enjoy the delightful flavors of these cruffins without compromising on their dietary needs!
Cheesy Garlic Cruffin: Your New Favorite Savory Snack!
Ingredients
Equipment
Method
- In a large mixing bowl, combine 4 cups of all-purpose flour, 2 tablespoons of granulated sugar, 1 teaspoon of salt, and 2 teaspoons of instant yeast. Use a whisk to ensure even distribution and aeration.
- Create a well in the center of your dry mixture and add 1 and ¼ cups of warm milk, ½ cup of melted unsalted butter, and ⅓ cup of warm water. Mix the ingredients together until a shaggy dough forms.
- Add the large egg to the dough and mix until fully incorporated. Transfer the dough to a lightly floured surface and knead for 8 to 10 minutes until smooth and elastic.
- Place the kneaded dough in a greased bowl, covering it to maintain warmth. Let it rise for about 1 hour, or until doubled in size.
- While the dough rises, mix together 4 tablespoons of softened butter, 3 cloves of minced garlic, and ¼ cup of chopped fresh parsley in a small bowl. Set aside.
- Preheat your oven to 375°F (190°C) and grease a muffin tin.
- Once the dough has risen, roll it into a large rectangle, about ¼ inch thick. Spread the garlic butter mixture evenly over the surface.
- Sprinkle ½ cup of grated Parmesan cheese and 1 cup of shredded mozzarella cheese over the garlic butter layer.
- Starting from one edge, tightly roll the rectangle into a log. Cut the log into 8-10 equal portions and place each roll vertically into the greased muffin tin.
- Cover the muffin tin with a kitchen towel and let the cruffins rest for about 20 minutes.
- Bake the muffin tin in the preheated oven for 20-25 minutes until golden brown and fragrant.
- Remove the cruffins from the oven and let cool in the pan for 5 minutes before transferring to a wire rack.
Leave a Reply