
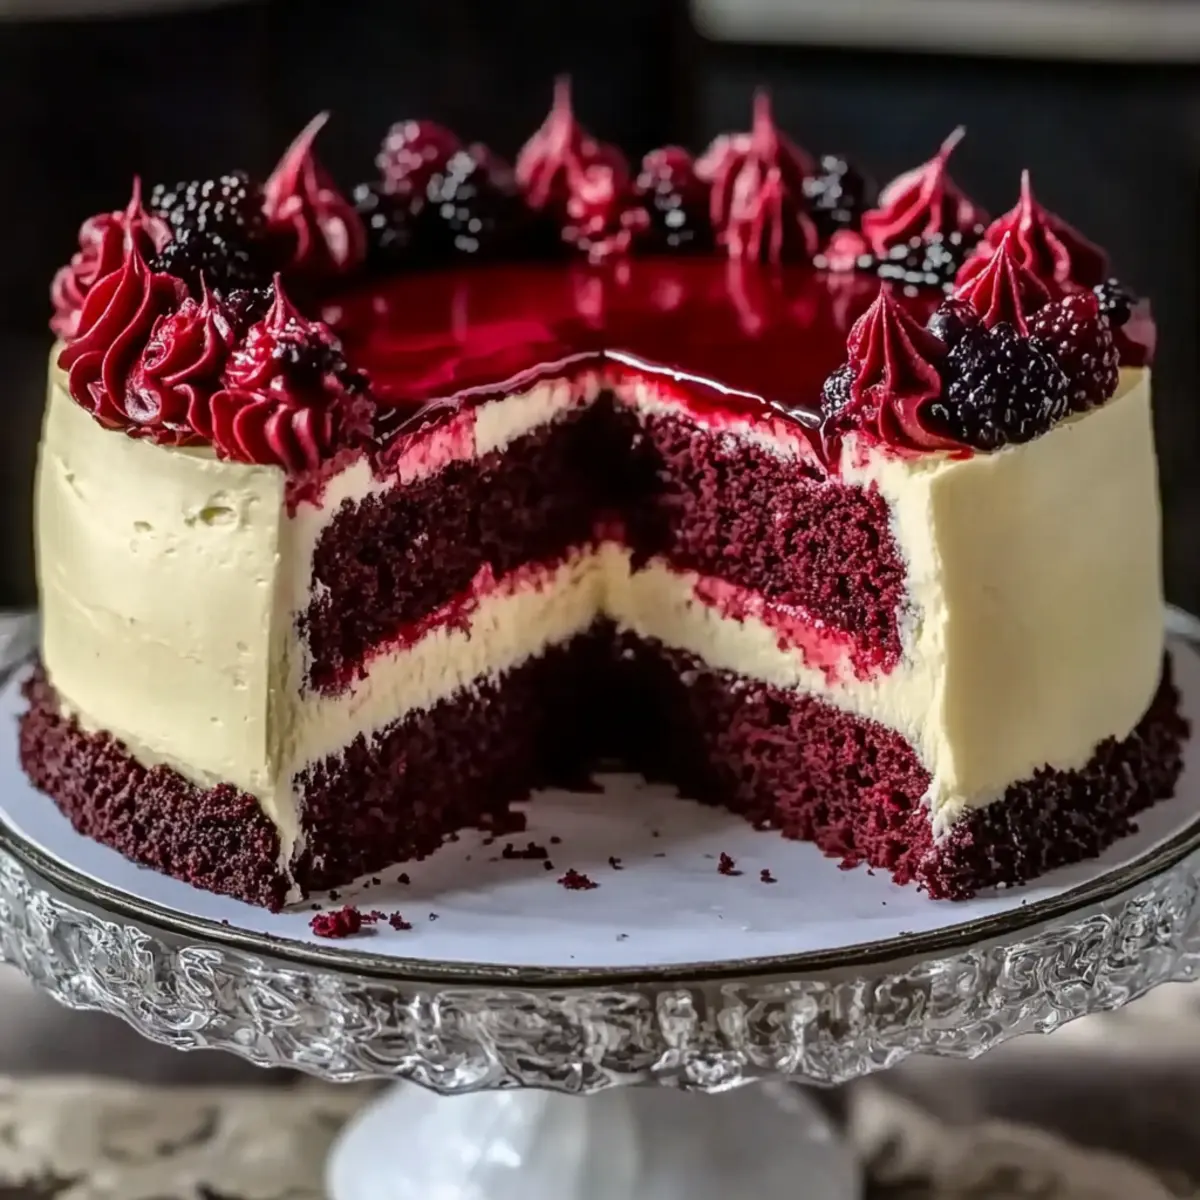
As I sifted through my pantry, a vibrant red discovery caught my eye—a bottle of red gel food coloring. Instantly, I was transported to a cozy kitchen where the rich aroma of baking cake enveloped me, reminding me of celebrations filled with laughter and sweet indulgence. Today, I’m excited to share my take on a stunning Red Velvet Cheesecake Layer Cake that seamlessly melds the iconic texture of red velvet with a creamy cheesecake layer. This recipe not only offers an impressive centerpiece for special occasions but also delivers the joy of homemade comfort food that feels both indulgent and satisfying. With its delightful cream cheese frosting and colorful berry glaze, this cake is sure to wow your guests while remaining surprisingly easy to prepare. Ready to bake something unforgettable? Let’s dive into this luscious dessert that’s as fun to make as it is to share!
Why is this cake a must-try?
Indulgent Delight: This Red Velvet Cheesecake Layer Cake is a luxurious fusion that elevates any celebration with its rich flavor and stunning appearance.
Layered Perfection: The combination of moist red velvet layers and creamy cheesecake creates an irresistible texture contrast that melts in your mouth.
Effortless Elegance: Despite its impressive look, this cake is surprisingly easy to make, perfect for both novice and experienced bakers looking to impress.
Versatile Flavor: Enjoy it plain or experiment with flavor variations, like adding a chocolate ganache or seasonal fruits, for a personal touch.
Crowd-Pleasing Appeal: Whether it’s a birthday, holiday, or just a gathering with friends, this eye-catching cake is sure to be the highlight, leaving everyone wanting more.
Pair it with a rich cup of coffee or try it alongside a scoop of vanilla ice cream for that extra special touch!
Red Velvet Cheesecake Layer Cake Ingredients
For the Cake Layers
- All-purpose flour – Provides structure to the cake layers. Substitution: Gluten-free all-purpose flour blend (with xanthan gum).
- Unsweetened cocoa powder – Adds depth and slight bitterness, enhancing the cake’s rich flavor. Note: Ensure it’s unsweetened for balanced sweetness.
- Baking soda & Baking powder – Helps the cake rise, contributing to a light texture. Use both for optimal leavening.
- Salt – Enhances flavor and balances sweetness in both cake and cheesecake layers.
- Granulated sugar – Sweetens the cake and cheesecake, keeps textures moist. Can substitute with coconut sugar for a lower glycemic index.
- Vegetable oil – Keeps the cake moist and tender. Substitution: Canola oil or melted coconut oil.
- Eggs – Essential for structure and moisture. Ensure they are at room temperature for best incorporation.
- Buttermilk – Adds tanginess and keeps the cake moist. Substitution: Milk with vinegar or lemon juice (1 cup milk + 1 tbsp vinegar).
- Vinegar – Reacts with baking soda to enhance rise and tenderness of the cake. Optional for flavor enhancement but recommended.
- Vanilla extract – Adds a deep flavor note to both cake and cheesecake layers.
- Red gel food coloring – Gives the cake its signature vibrant color. Important to use gel, as liquid dye will dilute the batter.
For the Cheesecake Layer
- Cream cheese – Main component for cheesecake layer, lending richness and tang. Heavy cream can substitute in a pinch.
- Sour cream – Adds creaminess and a slight tang to the cheesecake mixture.
For the Toppings
- Dark chocolate chips – Optional garnish to enhance the cake’s appearance and richness.
- Strawberry or raspberry jam – Creates the glossy red berry glaze, adding flavor and visual appeal.
Delve into this delightful Red Velvet Cheesecake Layer Cake that promises to impress at your next special occasion!
Step‑by‑Step Instructions for Red Velvet Cheesecake Layer Cake
Step 1: Prepare the Cookie Crust
Preheat your oven to 350°F (175°C). In a mixing bowl, combine chocolate cookie crumbs with melted butter, stirring until well mixed. Press the mixture into the bottom of a 9-inch springform pan to form a sturdy crust. Bake for 10 minutes until set and lightly crisp, then remove from the oven and allow it to cool completely on a wire rack.
Step 2: Make the Red Velvet Cake Batter
While the crust cools, adjust your oven temperature back to 350°F (175°C). In a large bowl, whisk together the flour, cocoa powder, baking soda, baking powder, and salt. In another bowl, mix the sugar, vegetable oil, eggs, buttermilk, vinegar, vanilla extract, and red gel food coloring until smooth. Combine the wet and dry mixtures, stirring until no lumps remain, then divide the batter evenly between two greased and lined 9-inch round pans. Bake for 25-30 minutes until a toothpick inserted comes out clean. Cool in pans for a few minutes, then remove to a wire rack to cool completely.
Step 3: Prepare the Cheesecake Layer
Reduce the oven temperature to 325°F (160°C) for the cheesecake layer. In a mixing bowl, beat the cream cheese and sugar together using a hand mixer until smooth and fluffy. Add eggs one at a time, mixing gently to incorporate each one before adding the next. Stir in the vanilla extract and sour cream until the mixture is well blended. Pour the cheesecake mixture over the cooled cookie crust or directly into a lined pan, then bake for 40-45 minutes. The cheesecake should be set but still slightly jiggly in the center. Turn off the oven and let it cool inside for about an hour before transferring it to the refrigerator to chill completely.
Step 4: Assemble the Cake
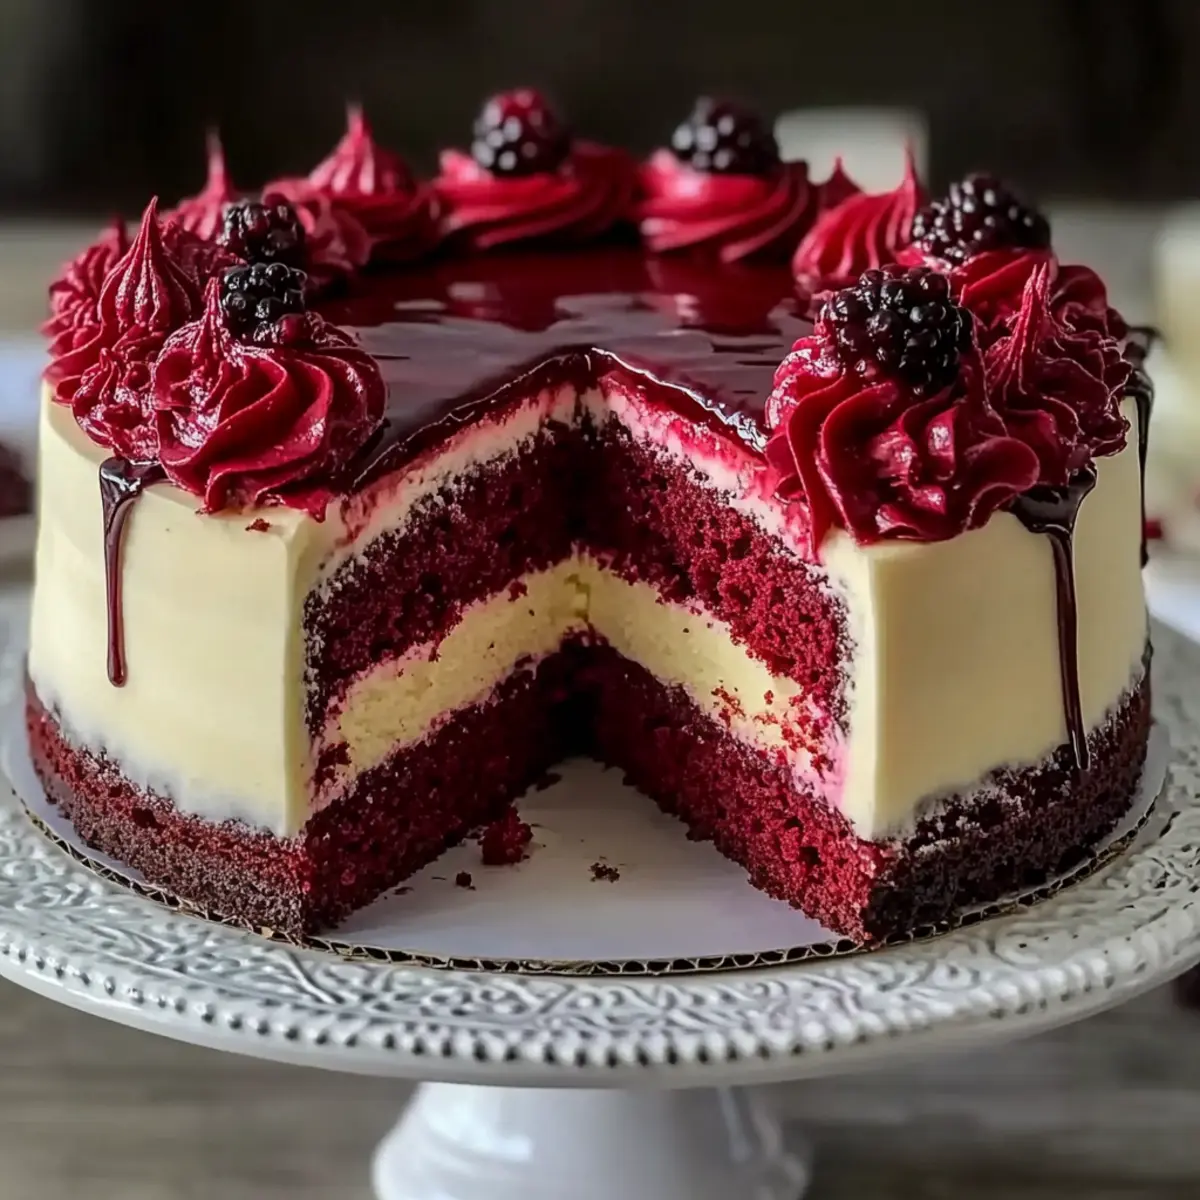
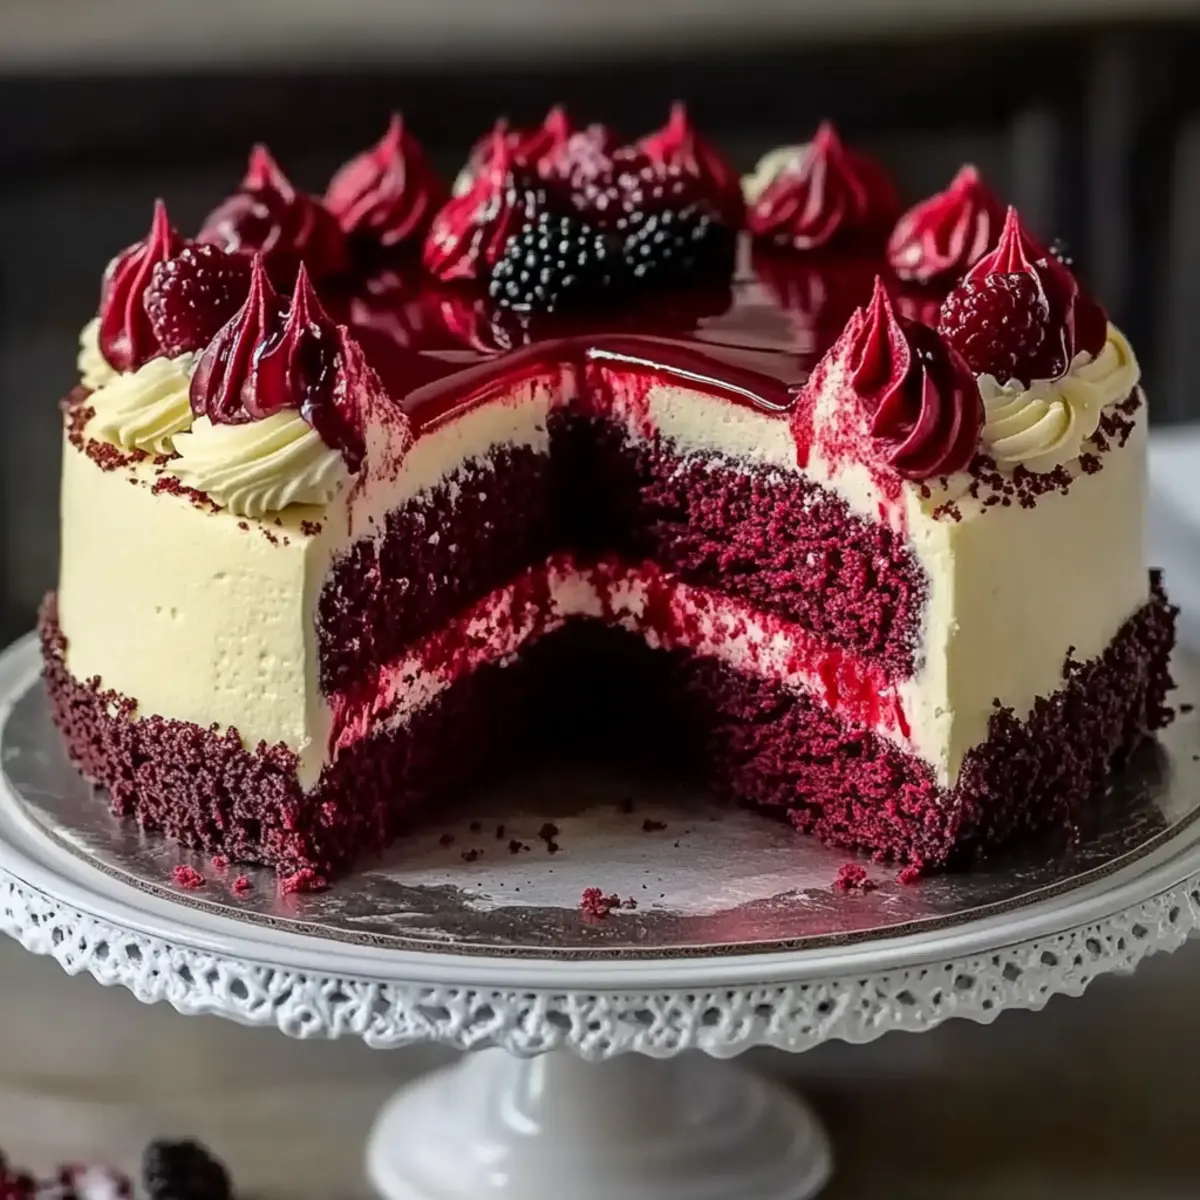
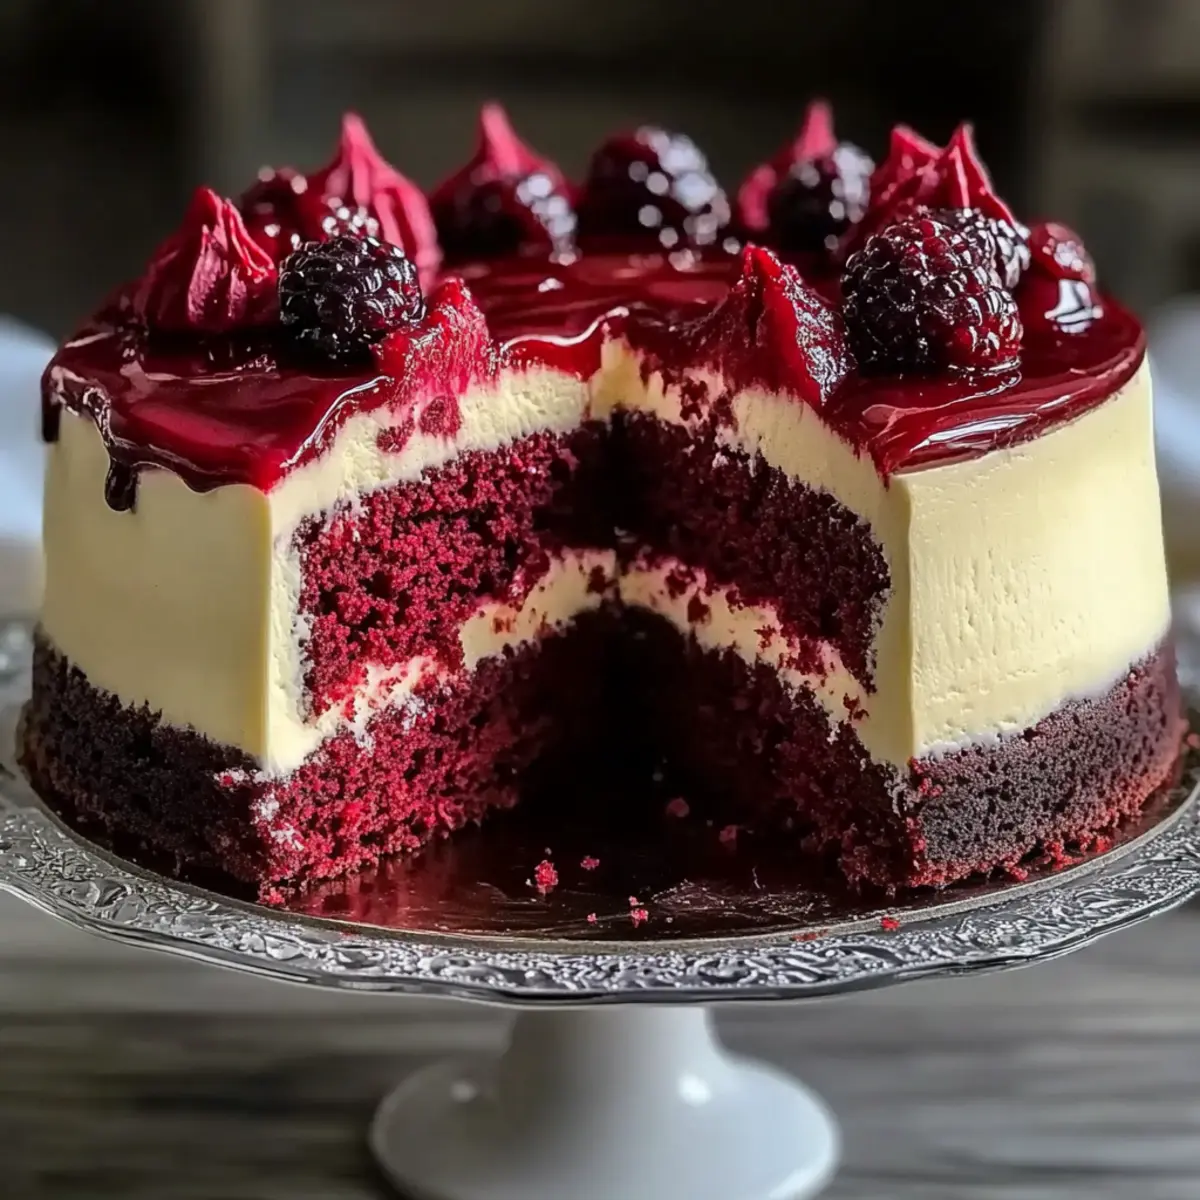
Once all layers are completely cooled, start assembling your Red Velvet Cheesecake Layer Cake. Place one layer of red velvet cake on a serving plate and generously frost the top with cream cheese frosting. Carefully layer the cheesecake on top followed by another red velvet layer if desired. Frost the entire cake with more cream cheese frosting, smoothing it out for an elegant finish.
Step 5: Add the Finishing Touches
To create a beautiful glossy glaze, gently warm the strawberry or raspberry jam on the stove or in the microwave until pourable. Drizzle the glaze over the top of the cake for a stunning presentation. If you like, sprinkle dark chocolate chips on top as a finishing touch, enhancing both the look and flavor of the cake.
Step 6: Serve and Enjoy
Before slicing, chill the completed cake for at least one hour, allowing everything to set beautifully. When ready to serve, slice the Red Velvet Cheesecake Layer Cake and present it chilled or at room temperature for a delightful dessert experience that’s sure to impress friends and family alike.
Red Velvet Cheesecake Layer Cake Variations
Feel free to get creative with this recipe and make your Red Velvet Cheesecake Layer Cake uniquely yours!
- Gluten-Free: Use a gluten-free all-purpose flour blend for a delicious alternative that everyone can enjoy.
- Berry Bliss: Swap the berry glaze for a chocolate ganache to add a rich, decadent twist to your cake.
- Mini Marvels: Create mini versions by layering cake and cheesecake in individual glass jars for a charming dessert presentation.
- Seasonal Twist: Garnish with seasonal fruits or edible flowers to brighten your cake for celebrations like Easter or summer gatherings.
- Dairy-Free: Substitute cream cheese and sour cream with dairy-free alternatives for a vegan-friendly option.
- Flavor Boost: Add a teaspoon of almond extract to the batter for an unexpected depth of flavor that pairs beautifully with red velvet.
- Nutty Surprise: Fold in some chopped pecans or walnuts into the cheesecake layer for a delightful crunch and extra richness.
- Cheesecake Variations: Try different cheesecake flavors, like lemon or pumpkin, to complement the vibrant red layers for a seasonal spin.
And if you’re in the mood for more sweet treats, be sure to check out my delightful Cheesecake Stuffed Baked Apples or these scrumptious Fried Strawberry Cheesecake Sandwiches. Each recipe is a journey in flavors, waiting to bring joy to your kitchen!
How to Store and Freeze Red Velvet Cheesecake Layer Cake
-
Fridge: Store your completed Red Velvet Cheesecake Layer Cake in an airtight container for up to 4-5 days. This ensures the cake stays moist and flavorful.
-
Freezer: For longer preservation, wrap individual slices tightly in plastic wrap and place them in a freezer-safe bag. The cake can be frozen for up to 3 months without losing its delicious taste.
-
Reheating: When ready to enjoy, simply thaw the slices overnight in the fridge. Serve chilled right from the fridge, or let them come to room temperature for a deliciously soft bite.
-
Airtight Tips: If freezing the whole cake, ensure it’s well-wrapped and in a container to prevent freezer burn and maintain the integrity of the cheesecake layer.
Expert Tips for Red Velvet Cheesecake Layer Cake
-
Room Temperature Ingredients: Ensure all ingredients are at room temperature for the best incorporation. This helps achieve a smooth batter and even texture in your layers.
-
Avoid Overmixing: When mixing your cake batter, gently combine until just incorporated. Overmixing can lead to a dense and tough Red Velvet Cheesecake Layer Cake.
-
Cooling Time: Allow your cake layers and cheesecake to cool completely before assembling. This prevents melting the frosting and keeps your layers intact.
-
Prevent Cracks: To avoid cracks in your cheesecake, beat the batter on low speed and avoid overmixing after adding the eggs. A gentle touch is key.
-
Layering Tips: For a clean slice, let the cake chill thoroughly before cutting. Use a sharp knife dipped in hot water for neat edges.
-
Personal Touch: Feel free to experiment with flavor variations, adding a chocolate ganache or seasonal fruits to make your Red Velvet Cheesecake Layer Cake uniquely yours!
What to Serve with Red Velvet Cheesecake Layer Cake?
Delight your guests with an array of sumptuous sides and drinks that enhance the experience of this show-stopping dessert.
-
Rich Coffee: A steaming cup of bold coffee perfectly contrasts the cake’s sweetness, uplifting the rich flavors of the cheesecake and red velvet.
-
Vanilla Bean Ice Cream: Creamy vanilla ice cream adds a soothing, chilly element, enhancing the texture and taste of each slice.
-
Fresh Berries: Juicy strawberries or raspberries not only add a pop of color but also provide a tartness that complements the cake’s sweetness beautifully.
-
Chocolate-Covered Strawberries: These indulgent bites echo the flavors of the cake while adding a playful touch to your dessert table.
-
Sparkling Water: A refreshing, fizzy drink can reset the palate between bites, enhancing the overall dining experience without overwhelming the senses.
-
Creamy Mashed Potatoes: For an unexpected twist, serve this cake after a comforting dinner of creamy mashed potatoes, where the rich gluten-free cake provides a delightful sweet ending.
-
Mint Tea: Serve a soothing mint tea alongside the cake for a refreshing herbal note that will cleanse the palate after the indulgence.
-
Caramel Sauce: Drizzle warm caramel sauce over each slice for an extra layer of luxurious flavor that makes every bite feel decadent.
These pairings not only elevate your Red Velvet Cheesecake Layer Cake but also create a multi-sensory experience for your guests, ensuring that every celebration is unforgettable!
Make Ahead Options
This Red Velvet Cheesecake Layer Cake is an ideal choice for busy home cooks looking to save time! You can prepare the cake layers and cheesecake up to 3 days in advance. Bake the red velvet cake layers and let them cool completely, then wrap them tightly in plastic wrap and refrigerate. The cheesecake can also be made ahead—simply refrigerate it after cooling to ensure it stays fresh and creamy. When you’re ready to serve, frost the layers with cream cheese frosting and drizzle the warm berry glaze on top. This way, you’ll have a stunning dessert ready to impress your guests with minimal last-minute effort!
Red Velvet Cheesecake Layer Cake Recipe FAQs
What type of flour should I use for the cake?
All-purpose flour is typically used, as it provides the necessary structure for the cake layers. If you’re looking for a gluten-free option, I recommend using a gluten-free all-purpose flour blend that includes xanthan gum for the best texture.
How should I store the Red Velvet Cheesecake Layer Cake?
Store your completed cake in an airtight container in the refrigerator for up to 4-5 days. This helps maintain its moisture and flavor. If the cake is covered with frosting, placing it in a container will also help prevent it from drying out.
Can I freeze the Red Velvet Cheesecake Layer Cake?
Absolutely! For freezing, wrap individual slices tightly in plastic wrap and put them in a freezer-safe bag. The cake can be frozen for up to 3 months. When you’re ready to enjoy it, just thaw the slices overnight in the fridge, and they’ll taste as delightful as the day you made them.
What should I do if my cheesecake cracks during baking?
To prevent cracks, make sure to beat the cheesecake mixture on low speed and avoid overmixing after adding the eggs. Additionally, placing a pan of water in the oven while the cheesecake is baking can help maintain moisture and reduce the risk of cracks.
Is there a particular way to select ripe ingredients, like the eggs and buttermilk?
For the best results, always use ingredients at room temperature. Eggs can be gently warmed in a bowl of warm water for about 10 minutes if they’re cold. For buttermilk, if you’re making a substitute with milk and vinegar, ensure the mixture sits for about 5-10 minutes to curdle before adding it to your batter.
Can I use substitutions for some ingredients, like the sugar?
Yes! For a healthier alternative, you can substitute granulated sugar with coconut sugar, which has a lower glycemic index while still offering sweetness. If you prefer a sugar-free option, consider using a baking blend that suits your dietary needs.
Luscious Red Velvet Cheesecake Layer Cake for Special Celebrations
Ingredients
Equipment
Method
- Preheat your oven to 350°F (175°C). In a mixing bowl, combine chocolate cookie crumbs with melted butter, stir until mixed. Press into a 9-inch springform pan and bake for 10 minutes until set. Cool on wire rack.
- Adjust oven back to 350°F (175°C). In a bowl, whisk together flour, cocoa powder, baking soda, baking powder, and salt. In another bowl, mix sugar, oil, eggs, buttermilk, vinegar, vanilla extract, and food coloring. Combine both mixtures and divide into two greased 9-inch pans. Bake for 25-30 minutes until clean. Cool in pans before transferring to wire rack.
- Reduce oven to 325°F (160°C). Beat cream cheese and sugar until smooth. Add eggs one at a time, mixing gently. Stir in vanilla extract and sour cream. Pour over cooled crust or in lined pan. Bake for 40-45 minutes, cool in oven for an hour, then chill.
- Once cooled, start assembling. Place one layer of red velvet on a plate, frost with cream cheese frosting, layer cheesecake on top, then add another red velvet layer if desired. Frost entire cake.
- Warm the strawberry or raspberry jam until pourable, then drizzle over the top. Optionally, sprinkle dark chocolate chips on top.
- Chill for at least one hour before serving. Slice and present chilled or at room temperature.
Leave a Reply