
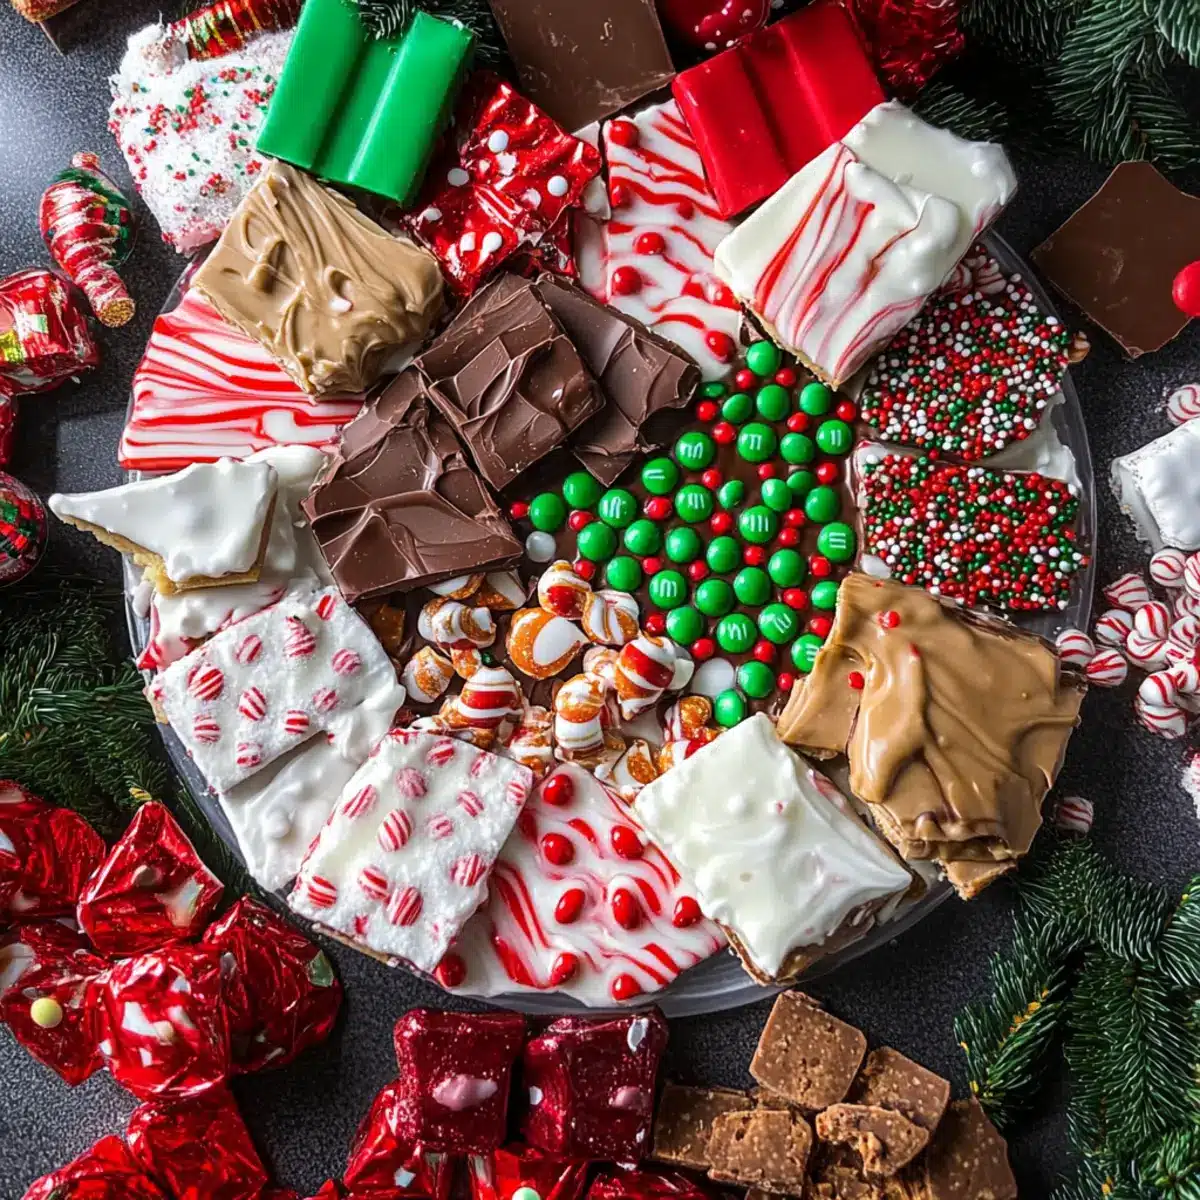
The enchanting aroma of melting chocolate and the sweet crunch of candy charm me every holiday season, igniting a sense of nostalgia I simply can’t resist. With this Old-Fashioned Christmas Candy Dessert Board, I’m thrilled to share a delightful assortment of homemade treats that are perfect for anyone looking to elevate their festive celebrations. This no-bake masterpiece features rich fudge, crunchy peanut brittle, and soft, chewy candies, making it an easy and fun project for the whole family. Not only will it impress your holiday guests, but it also allows for personalization as you mix and match your favorite confections. Get ready to create a beautiful centerpiece that will have everyone reaching for more! What favorite candies will you include in your board?
Why Make a Candy Dessert Board?
Nostalgic Experience: The combination of rich fudge and crunchy peanut brittle will transport you back to cherished holiday moments.
Easy and Fun: No baking is needed! This project is perfect for the whole family to join in, making it a delightful way to bond over sweets.
Versatile Options: Mix and match your favorite candies, from festive M&M’s to seasonal sprinkles — creativity knows no bounds!
Impressive Presentation: Serve your candy board on a beautiful platter, making it not just a treat, but a stunning centerpiece for your holiday gatherings.
Make-Ahead Magic: Prepare these candies in advance, saving time for festive fun while ensuring freshness when it’s time to serve. For more ideas, check out this delicious recipe for Stuffed Baked Apples as another festive treat!
Candy Dessert Ingredients
For the Fudge
• Dark Chocolate Melting Wafers – This acts as the rich base layer for your candy dessert, providing the perfect chocolaty foundation.
• Sweetened Condensed Milk – Adds creaminess and sweetness to the fudge; make sure to use the full-fat version for the best texture.
For the Peanut Brittle
• Granulated Sugar – The key ingredient that forms the crunchy texture of the brittle, ensuring you achieve that satisfying crack.
• Unsalted Butter – Adds richness and helps to achieve that perfect glossy finish; be sure to keep it at room temperature.
• Raw Peanuts – Traditional choice for the brittle; you can substitute with other nuts if you prefer a different flavor profile.
For the Peppermint Bark
• White Melting Wafers – Use this as the sweet topping that contrasts beautifully with the dark chocolate underneath.
• Peppermint Extract – Infuse your bark with a refreshing mint flavor; a little goes a long way!
• Crushed Candy Canes – Adds a delightful crunch and festive flair, making your candy dessert eye-catching and flavorful.
For Toppings
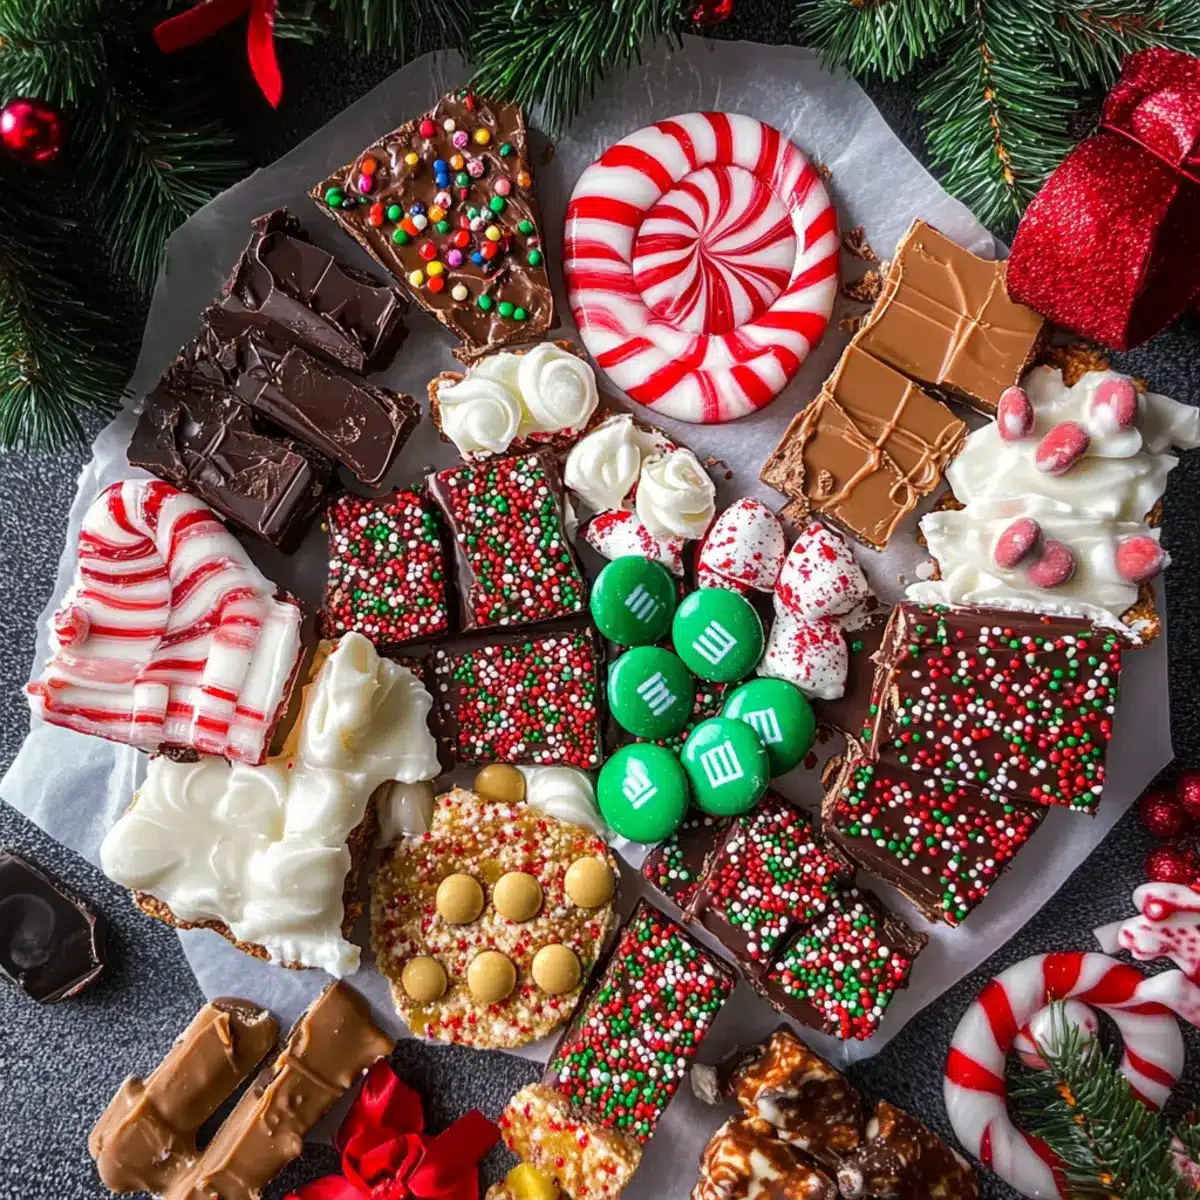
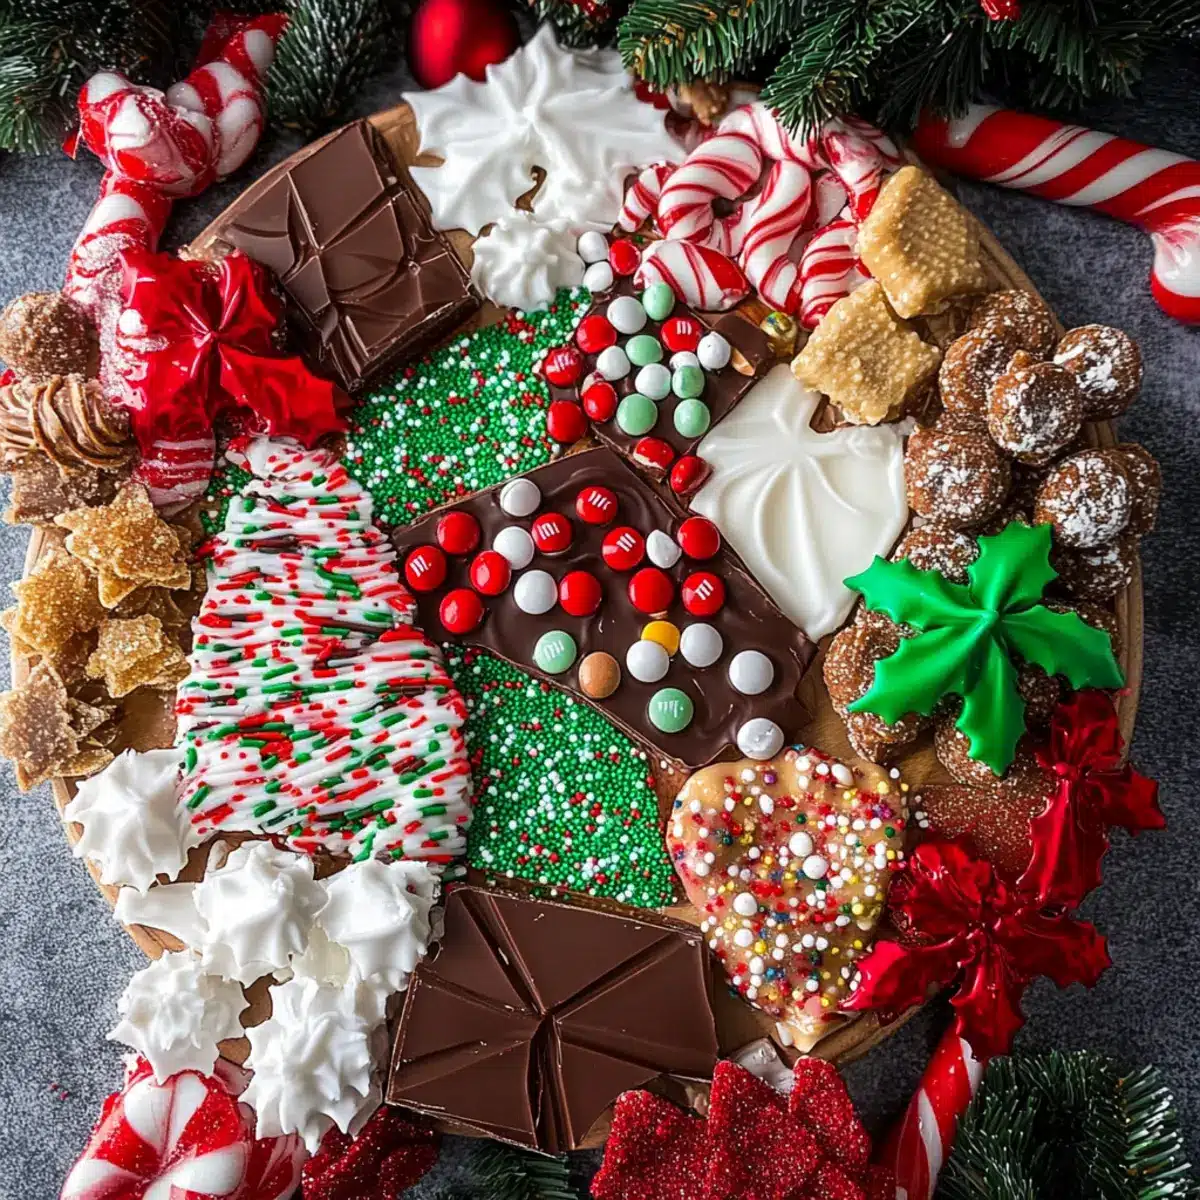
• Christmas Colored M&M’s – These not only add a pop of color to your dessert board but also cater to your sweet tooth.
• Christmas Sprinkles and Nonpareils – Perfect for enhancing visual appeal; feel free to choose any seasonal sprinkle themes that match your holiday decor.
• Flaky Sea Salt – A sprinkle of this on your toppings enhances the sweetness and balances flavors, especially for caramel-based candies.
Step‑by‑Step Instructions for Old-Fashioned Christmas Candy Dessert Board
Step 1: Prepare the Pan
Begin by lining an 8×8 square cake pan with parchment paper, ensuring to leave some overhang for easy removal later. This step is crucial for the success of your Candy Dessert, as it prevents sticking and allows for a clean presentation. Preheat your workspace by clearing clutter and preparing all ingredients nearby.
Step 2: Melt Dark Chocolate
Next, follow the package instructions to melt the dark chocolate melting wafers in a microwave-safe bowl. Heat in 30-second intervals, stirring well until smooth and glossy, which should take about 1-2 minutes. Pour the melted chocolate into the prepared pan, using a spatula to spread it evenly over the bottom, creating a solid base layer for your delicious dessert board.
Step 3: Set Layer
Allow the dark chocolate layer to set at room temperature until it loses its shine, which should take about 15-20 minutes. This partial setting is key to achieving distinct layers in your Candy Dessert Board. Keep an eye on it—once it’s firm to the touch but still slightly soft, it’s ready for the next step.
Step 4: Melt and Apply White Chocolate
While the dark chocolate is setting, melt the white melting wafers using the same microwave technique. Ensure that the white chocolate runs smooth and creamy, around 1-2 minutes, stirring frequently. Once melted, carefully pour it over the dark layer, gently smoothing it out to avoid blending the layers, creating that stunning contrast for your Candy Dessert.
Step 5: Add Toppings
Once the white chocolate layer is spread evenly, it’s time to get festive! Generously sprinkle Christmas-colored M&M’s, sprinkles, and nonpareils evenly over the top while the white chocolate is still warm. The vivid colors will not only enhance the visual appeal of your Candy Dessert Board but also add delightful crunch and sweetness.
Step 6: Chill
Transfer the pan to the refrigerator and allow the chocolate layers to chill until they are completely firm, about 30-45 minutes. This chilling step is essential for achieving the perfect texture in your candy bar. Keep the board away from any strong odors in the fridge, as chocolate can absorb scents.
Step 7: Cut and Serve
Once fully set, remove the chocolate from the pan using the overhanging parchment paper and place it on a cutting board. With a sharp knife, cut it into squares or rectangles, depending on how you want to present your Old-Fashioned Christmas Candy Dessert Board. Arrange the pieces beautifully on a festive platter for serving.
Make Ahead Options
These Old-Fashioned Christmas Candy Dessert Board treats are ideal for meal prep! You can prepare the dark chocolate layer and the white chocolate layer up to 3 days in advance by melting and setting them separately as instructed. Once cooled, store the layers in an airtight container at room temperature—just be sure to keep them away from direct sunlight to maintain their glossy appearance. On the day of serving, simply layer the chocolates, add your colorful toppings, and refrigerate until firm (about 30-45 minutes). This way, you can enjoy a stress-free holiday gathering with a beautiful candy dessert that’s just as delightful, saving you valuable time for festive fun!
What to Serve with Old-Fashioned Christmas Candy Dessert Board?
Indulging in a homemade candy dessert board is just the beginning of your festive feast. Pair it with delicious sides and drinks to elevate the entire experience.
-
Creamy Hot Chocolate: The warmth of rich hot chocolate will beautifully complement the sweet, crunchy treats on your dessert board. Imagine cozying up with a mug in hand while savoring each bite!
-
Savory Cheese Platter: A selection of sharp and creamy cheeses can create a fantastic contrast with the sweetness of your candy. This balance keeps the palate intrigued and enhances the overall experience.
-
Fresh Fruit Salad: Juicy oranges, tart cranberries, and crisp apples add a refreshing touch to your candy board. The burst of flavors can cleanse the palate from the rich sweetness—a perfect combo!
-
Warm Spiced Nuts: A mix of warm spiced nuts brings a savory crunch alongside your sweet offerings. Their warm spices echo the festive season and create a wonderful balance of flavors.
-
Gingerbread Cookies: Traditional gingerbread cookies harmonize wonderfully with the candy dessert’s sweetness. Their spiced aroma adds nostalgia and warmth to your holiday gathering.
-
Christmas Punch: Serve a frosty glass of spiced Christmas punch to bring a festive spirit. The fruity and spicy notes provide an easy-going refreshment that pairs well with the variety of candies.
Explore these delightful combinations and watch your holiday gathering come alive with flavors and joy!
Candy Dessert Variations & Substitutions
Feel free to get creative with your candy dessert board and make it your own with these delightful twists!
-
Peppermint Twist: Substitute regular white chocolate with peppermint white chocolate for a festive minty flavor. It will add a pleasant holiday zing to your candy bark!
-
Nutty Crunch: Swap in crushed nuts like almonds or cashews on top of your chocolate for added texture. Nuts add a delightful crunch and a savory balance to sweet candies.
-
Spicy Kick: Add a sprinkle of cayenne pepper or chili powder to the chocolate for a fun heat that complements the sweetness beautifully. Just a pinch can transform your dessert into a daring treat!
-
Flavored Bark: Use flavored melting wafers like raspberry or lemon for a jazzy twist on your traditional chocolate. These flavors can elevate the whole experience, especially around the holidays.
-
Dried Fruit Surprise: Mix in dried cranberries or apricots among your candies for a chewy element that’s both sweet and tart.
-
Vegan-Friendly: Substitute dairy chocolate with dairy-free chocolate and use maple syrup in place of sweetened condensed milk for a delicious vegan option. Your vegetarian friends will appreciate this thoughtful touch!
-
Caramel Infusion: Add a layer of homemade or store-bought caramel sauce atop the dark chocolate layer before pouring the white chocolate. It will introduce a lovely chewy texture that pairs excellently with the crisp chocolate.
-
Decorative Finish: Top your candy board with edible glitter or gold leaf for a glamorous presentation. It adds a touch of elegance and makes your dessert board a real showstopper!
For more delightful variations, consider incorporating elements from classic treats like these mouthwatering Stuffed Baked Apples. Your imagination is the limit when assembling a memorable holiday candy treat!
Expert Tips for Candy Dessert
-
Layer Distinction: Ensure each chocolate layer sets properly before adding the next. This will help maintain distinct layers in your Candy Dessert.
-
Chocolate Melting Technique: When melting chocolate, use short intervals in the microwave and stir frequently to prevent scorching and achieve a smooth consistency.
-
Topping Variety: Get creative with toppings! Mix and match candies, nuts, or dried fruits for a unique flair and texture in your dessert board.
-
Clean Workspace: Always keep your workspace clean and dry. This helps avoid any unwanted stickiness, especially crucial when handling chocolate and candies.
-
Serving Freshness: Make your Candy Dessert a day in advance. Store it properly, and it will still taste fresh during your holiday festivities.
How to Store and Freeze Candy Dessert
Room Temperature: Store your candy dessert board in an airtight container at room temperature for up to two weeks to maintain its deliciousness and prevent it from becoming too hard.
Fridge: If you want to extend freshness, keep your candy dessert in the refrigerator for up to three weeks, ensuring it’s in an airtight container to avoid moisture.
Freezer: For longer storage, freeze the candy dessert for up to three months. Cut into pieces, wrap them individually in plastic wrap, and place in a freezer-safe container. Allow to thaw at room temperature before serving.
Reheating: There’s no need to reheat your candy dessert! Simply allow it to return to room temperature after removal from the fridge or freezer for optimal taste and texture.
Old-Fashioned Christmas Candy Dessert Board Recipe FAQs
How do I choose ripe ingredients for my candy dessert?
Absolutely! When selecting ingredients for your Old-Fashioned Christmas Candy Dessert Board, the quality of your chocolate is crucial. I recommend using Ghirardelli melting wafers; look for shiny packaging with no dents. For flavoring, ensure that your peppermint extract is pure and not imitation, as this makes a significant difference in taste.
What are the best storage methods for my candy dessert?
Very much! Store your candy dessert board in an airtight container at room temperature for up to two weeks to maintain its deliciousness. If you want to keep it fresh longer, refrigerate it for up to three weeks, again ensuring it’s in an airtight container to prevent moisture absorption.
Can I freeze my candy dessert?
Absolutely! To freeze your candy dessert, cut it into smaller pieces first. Then wrap each piece in plastic wrap and place it in a freezer-safe container. This method allows for easy serving later, and your dessert can last up to three months in the freezer. When ready to enjoy, simply let it thaw at room temperature for about 15-20 minutes, and it will be perfect!
What should I do if my chocolate doesn’t melt smoothly?
Don’t worry! If your chocolate doesn’t melt smoothly, it might have been overheated. Try adding a tiny bit of vegetable oil or coconut oil — about a teaspoon at a time — to help loosen it up. Remember to melt chocolate in short intervals — 30 seconds in the microwave, stirring in between — to maintain that glossy texture.
Are there any dietary considerations for making this dessert?
Very! If you or your guests have dietary restrictions, feel free to substitute with allergen-free chocolate options or nut-free M&M’s to accommodate allergies. For those watching their sugar intake, consider making a sugar-free version of fudge or using alternative sweeteners that work well with chocolate. Always check ingredient labels for allergens!
How can I customize my candy dessert board?
The more the merrier! You can swap the toppings with your favorites, such as crushed pretzels, dried fruits, or even different flavored melting wafers. For a fun twist, try drizzling some caramel or peanut butter on top before adding your sprinkles for an extra layer of flavor!

Delightful Candy Dessert Board for Your Holiday Gatherings
Ingredients
Equipment
Method
- Prepare the pan by lining an 8x8 square cake pan with parchment paper, leaving overhang for easy removal.
- Melt dark chocolate wafers in a microwave-safe bowl in 30-second intervals until smooth.
- Pour melted chocolate into the prepared pan and spread evenly to form a base layer.
- Allow dark chocolate layer to set at room temperature for 15-20 minutes.
- Melt white melting wafers using the same microwave technique and pour over the dark layer.
- Sprinkle M&M's, sprinkles, and nonpareils over the white chocolate while it's warm.
- Chill the pan in the refrigerator for 30-45 minutes until completely firm.
- Remove from pan using parchment overhang, cut into squares, and arrange on a platter.
Leave a Reply